Cheap Junk 1971 Build
-
dave t

- Posts: 427
- Joined: Sat Nov 25, 2006 5:43 pm
Re: Cheap Junk 1971 Build
Out behind the pole barn arouse such a CLATTER, thru boxes and crates oh that didn't matter. I found the parts all greasy and rusted, the cold pills are working and I just got busted. I will call you. Thanks Dave T
-
Clatter

- Posts: 2034
- Joined: Sun Apr 28, 2002 1:01 am
Re: Cheap Junk 1971 Build
I know what I want for Christmas, Dave 
So, dag, here's a tangent off into another direction...
Any real motor would get a real exhaust.
So lets waste like a week messing with some heater boxes!
Before we had some pics of the heaters disassembled, and what we discovered was inside.
They had been tanked clean, and a plan was formulated.
Here's what happened with them:
First, a blasting was in order to get them really clean clean between...

This is a proper glass-bead cabinet at my local Santa Cruz Metal Polishing.
Looking closely, the leftover baked-on grime is obvious.

Two hours(!) later, they look mostly clean.
This is a Big/Badass Blaster, mind you, not just a HF cheapie...

After the first blasting session, the remaining tiny bits of burned oil are chased out of cracks/crevices with a sharpened tiny screwdriver.
Then, it's blasted again, to remove the residue under the chased-out bits.
EGR port welded up.

Flanges detailed.
It irks me when the blobs of welding slag protrude into the airflow at the flange.

After porting a few sets of heads, any airflow impedance starts getting looked at.
Yeah, likely a waste of time. (look what happens when we get to the muffler! )
)
A stone in a die-grinder cleans the welds up.
After.
Super high-performance blueprinted raging power perfection!
Rusty garbage outer skins.
Weld, grind, cuss, weld again, grind, cuss, repeat.


Helps to have a motor upside-down on the stand to mock these up.
There is a LOT of tweaking and hammer/dolly work to get everything tight.
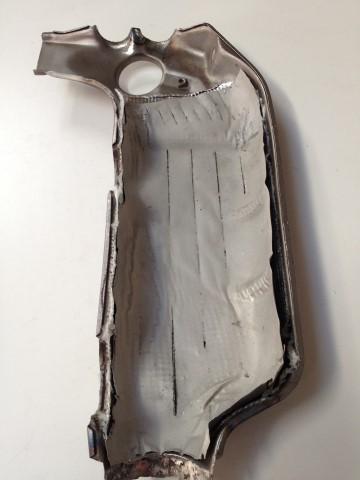
Even sanded down like this, they look super crappy,
But,
They have no pin-holes and are finished on both sides, smooth enough to work, at least.
The halves get assembled bare to check the fits.
And to make-up patch pieces for areas that are too gone to just plug-weld...

Some of this blobby birdshit welding looks like total crap,
But it's in a location where I'm just not going to deal with grinding it.
Plus, they're heater boxes fer chrissakes!
Bodywork, fit, weld, grind, repeat...


Finally, the big moment is upon us,
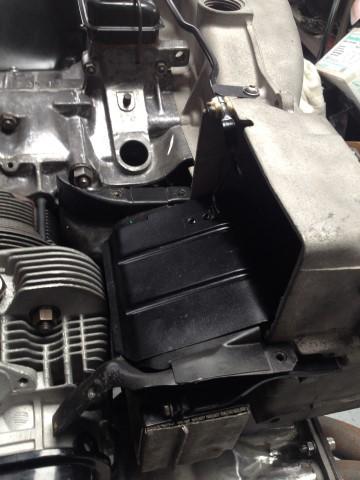
The insulation from Thermal Zero is trimmed up and installed, and the 'final' assembly if the boxes is completed.

All fit up, and ready to be tightened down...

Now, this is all bare metal.
The motor is slated to be test-run in the coming days/weeks, and the bare metal will allow any stink/fumes from the insulation to be identified.
If this stuff runs-in on the stand without stinking, I'll be coating the tins and heaters inside there.
Then we will run it again to see of the coating stink burns off like it's supposed to.
So we'll keep y'all posted....
Also got some dies from McMaster Carr to make up the linkage rods.
These taps from HF are a total joke.
Won't even tap mild steel.
And, the sizes are wrong, so not really good for chasing threads, even.
junk.

Was also going to plumb up the carbs and run-stand,
but,
woops,
Time to order some fittings from Pierce.

So, eventually, we'll get there....
So, dag, here's a tangent off into another direction...
Any real motor would get a real exhaust.
So lets waste like a week messing with some heater boxes!
Before we had some pics of the heaters disassembled, and what we discovered was inside.
They had been tanked clean, and a plan was formulated.
Here's what happened with them:
First, a blasting was in order to get them really clean clean between...
This is a proper glass-bead cabinet at my local Santa Cruz Metal Polishing.
Looking closely, the leftover baked-on grime is obvious.
Two hours(!) later, they look mostly clean.
This is a Big/Badass Blaster, mind you, not just a HF cheapie...
After the first blasting session, the remaining tiny bits of burned oil are chased out of cracks/crevices with a sharpened tiny screwdriver.
Then, it's blasted again, to remove the residue under the chased-out bits.
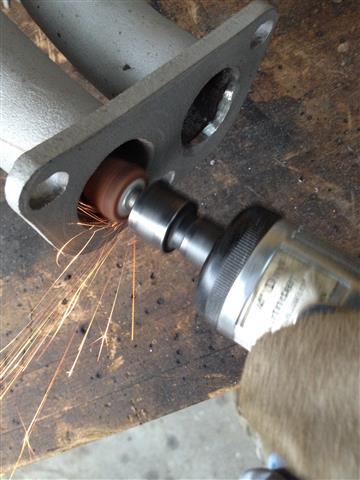
EGR port welded up.
Flanges detailed.
It irks me when the blobs of welding slag protrude into the airflow at the flange.
After porting a few sets of heads, any airflow impedance starts getting looked at.
Yeah, likely a waste of time. (look what happens when we get to the muffler!
A stone in a die-grinder cleans the welds up.
After.
Super high-performance blueprinted raging power perfection!
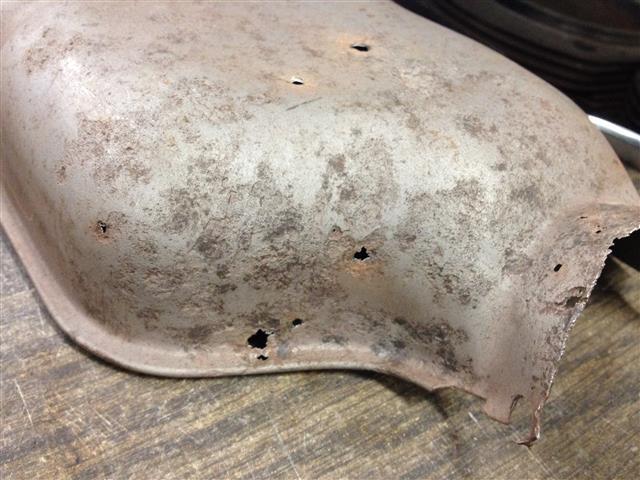
Rusty garbage outer skins.
Weld, grind, cuss, weld again, grind, cuss, repeat.
Helps to have a motor upside-down on the stand to mock these up.
There is a LOT of tweaking and hammer/dolly work to get everything tight.
Even sanded down like this, they look super crappy,
But,
They have no pin-holes and are finished on both sides, smooth enough to work, at least.
The halves get assembled bare to check the fits.
And to make-up patch pieces for areas that are too gone to just plug-weld...
Some of this blobby birdshit welding looks like total crap,
But it's in a location where I'm just not going to deal with grinding it.
Plus, they're heater boxes fer chrissakes!
Bodywork, fit, weld, grind, repeat...
Finally, the big moment is upon us,
The insulation from Thermal Zero is trimmed up and installed, and the 'final' assembly if the boxes is completed.
All fit up, and ready to be tightened down...
Now, this is all bare metal.
The motor is slated to be test-run in the coming days/weeks, and the bare metal will allow any stink/fumes from the insulation to be identified.
If this stuff runs-in on the stand without stinking, I'll be coating the tins and heaters inside there.
Then we will run it again to see of the coating stink burns off like it's supposed to.
So we'll keep y'all posted....
Also got some dies from McMaster Carr to make up the linkage rods.
These taps from HF are a total joke.
Won't even tap mild steel.
And, the sizes are wrong, so not really good for chasing threads, even.
junk.
Was also going to plumb up the carbs and run-stand,
but,
woops,
Time to order some fittings from Pierce.
So, eventually, we'll get there....
Last edited by Clatter on Fri Oct 25, 2019 2:10 pm, edited 1 time in total.
Speedier than a Fasting Bullet!
Beginners' how-to Type 4 build thread ---> http://shoptalkforums.com/viewtopic.php?f=1&t=145853
Beginners' how-to Type 4 build thread ---> http://shoptalkforums.com/viewtopic.php?f=1&t=145853
-
dave t
- Posts: 427
- Joined: Sat Nov 25, 2006 5:43 pm
Re: Cheap Junk 1971 Build
Parts away!!!!!!!!!!
-
Clatter
- Posts: 2034
- Joined: Sun Apr 28, 2002 1:01 am
Re: Cheap Junk 1971 Build
Well Awlrighty, then...
The Exhaust Adventures continue!
Will keep showing y'all how to keep those crappy exhaust manifolds from leaking and ruining your heads!
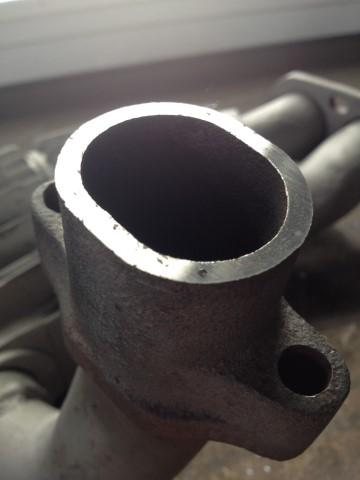
First, you need to surface the, er, surface, that the manifold uses to attach to the head.
Some say to use a file. Yeah, right. Don't make me insert some more eye-rolls.
I said I would show how they do it, when it's done correctly,
And here you go. (almost, I didn't get a pic of the manifold in action).
Here is an automotive 'milling machine' used for 'surfacing', a.k.a 'milling' heads.
While we have a motorcycle head mounted up here, hanging an exhaust manifold is done in a similar manner.

The manifold is very carefully aligned, to take only the minimum required to make the surfaces true and flat.
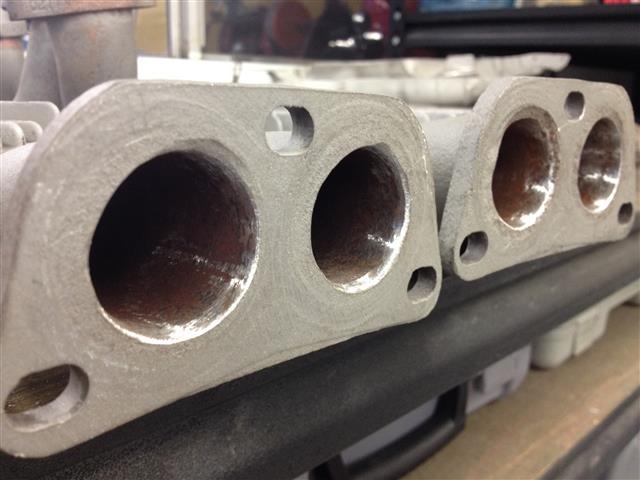
This manifold had surface corrosion and pitting,
And you will notice that Jim at Carr Parts in Santa Cruz took only the very minimal amount required to clean up.
Those dark spots are the very, very bottom of former craters in the surface.
This is perfection, folks; Those remaining pits show only very slightly.
You do not want to take any more off of here than is absolutely needed.
Some irregularity between the two 'arms' of the manifold was corrected, too.
Beautiful...
NOW, we might take a file and smooth out the finish of these mounting faces.
And de-burr the edges...
Otherwise, using a file would have been futile, and an exercise in vandalism, possibly, even.
The Exhaust Adventures continue!
Will keep showing y'all how to keep those crappy exhaust manifolds from leaking and ruining your heads!
First, you need to surface the, er, surface, that the manifold uses to attach to the head.
Some say to use a file. Yeah, right. Don't make me insert some more eye-rolls.
I said I would show how they do it, when it's done correctly,
And here you go. (almost, I didn't get a pic of the manifold in action).
Here is an automotive 'milling machine' used for 'surfacing', a.k.a 'milling' heads.
While we have a motorcycle head mounted up here, hanging an exhaust manifold is done in a similar manner.
The manifold is very carefully aligned, to take only the minimum required to make the surfaces true and flat.
This manifold had surface corrosion and pitting,
And you will notice that Jim at Carr Parts in Santa Cruz took only the very minimal amount required to clean up.
Those dark spots are the very, very bottom of former craters in the surface.
This is perfection, folks; Those remaining pits show only very slightly.
You do not want to take any more off of here than is absolutely needed.
Some irregularity between the two 'arms' of the manifold was corrected, too.
Beautiful...
NOW, we might take a file and smooth out the finish of these mounting faces.
And de-burr the edges...
Otherwise, using a file would have been futile, and an exercise in vandalism, possibly, even.
Last edited by Clatter on Fri Oct 25, 2019 2:12 pm, edited 1 time in total.
Speedier than a Fasting Bullet!
Beginners' how-to Type 4 build thread ---> http://shoptalkforums.com/viewtopic.php?f=1&t=145853
Beginners' how-to Type 4 build thread ---> http://shoptalkforums.com/viewtopic.php?f=1&t=145853
-
Clatter
- Posts: 2034
- Joined: Sun Apr 28, 2002 1:01 am
Re: Cheap Junk 1971 Build
Since the exhaust manifolds/heaters were now correct,
It was time for some more mock-up...
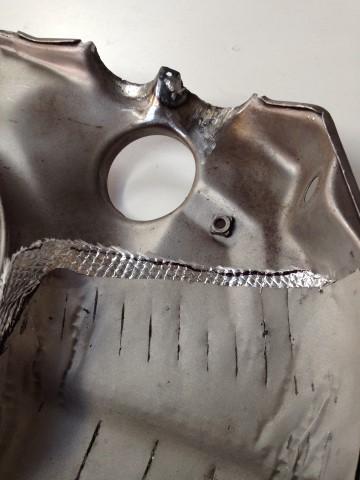
Here's what the inside of the lower tin looked like.
My repairs look a lot better where they can be ground..

There was this metal 'shielding' between the heat-sink and insulation.
Presumably to keep the insulation from burning off?
Likely to keep it out from between the fins of the sink, too..
I'm going to try using the shields on the top to keep it out of the fins.
But,
On the bottom, gravity will keep it out of the fins,
and,
The new insulation is rated to 2000F,
So it should all work, right?
We'll test it!
Here's the shield in place; Upper side of box.
These got trimmed better later....
As the rest of the heater ductwork gets assembled, we get to this;
The control flaps in the 'chimneys(?)' are held by this single sketchy rivet.

Once this thing goes, it can stop up the constant flow of air out of the system;
Stacking up heat in the box and warping things and breaking havoc.
So inspect that little sucker.
Rusty areas and damp climates can cause it to go away.
Mine here is getting sketchy.
Will show it's re-riveting in a later installment...
Also,
Install the thermostat flaps and return spring and all, but not the cable, or the drivers-side (left) top tin.
You want to make sure that when the thermostat is fully open, the flap lays tight against the above-cooler tin.
Said another way, you want the flapper above the cooler to seat all the way home.
Check it in real life. Things can get bent and whatnot...
More to come...
It was time for some more mock-up...
Here's what the inside of the lower tin looked like.
My repairs look a lot better where they can be ground..
There was this metal 'shielding' between the heat-sink and insulation.
Presumably to keep the insulation from burning off?
Likely to keep it out from between the fins of the sink, too..
I'm going to try using the shields on the top to keep it out of the fins.
But,
On the bottom, gravity will keep it out of the fins,
and,
The new insulation is rated to 2000F,
So it should all work, right?
We'll test it!
Here's the shield in place; Upper side of box.
These got trimmed better later....
As the rest of the heater ductwork gets assembled, we get to this;
The control flaps in the 'chimneys(?)' are held by this single sketchy rivet.
Once this thing goes, it can stop up the constant flow of air out of the system;
Stacking up heat in the box and warping things and breaking havoc.
So inspect that little sucker.
Rusty areas and damp climates can cause it to go away.
Mine here is getting sketchy.
Will show it's re-riveting in a later installment...
Also,
Install the thermostat flaps and return spring and all, but not the cable, or the drivers-side (left) top tin.
You want to make sure that when the thermostat is fully open, the flap lays tight against the above-cooler tin.
Said another way, you want the flapper above the cooler to seat all the way home.
Check it in real life. Things can get bent and whatnot...
More to come...
Last edited by Clatter on Fri Oct 25, 2019 2:13 pm, edited 2 times in total.
Speedier than a Fasting Bullet!
Beginners' how-to Type 4 build thread ---> http://shoptalkforums.com/viewtopic.php?f=1&t=145853
Beginners' how-to Type 4 build thread ---> http://shoptalkforums.com/viewtopic.php?f=1&t=145853
-
Clatter
- Posts: 2034
- Joined: Sun Apr 28, 2002 1:01 am
Re: Cheap Junk 1971 Build
Now, we move on to the exhaust header...
Luckily, I have two headers here;
A 'real' Thunderbird, (newer Pertronix version) and also a cheap Empi copy.
The Empi was ceramic coated silver, and the 'real' one is black.
First, the Empi one had done duty on my bus for a couple of years before I got another real T-bird.
The real one here was found at a swap meet, and is basically unknown.
I know it's a Pertronix one, because it matches another of known origin.
So, the story with the Empi header is a long one.
It was basically the biggest piece of crap I ever saw.
First, it had the flanges far, far out of alignment.
Before it was installed, it was bolted to a mock-up motor and heated cherry-red with a torch to 'relieve' it.
As it was heated, the bolts were tightened down, until it came into place, and then cooled that way.
PITA.
I had to take a whole motor, on a stand, in a truck to the muffler shop.
They had to use a big-ass torch, the likes of which I never saw, to get the thing basically melted into place.
The Empi also interfered with the fan shroud.
Had to bang a big dimple in it at the very front, as a bend came around the shroud.
Didn't get a pic of this, but you will see this if you ever try to use one of these.
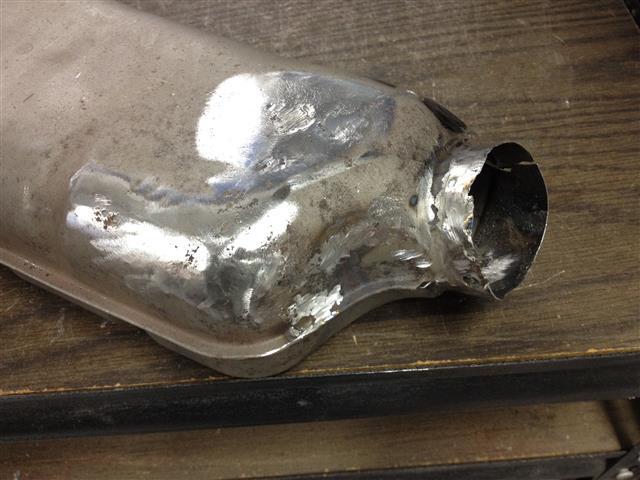
Lastly, (and this really pissed me off) there was a huge gaping hole in the middle of the collector.
You couldn't see it unless you looked very, very closely.
Unfortunately, this didn't show itself until after it was coated, and run.
It made such a racket!
Had to come back off, and Jim welded the very center.
This ruined the coating, and it got touched up with rattle-bomb, but the damage was done....

Here is the inside of the Empi collector after much re-work to plug the hole.

The hole in the middle was almost big enough to put your finger through..
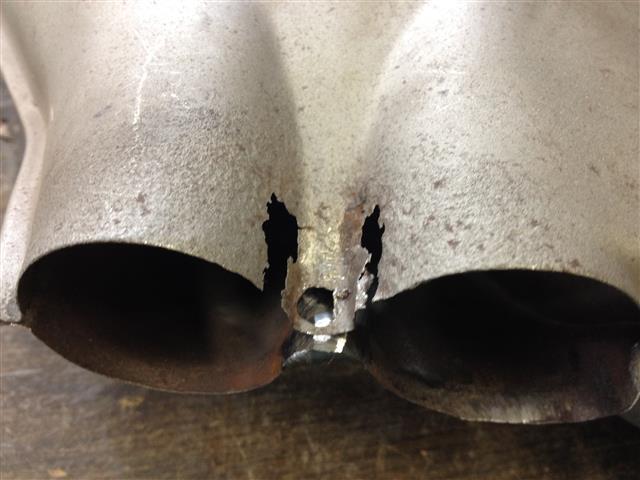
The 'real' T-bird collector ain't no prize, either...
Look how sloppy the ends of the pipe were trimmed.

There are also massive blobs of weld at the flanges.
Welds that looked like the were squeezed out of a toothpaste tube!

A notch was required to get the bolt even on at all on one side.
And more blob welds... Still the "OG" T-bird here..

Of the two, the T-bird is far better than the Empi copy.
First, it didn't need dimpling to clear the fan shroud.
Second, the collector didn't have a hole in it.
Third, shown here, is that any mis-alignment could be mostly ( it's still crooked, see?) 'corrected' by tightening the thing down.
The Empi one couldn't be brought together at the flanges without torch work.

There was quite a bit of mis-alignment, though. this thing is no treasure...
You can see it still doesn't suck completely tight.
Maybe with some running/heat?
Maybe??
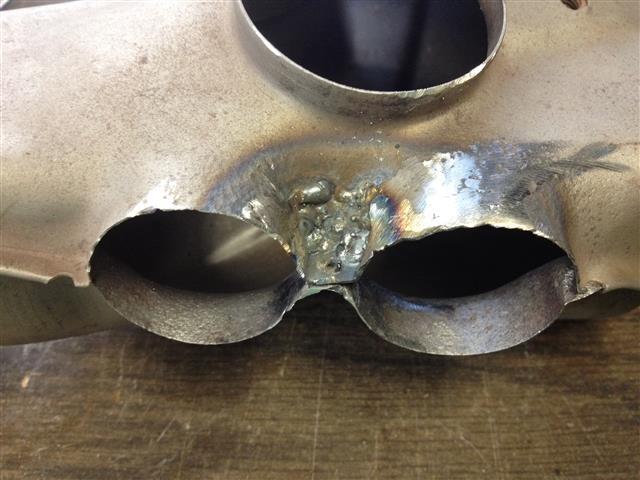
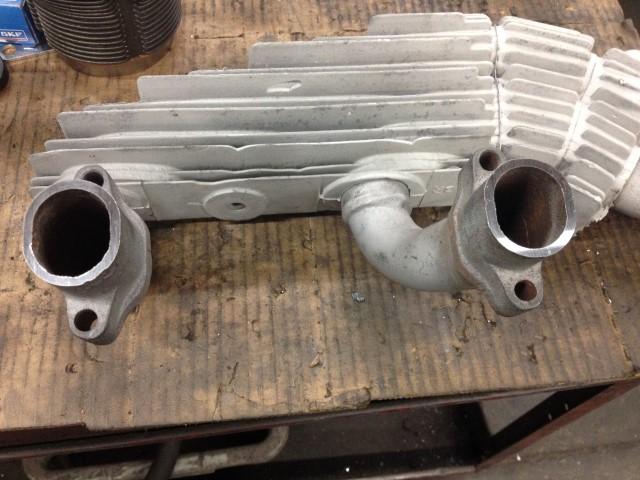
So, an odd thing about how they fit:
Here we have a stock engine, width-wise; Minus about .020" for fly-cut/deck.
Look closely at the pic above.
This would be the passenger side (right) viewed looking up from below, as installed in the car.
Below is the driver's (left) side seen from below (underneath). As stated above Riddles...

If you use your imagination, piecing these together, and look closely,
The T-bird is designed for a motor wider than stock.
See how the heater box pipe flanges are closer together than the flanges on the header?
The tubes don't align at the flange.
All of that work dressing the welds at the flanges was essentially a waste.
The pipes don't align at the flanges.
The tubing 'shifts' over at the connection.
The Empi, on the other hand, was too narrow for my stock motor.


Of the two, the Empi had more mis-alignment.
The 'T-bird' was a bit closer.
There is likely a bunch of variation in manufacturing with these no matter what.
But some stuff to look for...
Trying to get these things perfect can be nigh impossible.
Best would be to cut the thing in half, align, and then sleeve; like I did with those 411/412 header pipes I showed earlier.
FWIW.
I had these two sitting here, and decided to share what I saw.
Hope somebody out there finds this useful one day.
Luckily, I have two headers here;
A 'real' Thunderbird, (newer Pertronix version) and also a cheap Empi copy.
The Empi was ceramic coated silver, and the 'real' one is black.
First, the Empi one had done duty on my bus for a couple of years before I got another real T-bird.
The real one here was found at a swap meet, and is basically unknown.
I know it's a Pertronix one, because it matches another of known origin.
So, the story with the Empi header is a long one.
It was basically the biggest piece of crap I ever saw.
First, it had the flanges far, far out of alignment.
Before it was installed, it was bolted to a mock-up motor and heated cherry-red with a torch to 'relieve' it.
As it was heated, the bolts were tightened down, until it came into place, and then cooled that way.
PITA.
I had to take a whole motor, on a stand, in a truck to the muffler shop.
They had to use a big-ass torch, the likes of which I never saw, to get the thing basically melted into place.
The Empi also interfered with the fan shroud.
Had to bang a big dimple in it at the very front, as a bend came around the shroud.
Didn't get a pic of this, but you will see this if you ever try to use one of these.
Lastly, (and this really pissed me off) there was a huge gaping hole in the middle of the collector.
You couldn't see it unless you looked very, very closely.
Unfortunately, this didn't show itself until after it was coated, and run.
It made such a racket!
Had to come back off, and Jim welded the very center.
This ruined the coating, and it got touched up with rattle-bomb, but the damage was done....
Here is the inside of the Empi collector after much re-work to plug the hole.
The hole in the middle was almost big enough to put your finger through..
The 'real' T-bird collector ain't no prize, either...
Look how sloppy the ends of the pipe were trimmed.
There are also massive blobs of weld at the flanges.
Welds that looked like the were squeezed out of a toothpaste tube!
A notch was required to get the bolt even on at all on one side.
And more blob welds... Still the "OG" T-bird here..
Of the two, the T-bird is far better than the Empi copy.
First, it didn't need dimpling to clear the fan shroud.
Second, the collector didn't have a hole in it.
Third, shown here, is that any mis-alignment could be mostly ( it's still crooked, see?) 'corrected' by tightening the thing down.
The Empi one couldn't be brought together at the flanges without torch work.
There was quite a bit of mis-alignment, though. this thing is no treasure...
You can see it still doesn't suck completely tight.
Maybe with some running/heat?
Maybe??
So, an odd thing about how they fit:
Here we have a stock engine, width-wise; Minus about .020" for fly-cut/deck.
Look closely at the pic above.
This would be the passenger side (right) viewed looking up from below, as installed in the car.
Below is the driver's (left) side seen from below (underneath). As stated above
If you use your imagination, piecing these together, and look closely,
The T-bird is designed for a motor wider than stock.
See how the heater box pipe flanges are closer together than the flanges on the header?
The tubes don't align at the flange.
All of that work dressing the welds at the flanges was essentially a waste.
The pipes don't align at the flanges.
The tubing 'shifts' over at the connection.
The Empi, on the other hand, was too narrow for my stock motor.
Of the two, the Empi had more mis-alignment.
The 'T-bird' was a bit closer.
There is likely a bunch of variation in manufacturing with these no matter what.
But some stuff to look for...
Trying to get these things perfect can be nigh impossible.
Best would be to cut the thing in half, align, and then sleeve; like I did with those 411/412 header pipes I showed earlier.
FWIW.
I had these two sitting here, and decided to share what I saw.
Hope somebody out there finds this useful one day.
Last edited by Clatter on Fri Oct 25, 2019 2:15 pm, edited 1 time in total.
Speedier than a Fasting Bullet!
Beginners' how-to Type 4 build thread ---> http://shoptalkforums.com/viewtopic.php?f=1&t=145853
Beginners' how-to Type 4 build thread ---> http://shoptalkforums.com/viewtopic.php?f=1&t=145853
-
Clatter
- Posts: 2034
- Joined: Sun Apr 28, 2002 1:01 am
Re: Cheap Junk 1971 Build
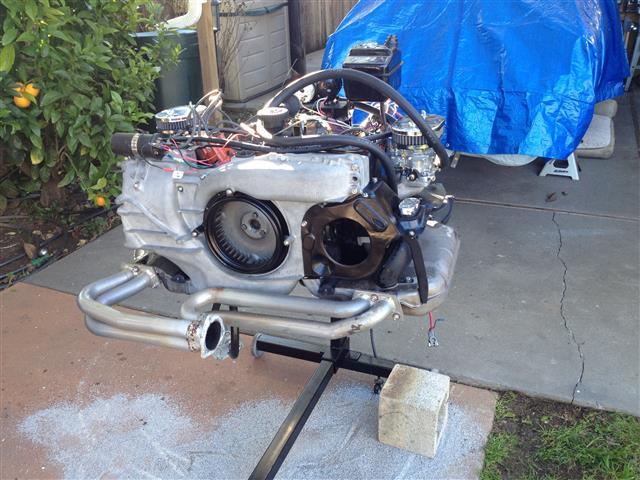
So, after a little holiday hiatus, we get back into this again...
First off, here was a de-rusting effort to some of the tins i got from Dave T.

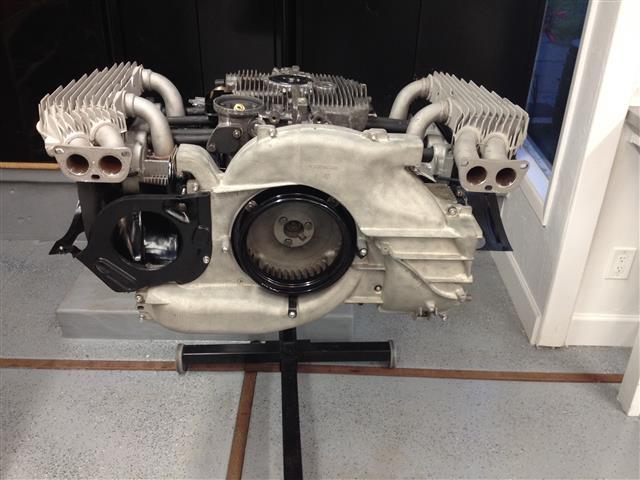
This allowed the rest of the motor to go together.
You can see that a bunch of stuff got rigged up temporary-like.
Used a big piece of breather hose to connect the two head breather ports together,
And one of those filter thingies for the top of the breather tower.
Etc..
Basically getting it all ready to run on the stand..


Another cool thing about the work stand being used to run in,
Is that you can tip it sideways to get out the door!

Here you can see how i rigged up the CB/Carter rotary fuel pump,
And also how those under tins got patched up.
After the tippage, and it was outside, i added fuel and oil.
Here's how you tell you got the right Valvolene for our motors; It has the little quip about not be OK to use for cats.

Also, since the bearings didn't get shined up enough,
I added a bottle of this in there, too.

When it came crank-for-oil-pressure time, it became obvious that the 68-71 002 bus bell-housing won't clear a 228 P/P.

My '79 CA Hall-sensor ignition wouldn't spark spark either, to out came the old 009, too.
Yes, they are good for something...
After it all got straightened out, the break-in went (reasonably) well.
These carbs had never been run since rebuilding, so they popped a bit on one hole until it warmed up.
There was, however one blunder on my part...

See that 'front main seal' there?
It's um, not really a front main seal...
It's a rear wheel bearing seal. DOH!
(You can tell by the 113 part number on it)
That's the kind of thing that happens when you build motors out of piles of parts.
It leaked oil all over the place.
Good thing it was outside.
Here's a pic of it the next morning, cat litter all over the place,
Like your parent's house after you had that big party in high school...

So, waiting on a couple of main seals,
Then the next 10-minute run-in,
And a carb tuning,
And it will be ready to get stashed under a workbench!
First off, here was a de-rusting effort to some of the tins i got from Dave T.
This allowed the rest of the motor to go together.
You can see that a bunch of stuff got rigged up temporary-like.
Used a big piece of breather hose to connect the two head breather ports together,
And one of those filter thingies for the top of the breather tower.
Etc..
Basically getting it all ready to run on the stand..
Another cool thing about the work stand being used to run in,
Is that you can tip it sideways to get out the door!
Here you can see how i rigged up the CB/Carter rotary fuel pump,
And also how those under tins got patched up.
After the tippage, and it was outside, i added fuel and oil.
Here's how you tell you got the right Valvolene for our motors; It has the little quip about not be OK to use for cats.
Also, since the bearings didn't get shined up enough,
I added a bottle of this in there, too.
When it came crank-for-oil-pressure time, it became obvious that the 68-71 002 bus bell-housing won't clear a 228 P/P.
My '79 CA Hall-sensor ignition wouldn't spark spark either, to out came the old 009, too.
Yes, they are good for something...
After it all got straightened out, the break-in went (reasonably) well.
These carbs had never been run since rebuilding, so they popped a bit on one hole until it warmed up.
There was, however one blunder on my part...
See that 'front main seal' there?
It's um, not really a front main seal...
It's a rear wheel bearing seal. DOH!
(You can tell by the 113 part number on it)
That's the kind of thing that happens when you build motors out of piles of parts.
It leaked oil all over the place.
Good thing it was outside.
Here's a pic of it the next morning, cat litter all over the place,
Like your parent's house after you had that big party in high school...
So, waiting on a couple of main seals,
Then the next 10-minute run-in,
And a carb tuning,
And it will be ready to get stashed under a workbench!
Last edited by Clatter on Fri Oct 25, 2019 2:18 pm, edited 1 time in total.
Speedier than a Fasting Bullet!
Beginners' how-to Type 4 build thread ---> http://shoptalkforums.com/viewtopic.php?f=1&t=145853
Beginners' how-to Type 4 build thread ---> http://shoptalkforums.com/viewtopic.php?f=1&t=145853
-
aircooledtechguy

- Posts: 1709
- Joined: Sun Oct 28, 2001 1:01 am
Re: Cheap Junk 1971 Build
Love it Clatter!!
Sneaky way to get those DCNFs tuned before the big motor. . . 
Sneaky way to get those DCNFs tuned before the big motor. . .
-
Clatter
- Posts: 2034
- Joined: Sun Apr 28, 2002 1:01 am
Re: Cheap Junk 1971 Build
Thanks for the kind words, Nate.
Glad to see you watching.
This thread could be called "Set up your carbs the hard way"!
It's always fun breaking it in on the stand.
Now that i have done a few of them, you can start telling their personality as they rev.
(Can't resisst wacking the throttle during run-in)
With a header, 86 cam, ported heads, more compression, and Webers,
This thing has a bit of attitude!
Also, the heater box insulation test went well, too.
After 10 min at 2000RPM, they got hot.
And, sniffing the heater outlet, it was nice and fresh!
WhooHoo!
That insulation rated to 2000F looks like it will work (so far).
Running a bus out on the highway will only tell for sure.
Doing that, i was reminded of an old SNL skit.
Ever see this one?
http://snltranscripts.jt.org/78/78aautoscent.phtml
Speedier than a Fasting Bullet!
Beginners' how-to Type 4 build thread ---> http://shoptalkforums.com/viewtopic.php?f=1&t=145853
Beginners' how-to Type 4 build thread ---> http://shoptalkforums.com/viewtopic.php?f=1&t=145853
-
ProctorSilex

- Posts: 228
- Joined: Sun Jul 17, 2011 6:09 pm
Re: Cheap Junk 1971 Build
You keep holding out on us, Clatter! Just what color are your hand towels?
-
Clatter
- Posts: 2034
- Joined: Sun Apr 28, 2002 1:01 am
Re: Cheap Junk 1971 Build
So, just to wrap this up...
After the run-in everything got cleaned up, and left in the sun to dry before being put away.

The Oberg got opened up,
and all looks good.
Lint from my rags, and bits of paper towel.
And a few dog hairs, too, for some reason.

Made me a clean spot under a bench, and there she sits, all oiled up and ready to go!
Like money in the bank, baby...

Thanks for watching, helping, and encouragement.
Hope somebody learned something..
Let's keep this forum alive!
Steve
After the run-in everything got cleaned up, and left in the sun to dry before being put away.
The Oberg got opened up,
and all looks good.
Lint from my rags, and bits of paper towel.
And a few dog hairs, too, for some reason.
Made me a clean spot under a bench, and there she sits, all oiled up and ready to go!
Like money in the bank, baby...
Thanks for watching, helping, and encouragement.
Hope somebody learned something..
Let's keep this forum alive!
Steve
Last edited by Clatter on Fri Oct 25, 2019 2:19 pm, edited 1 time in total.
Speedier than a Fasting Bullet!
Beginners' how-to Type 4 build thread ---> http://shoptalkforums.com/viewtopic.php?f=1&t=145853
Beginners' how-to Type 4 build thread ---> http://shoptalkforums.com/viewtopic.php?f=1&t=145853
-
dave t
- Posts: 427
- Joined: Sat Nov 25, 2006 5:43 pm
Re: Cheap Junk 1971 Build
Cool, now what or how did you go about "oiling" the engine for storage? Is this a long or short term storage? Usually "oiling" in my garage is caused by something being spilled unbolted, or tripped over 
-
Clatter
- Posts: 2034
- Joined: Sun Apr 28, 2002 1:01 am
Re: Cheap Junk 1971 Build
Yeah, "All Oiled Up" in this case means after the main seal fiasco, there is oil all over it!
Actually, it means full of oil and cam broken in and no leaks found!
If short-term storage turns into long term, i'll be pulling the pushrods to give the springs a rest..
Actually, it means full of oil and cam broken in and no leaks found!
If short-term storage turns into long term, i'll be pulling the pushrods to give the springs a rest..
Speedier than a Fasting Bullet!
Beginners' how-to Type 4 build thread ---> http://shoptalkforums.com/viewtopic.php?f=1&t=145853
Beginners' how-to Type 4 build thread ---> http://shoptalkforums.com/viewtopic.php?f=1&t=145853
-
typ4

- Posts: 551
- Joined: Sat Mar 01, 2008 9:46 pm
Re: Cheap Junk 1971 Build
Just got back on Shop talk, really been missing out. Clatter, great build, I have been building "floor sweep" engines for a while, I swear, the old cleaned up german parts seem to last longer than new crap. I have been having my cam grinder regrind german cams and lifters. Have had zero failures. same with p&l's.
I have 15 bus engines in the garage to slowly liquidate, I may build them, like you say ,money in the bank.
Oh and used pressure plates are the bomb, better than new almost every time.
I have 15 bus engines in the garage to slowly liquidate, I may build them, like you say ,money in the bank.
Oh and used pressure plates are the bomb, better than new almost every time.
-
Zaphod Beetlebrox
- Posts: 9
- Joined: Sun Feb 21, 2010 9:41 am
Re: Cheap Junk 1971 Build
Nice pictures, nice build. Those stripped heatexchangers look like the heatexchanger on my shop-air
compressor . The next step would be to recreate the tin halves in stainless.
Not kidding, I guess, you could make a few bucks with such a kit.
If this is your "cheap junk build", I couldn´t wait to see your hightec, bigbuck motors .
A good start into the new season,
Frank
compressor
Not kidding, I guess, you could make a few bucks with such a kit.
If this is your "cheap junk build", I couldn´t wait to see your hightec, bigbuck motors
A good start into the new season,
Frank