Cheap Junk 1971 Build

This is the place to discuss, or get help with any of your Type 4 questions.
User avatar
Clatter
Posts: 2034
Joined: Sun Apr 28, 2002 1:01 am

Re: Cheap Junk 1971 Build

Post by Clatter »

Pile!

Imagine seeing you here!
:lol: :lol:

I just got done posting, and it took a long time, and scared me, and there you were..

FWIW, if you look closely, that main seal is indeed the Brazilian Sabo.
Need to pull it out - too nice for this build! :lol:

So, say (hypothetically) that I didn't really think that cutting the pistons down was a viable alternative for this build.
(Even though it is the best way to get this right)
Cost/time and all...
Plus, what about valvetrain geometry?
Can't be buying a set of those expensive cut-to-length pushrods, now.
That would totally blow the budget! :D

.030 at 7.6 or .040 at 7.5??
Speedier than a Fasting Bullet!

Beginners' how-to Type 4 build thread ---> http://shoptalkforums.com/viewtopic.php?f=1&t=145853
User avatar
Piledriver
Moderator
Posts: 22520
Joined: Sat Feb 16, 2002 12:01 am

Re: Cheap Junk 1971 Build

Post by Piledriver »

...Shave the pistons. Needs more compression anyway...
Who needs a machinist to sand a few thou off some pistons that only have a ~12mm lip around the edge??
Get a good flat surface, some 220 grit wetordry and give it 50 strokes while rotating 1/4 turn occasionally.
Those pistons have a ton of meat at the top surface around the dish, look at the underside.

You want Ghetto build? In this case "Ghetto" and doing it properly are not strictly incompatible.
You will be able to get an absolutely uniform deck, at the cost of having to rebalance your pistons.
(put the originally heaviest one on the short rod, as I think you balanced them already)

If you reaally want to get fancy, machine in some swirl.

...although just tight works well, I ran the old pile motor at .028" (all 4, even) to redline at every onramp for 150K miles and it had >300K on the bottom end when I pulled the base shims to get there.

The only reason I pulled it down was due to the cam thrust ~@1mm. og half thrust bearing was essentially gone, thus all the "funny" noises.
Addendum to Newtons first law:
zero vehicles on jackstands, square gets a fresh 090 and 1911, cabby gets a blower.
EZ3.6 Vanagon after that.(mounted, needs everything finished) then Creamsicle.
User avatar
ProctorSilex
Posts: 228
Joined: Sun Jul 17, 2011 6:09 pm

Re: Cheap Junk 1971 Build

Post by ProctorSilex »

I recently used Krud Kutter's "The Must for Rust" and a very fine Scotch Brite hand pad to clean some rusty cylinders to see whether any were better than the two corroded cylinders in a junky engine. It took care of the rust and, to a lesser extent, the carbon. The sealing surfaces cleaned up nicely. Everything became bright and shiney. I did not see or feel any etching. I rinsed the good ones with water, towel dried, and coated with WD40. I do not know whether that works better than carb cleaner or detergent, but it sure did work nicely (with some elbow grease). I think the Krud Kutter has phosphoric acid so it's probably bad to let it sit terribly long.

Clatter, thanks for this thread. The hill billies of the world salute you!
User avatar
Clatter
Posts: 2034
Joined: Sun Apr 28, 2002 1:01 am

Re: Cheap Junk 1971 Build

Post by Clatter »

WhooooEEee!!! What a day!! :shock:

So, after some inspiration from our hero Pile here, and a good night's rest....
I went after the top end with a fresh outlook.

Before, I was going at it like it was just a 'slap together'.
And, up until now, it kind of was.
Until I got called out...

First thing I did was get the shop area cleaned up, and the board out.
Image

A couple of the wrist pins were tight.
It was driving me nuts all of yesterday.
I think they got burred up at the snap ring groove, maybe?
Was using the MAPP gas torch like in the old V8 days,
Heating up the piston to make the pin slide easier,
But,
Man!
It was cooling off, and giving me fits - all seizing in the piston.
So finally, fuggit, I just reamed it with some Scotch-Brite.
Image
Much better.
Dag, that was driving me nuts!!! :evil:
If it wears out sooner, I still say it was worth it.
TOO many times on and off and on and off and on to have this poop going on!

Let's get his whole thing organized proper like.
TDC got marked 180 out, each side.
And every part got labeled big.
Every hole, case, jugs, pistons...
Remember, I'm easily confused.
Image

I'm a gonna chase down exactly where the wonky numbers are.
Measured each jug as best I can with a caliper.
Image

Made sure the deck and cylinders don't have any nonsense;
This lays flat right here.
Image

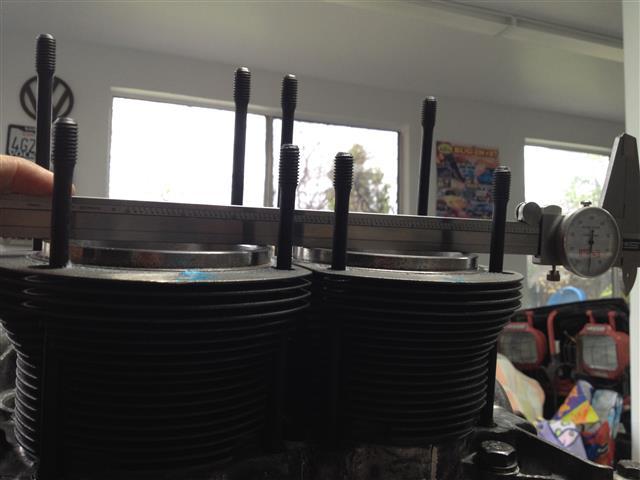
The deck measurement finally started making sense.
My TDC measurement/mark from yesterday was off(!)
GIGO...
Got them all to measure right around .005",
And labeled some more.
Image

So, it was time to take off the old wet/dry 400 from the surface plate...
Image

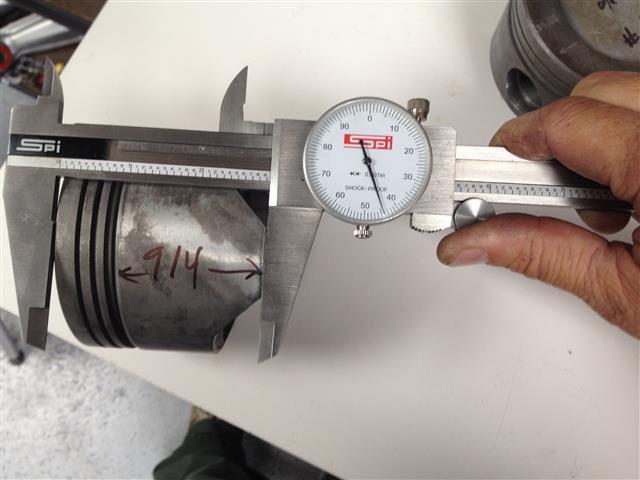
Figuring out how much to take off of each piston;
Man, there was a LOT of variation in these pistons.
Had to label them all separately with my target number.
Doing for .030 off here. That plus the .005 we already have.
Target number written on the side. Both sides. They were different.
Need to keep things square.
Remember, I'm easily confused...
Image

So, Pile said 50 strokes with some 220.
I figured some 180 would speed the process, especially flooded with solvent....
50 Strokes - Yeah, right!
Good thing I don't listen to what people tell me on the internet! :lol:
Humping this thing for several hundred strokes got me like .003...
Image
Now, I'm fat and need some exercise, don't get me wrong, but,
It would take all day to take off .030 by hand....

Time to break out my Ghetto Bench-Mount Belt-Sander.
(Patent Pending)
Don't try this at home kids...
Image

Now we're talking... 8)
Get it within a couple thou on the old 80-grit belt,
And by the time it cleans up on the 180 wet/dry,
There's your number...
Image

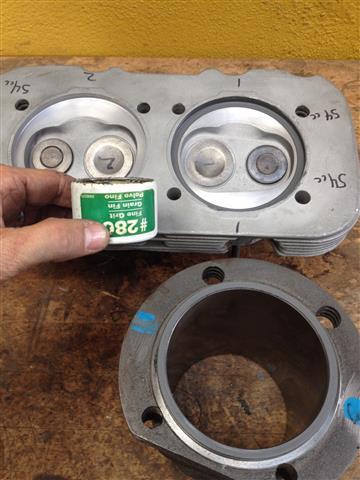
I even walked up to my perfect .035 on every hole.
You can creep up (very very slowly :lol: ) on your number with the wet/dry.
Taking the .035 feeler blade off, the mounting hole has a burr on it.
You can use it get a feel, and then some, as you lay it flat, and cruise it around measuring at different spots.
Nutted all four of them.... 8)
Damn, I feel cool right now...
Image

Lo and behold, we lost three full CCs by taking .030 off the piston top.
The man is a genius...
Image

My total chamber volume got dropped from 69 to 66 CCs.
Bringing my Compression Ratio up to 7.8. 8) 8)
Pile, I love you, man.... *sniff*

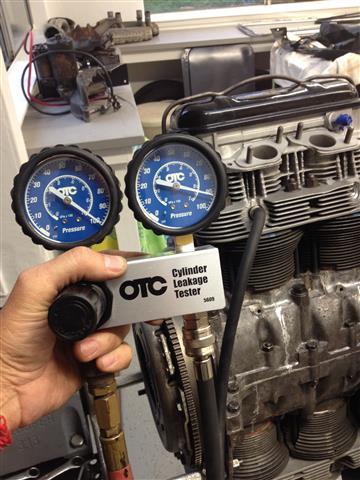
Afterwards, I broke out the die-grinder, ATF, safety gear, and made a big tank of air.
Only to find out some wrist-pin juggling brought me right in line!
Sometimes you get lucky(!) :D
Image

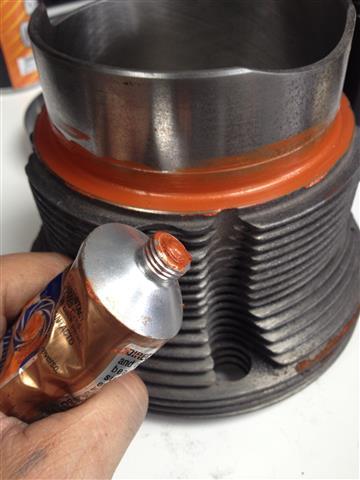
So, a big cleanup session, and assembly.
I use RTV.
There, I said it.
On a forum. On the Internet.
I don't care what anybody says. Other poop leaks sometimes at cylinder bases.
Proper use of RTV has may facets;
Not the least of which is making sure little dried up balls of it under the cap don't find their way into your project.
Image

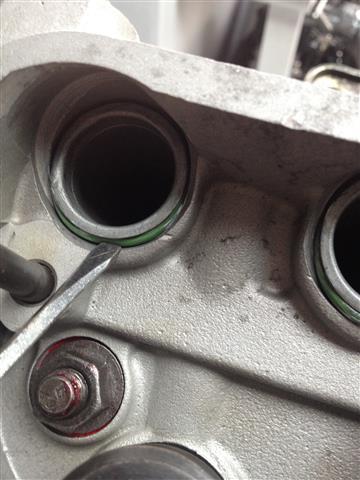
Making sure the sharp edge of the snap-rings face out...
Image

Don't let them pushrod tube O-rings pinch.
Image

518 under head washers.
Image

Since the gods smiled on me today,
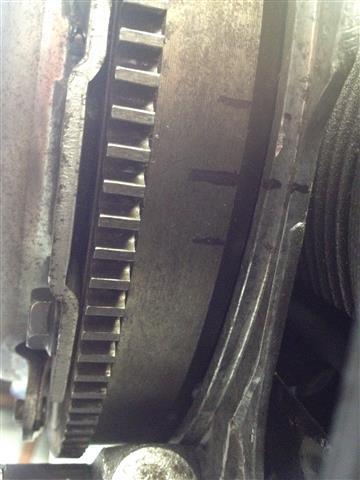
Couldn't resist taking it this next step, and lapped the jugs to the heads.
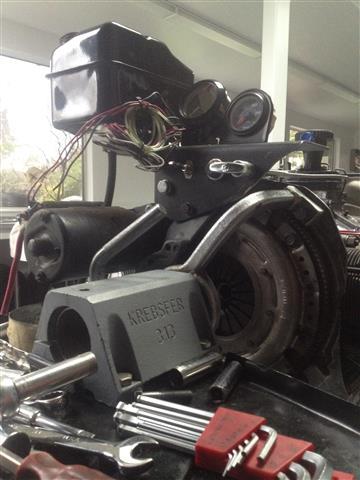
Image

Long Block! 8)
Image

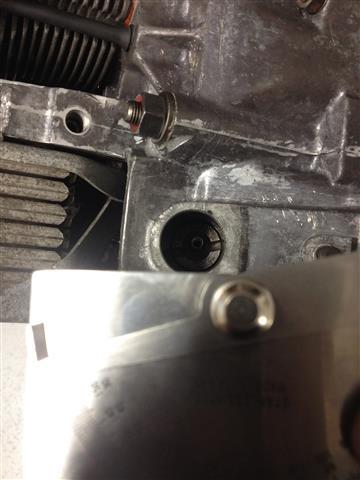
A couple of type-4-Isms.
Big Cheese-head screw on top of #3 for some reason...
Image

Smaller small cheese-head under head/cylinder tin for some other reason.
Image
God only knows what those reasons are... Keep us hunting for screws I guess... :roll: :roll:

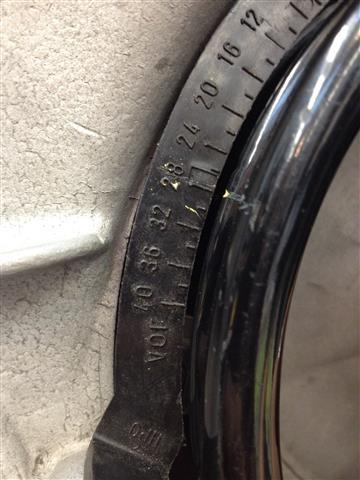
Twelve-degree angle of distributor drive - per the Bentley Bible.
Image

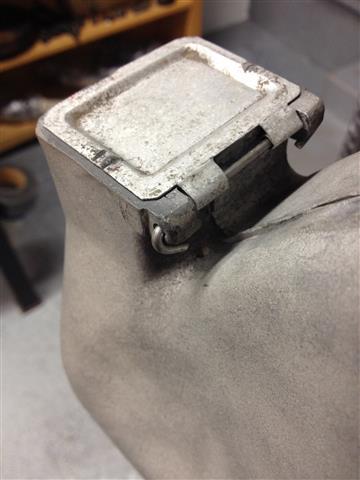
Quick-n-dirty cam degree checking.
The "split overlap method".
Making sure that during overlap, (360 degrees from TDC near when plug fires), that both valves are open the same amount at TDC.
You can see my TDC mark on the flywheel, and the level is the same er, level, as the head.
If my marks are correct, and the pushrods are the same length (checked), the cam is 'straight up' as it's supposed to be.
(at least in this case (sorry, pun... :lol: ) it's supposed to be run straight up.)
Image

Anyhow,
Mom let me work late into the night tonight,
And now I'm even dressing this motor up a bit! :D
Image

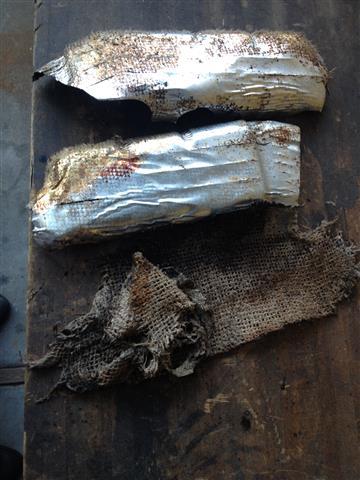
I have a project going restoring some 72-74 heater boxes (see TOS Type 3 forum for details),
And once those get done, the plan is to run it in on the test-stand for a cam break in.

Just need some linkage arms for my DCNFs here....
*hint* *hint*.... :wink:

Until next time...
Thanks for keeping me on it, Pile!
:wink:
Last edited by Clatter on Fri Oct 25, 2019 1:54 pm, edited 1 time in total.
Speedier than a Fasting Bullet!

Beginners' how-to Type 4 build thread ---> http://shoptalkforums.com/viewtopic.php?f=1&t=145853
User avatar
Piledriver
Moderator
Posts: 22520
Joined: Sat Feb 16, 2002 12:01 am

Re: Cheap Junk 1971 Build

Post by Piledriver »

:twisted: I thought you would figure it out pretty quickly :lol:
It's easy to take it down a few thou by hand, and it can be done very evenly.

I used a DA sander, and just finished it by hand.

You did make a note as to piston orientation? (the arrow got sanded off)
The pin offset on some pistons is ~1mm or even more, will be pretty noisy upside down.
(supposedly worth a little HP, have not tried it)

Delighted it worked out perfect!
I was worried you might have all different decks and have to massage the dishes CC a little.

I typically use RTV for the cylinder bases, but just a thin smear.

I have also tried Copper-kote, seemed to work very well, and cleans up a LOT easier than RTV.
Use it on the head seal as well. ( I think Jake suggested that)

Even "coated" a chamber with it once just to see what would happen.
AFAICT was all still there and clean 65K later.(except on the ex valve, totally MIA)
Addendum to Newtons first law:
zero vehicles on jackstands, square gets a fresh 090 and 1911, cabby gets a blower.
EZ3.6 Vanagon after that.(mounted, needs everything finished) then Creamsicle.
User avatar
Clatter
Posts: 2034
Joined: Sun Apr 28, 2002 1:01 am

Re: Cheap Junk 1971 Build

Post by Clatter »

Walking a little funny today...
That was indeed a pretty huge flog yesterday, and the two days prior.
Much of it was spend digging through shelves and cabinets and boxes and drawers for various little bits.
I typically only have these tiny windows of time to work on crap.
So, it makes me move as fast as i can.
Days like today, I'm back and hands are sore, my head is bumped, and by knuckles are skinned.
But, dag, it makes me happy when i pass by that motor on the stand! :D

I glued the heads on my bus once.
It seems odd that only these aircoolers don't glue the heads down.
Every other car on earth does, right?
Unfortunately, my bus came apart less than a year later, and it was a PITA to get them clean again.
So, i don't go like that anymore...

On that note, i need to drag out my leakdown tester and see how i did.

Waiting on:
Insulation for heater boxes
End-play shims
Carburetor linkage arms
Speedier than a Fasting Bullet!

Beginners' how-to Type 4 build thread ---> http://shoptalkforums.com/viewtopic.php?f=1&t=145853
User avatar
Clatter
Posts: 2034
Joined: Sun Apr 28, 2002 1:01 am

Re: Cheap Junk 1971 Build

Post by Clatter »

And i even got a few hours after work yesterday...

Started off with some tin fitting.
The last pics were a 'first initial mock-up' of tins,
To show any deficiencies.
Because we are mounting 72-74 bus tins onto a 914 heads, case, and shroud, there were a few little things to tweak.
Like clearancing the bus top tins for the 914 breather tubes that stick out of the heads...
There are little tits and nibs that need trimmed, and some hammer/dolly work to make everything fit as tight as possible.
Back in the old days in AZ, we used to even seal up all of the tin with RTV...!

Sometimes, there is damage from 'shelf rash', or things getting bent up over the years.
This could have made life less fun for sure:
Image

Anybody have one of those left front lower tins for me in their stash?
Looked and looked everywhere for this dang thing... :?
Image

Another part of the 914/Bus conversion, and also just good practice - the timing mark.
Image
See how my little yellow mark is off the factory mark there?
I'm glad that OG mark is buried under the powder coat.

Now, I'm 100% certain that i have TDC marked correctly.
Its on the side of the case, done with the indicator on top of the piston, remember?
Image

And on the other side, too.
Same measurement.
Image

Now, it does bug me when something doesn't match up with what it's supposed to.
The factory typically gets things right.
However, i triple-checked that TDC measurement on two different days, and that factory mark is off a few degrees for sure.
Here we have the marking pen i use;
Helps an old man see the timing mark in the dark under a flashing strobe.
Also shows again OG the mark being off...
Image

Finally, we take the timing to 28 - our baseline advance target - and mark it.
Damn yellow marking pen dried up - and it's only 22 years old! LOL!
Image

This enables me to accurately make a mark at 28 on the top of the fan,
Where the timing might be set in 914 mode.
The motor might end up in my Fastback some day - you just never know...
Image

Then the tins came back off, and the moment of truth is upon us. Leakdown test!
90+% on all four. 8)
Image

Broke out the big caliper and some stock(!) pushrods.
Haven't touched stock pushrods in at least 10 years!
(except to throw them away :D )
Interesting to see the variation in measurement, eh?
Image

This leads to our inevitable valvetrain geometry session...
Image

This is the quicky version of geometry.
Not the regularly-scheduled program... What we have here is a basic 'sanity check'.
All of everything here is basically stock - adjusters, rockers, cylinder length, etc.
The only variables are the case deck at .010, and a few thou fly-cut on the heads.
Here, *ahem* is my own personal invention/contribution to the aircooled VW world;
Using the 'ruler' part of a combination square(!) Like woodworking tool combination square...

It has two really slick ways of checking for 'square-ness' at half-lift.
(provided you checked the end of it for square already).

First, the line in the middle can be sighted along the edge of the adjuster screw.
Image

The ruler marks (lines) can be oriented across the top of the adjuster, too.
Image

Both of these together can show a lot about what is going on with the overall geometry.
If you look really closely at these last two pics,
a .010" shim looks like it would make everything perfect.
And that matches perfectly with our situation with the case deck and all...

So, numbers matching reality. We like that. Makes us feel good.
Both me, and the two other little friends of mine that live in my head... :wink:

Had to put them all through their paces and see if all was well in the world.
Not that there is anything to be done about any of this, as our pushrod length is fixed.
Just wanted to make sure it was all making sense, no flat cam lobes, and similar numbers from side-to-side.
Also put my square on them at half-lift for an eyeballing...
There was more variation in these numbers than i typically see.
Ordinarily, i am using the 1.7 rockers and swivel feet.
Check out how different those numbers are!
I re-checked them to be sure I (we) hadn't lost our mind... And it's all real, at least that's what they are saying...
Image

Did up a couple of these little heater flap thingies.
Bunch of time getting them to fit perfectly.
Usually i make new ones from some aluminum sheet.
Coat-hanger wire works beautifully for mounting.
Use a plastic-coated hanger wire for ultra-slide stealthy high-performance action! 8) 8)
Image
Image

Finally, i moved on to setting up the test-fire rig.
Always wanted to use a dis-assemble-able filter for early start-up and break-in.
Found a little Oberg filter at a swap, and adapted it.
Should be fun to see what all is in there after the initial run-in.
Image

So, still waiting on a few parts, and have a few more things to setup on the run stand.
Stay tuned, both of you! :lol:
Last edited by Clatter on Fri Oct 25, 2019 2:00 pm, edited 1 time in total.
Speedier than a Fasting Bullet!

Beginners' how-to Type 4 build thread ---> http://shoptalkforums.com/viewtopic.php?f=1&t=145853
User avatar
ProctorSilex
Posts: 228
Joined: Sun Jul 17, 2011 6:09 pm

Re: Cheap Junk 1971 Build

Post by ProctorSilex »

For the ruler squareness bit, are you checking that the valve keeper is perpendicular to the adjuster? Thanks
User avatar
Clatter
Posts: 2034
Joined: Sun Apr 28, 2002 1:01 am

Re: Cheap Junk 1971 Build

Post by Clatter »

ProctorSilex wrote:For the ruler squareness bit, are you checking that the valve keeper is perpendicular to the adjuster? Thanks
Exactly.

The retainer and the keeper.
Same thing.
Speedier than a Fasting Bullet!

Beginners' how-to Type 4 build thread ---> http://shoptalkforums.com/viewtopic.php?f=1&t=145853
User avatar
twinfin
Posts: 1
Joined: Wed Nov 10, 2010 5:12 pm

Re: Cheap Junk 1971 Build

Post by twinfin »

Man your good Steve! Is this the "Sweep the floor motor" you were talking about??
-Damon
-Santa Cruz, California
User avatar
Clatter
Posts: 2034
Joined: Sun Apr 28, 2002 1:01 am

Re: Cheap Junk 1971 Build

Post by Clatter »

Yep, that's the one...

Cleaning up!
An assembled motor takes up a lot less space than the parts it's made up from.

And, you never know when something like that might come in handy.
:wink:

The idea here is to dress it up in 72-74 tin and heaters,
Then run it in on the stand using a pair of carbs.
Speedier than a Fasting Bullet!

Beginners' how-to Type 4 build thread ---> http://shoptalkforums.com/viewtopic.php?f=1&t=145853
User avatar
Clatter
Posts: 2034
Joined: Sun Apr 28, 2002 1:01 am

Re: Cheap Junk 1971 Build

Post by Clatter »

And, a few more things got done.
Shims are getting hard to find.
Hoarders like me are swooping them up!
Image
Won't show the whole "pull the pp, disk, flywheel, and re-stab it all"... You get the idea.
The reason i didn't just leave the flywheel off until the motor was built was an important one... The brass distributor drive gear could get all buggered up!
Plus, the other reason, is that if i left it loose or something, it might not ever get tightened if i forgot.
(the 'Lambretta Rule' as I call it).

Ripped apart a set of the desirable 72-74 heater boxes.
Many of these got filled with oil over the years.
They sit right below the valve covers, and are very, very likely to get filled with oil.
Unless you bought your bus new, it is hard to tell that they never got filled with burned, caked oil.
Surrounding the finned inner heat exhanger part is a thin sheet, and some woven cloth/asbestos(?)-like stuff.
This shows the sheet on the left, and the woven stuff on the right.
These are bottom-side parts, soaked in burned oil for years.
Image
This is after sitting in a soak-tank over the holiday weekend.
Even so, the baked-on oil sludge/crust is still so tenacious, that the woven stuff stands stiff still...

Here are two of the top-side pieces after soaking.
Without the burned-oil crust treatment, they go limp and soggy after soaking.
Image

Here the over tins are removed, and blasted clean for some pin-hole welding and rust repair.
Also shown is the replacement for the woven mesh i am going to try - Stuff from a company called Thermal Zero.
Image

My helper here, with our little arts and crafts project; trimming the stuff to fit the tins.
Image
We don't need his sweet little lungs huffing burning oil sludge smoke as we go down the road.
My lungs have taken all kinds of abuse over the years, but his, we will try and protect.
He can ruin his whle he's away at college... :lol:

As far as I can tell, nobody has ever bothered to take a set of these apart and clean them out.
At least it has yet to be documented on the Internet.
Jake used to fill them with gas and 'burn the stuff out' of them.
It shows how to open them up in the Bentley, so it might even be SOP to get them clean.
I do know that pumping burning oil fumes into the passenger compartment while driving is no bueno.

Was going to have the parts all ceramic coated, until my local guy quoted me $500(!) for the job.
He's a little *high* me thinks...
Plus, who knows if ceramic coating fumes are good to breathe while burning, either?
So,
First, i will but the heater boxes together in bare metal, with the new insulation material, and test-run on the stand.
This way, i can not only run-in the motor, but get an idea of how much this Thermal Zero stuff off-gasses in this environment.
If they pass the test, then the tins will get ceramic coated (somewhere else) and we will repeat the test.
So, a little experiment...

Speaking of Run Stand...
Image
This is how "I" do it.
Yes, many consider it sketchy to run a motor on a stand designed for just working on motors.
You will notice what makes this possible - the word "Krebsfer" on the side of this stand.
This is a super heavy-duty stand, not just a China Empi one.
Plus, the bottom half of this is a V8 stand, designed for motors twice this size.
Finally, i push this thing outside onto the grass; if it does decide to break or tip over, it won't break anything.

Uh oh, here comes the boss!
Don't look... Act natural...
"No Honey, i wasn't working on cars".
Image

My little run-stand is half of an early bus bell-housing, a gas tank from a roto-tiller, a starter, and a big piece of flat plate bent 90 degrees.
This way, i get a tach, a mechanical oil pressure gauge, an on/off switch, starter button, and throttle control.
The throttle control, on the right, came from a mower shop.
You can pull it out, then twist it to lock it in place.
That way you can get the motor spinning at speed, and walk around front to set timing or whatever.
Nice to just lock it in at 2000RPM and break the cam in...

This thing is kind of a mess wiring-wise because it always just gets drug out and used as an afterthought, with a different config every time.
Need to spend some time straightening it up - put an insulated 'bus bar' or two on it; for 'Hot' and 'Switched Hot' power, plus ground.
It would be so much easier to work with that way.
Maybe next time... :mrgreen:
This time it's getting the CB/Carter regulated electric pump.
I think I'll hang it off the bottom like this...
Image

Anyways, the project is kind of 'stuck on stupid' for a while.
It's too windy fr me to weld all of the pin-holes up on the heater shells.
Need to work out this odd-ball 'type 4-into-type 3' throttle linkage.
Have to find a coater to not gouge me on price.
And get some fuel hose, and find an o-ring for the oil adaptor.
And make a living... :roll:

So, it might be a while, but, next time should include some run-in time.
Or, that might just be it, and i stash this thing under a bench and call it done.
Last edited by Clatter on Fri Oct 25, 2019 2:06 pm, edited 2 times in total.
Speedier than a Fasting Bullet!

Beginners' how-to Type 4 build thread ---> http://shoptalkforums.com/viewtopic.php?f=1&t=145853
User avatar
dave t
Posts: 427
Joined: Sat Nov 25, 2006 5:43 pm

Re: Cheap Junk 1971 Build

Post by dave t »

these? Image , or Image , or Image . Or go to my photo bucket and look at my pics and tell me if I have it:)
User avatar
Piledriver
Moderator
Posts: 22520
Joined: Sat Feb 16, 2002 12:01 am

Re: Cheap Junk 1971 Build

Post by Piledriver »

Was going to have the parts all ceramic coated, until my local guy quoted me $500(!) for the job.
He's a little *high* me thinks...
Ummm... PAY someone?
DIY.

Techline Coatings
Waxahatchie Texas
http://www.techlinecoatings.com/hi-perf ... efault.htm

There's a 99% chance the $500 would have gotten you the same coatings.

Black Satin rocks. Goes a long way.
Also available in silver, but doesn't work quite as well.
Addendum to Newtons first law:
zero vehicles on jackstands, square gets a fresh 090 and 1911, cabby gets a blower.
EZ3.6 Vanagon after that.(mounted, needs everything finished) then Creamsicle.
User avatar
Clatter
Posts: 2034
Joined: Sun Apr 28, 2002 1:01 am

Re: Cheap Junk 1971 Build

Post by Clatter »

Holy Poop!
:shock:

Dave T, that's it!

Bottom picture, right there in the very middle!

WhooHoo!!!!
:D :D
Speedier than a Fasting Bullet!

Beginners' how-to Type 4 build thread ---> http://shoptalkforums.com/viewtopic.php?f=1&t=145853
Post Reply