Cheap Junk 1971 Build
-
Piledriver

- Moderator
- Posts: 22520
- Joined: Sat Feb 16, 2002 12:01 am
Re: Cheap Junk 1971 Build
...So did you nab the fan housing?
Addendum to Newtons first law:
zero vehicles on jackstands, square gets a fresh 090 and 1911, cabby gets a blower.
EZ3.6 Vanagon after that.(mounted, needs everything finished) then Creamsicle.
zero vehicles on jackstands, square gets a fresh 090 and 1911, cabby gets a blower.
EZ3.6 Vanagon after that.(mounted, needs everything finished) then Creamsicle.
-
Clatter

- Posts: 2034
- Joined: Sun Apr 28, 2002 1:01 am
Re: Cheap Junk 1971 Build
Naw, I got one of those sitting here.Piledriver wrote:...So did you nab the fan housing?
Don't really have much room left to keep stuff these days.
It's at the Pick N Pull in Moss Landing if anyone wants it.
Has the oddball alternator and brackets and whatnot for it, too.
Real treasures, those things;
Trips me out when you see a hot motor with a header on it, and they didn't even bother to get a Vanagon shroud...
Looks like it would be an easier conversion to a better alternator, too.
Speedier than a Fasting Bullet!
Beginners' how-to Type 4 build thread ---> http://shoptalkforums.com/viewtopic.php?f=1&t=145853
Beginners' how-to Type 4 build thread ---> http://shoptalkforums.com/viewtopic.php?f=1&t=145853
-
Clatter
- Posts: 2034
- Joined: Sun Apr 28, 2002 1:01 am
Re: Cheap Junk 1971 Build
Dag,
I just typed up this whole thing and it just disappeared...

So, here's a half-assed quickie version of part of what i just did....
First off,
The case got tanked, but there is still some grime left in the bottom.

It got disposed of with a little brake cleaner...

I typed up a long dissertation about the different kinds of tanks, and using them, and etiquette,
but,
when i posted it, it all went blank,
So Sorry, i'm too pissed to type it again.
Bunch of stuff came back from blast.
Here a hole was rusted clear through a tube.
Couldn't even hardly see this before blasting, so another reason to blast.
Doesn't help that this thing was sitting under a tree for years and years...

Ugh,
Can't take it anymore...
Too pissed off...
I just spent SO much time typing this whole report to you guys,
And when i went to hit 'submit', it all went blank...
I just.... Can't... Do... It.... Again...
Without being all grumpy and mad!
So, maybe, after going and going something else,
i can get up the nerve to do this all again....
I just typed up this whole thing and it just disappeared...
So, here's a half-assed quickie version of part of what i just did....
First off,
The case got tanked, but there is still some grime left in the bottom.
It got disposed of with a little brake cleaner...
I typed up a long dissertation about the different kinds of tanks, and using them, and etiquette,
but,
when i posted it, it all went blank,
So Sorry, i'm too pissed to type it again.
Bunch of stuff came back from blast.
Here a hole was rusted clear through a tube.
Couldn't even hardly see this before blasting, so another reason to blast.
Doesn't help that this thing was sitting under a tree for years and years...
Ugh,
Can't take it anymore...
Too pissed off...
I just spent SO much time typing this whole report to you guys,
And when i went to hit 'submit', it all went blank...
I just.... Can't... Do... It.... Again...
Without being all grumpy and mad!
So, maybe, after going and going something else,
i can get up the nerve to do this all again....
Last edited by Clatter on Fri Oct 25, 2019 1:20 pm, edited 1 time in total.
Speedier than a Fasting Bullet!
Beginners' how-to Type 4 build thread ---> http://shoptalkforums.com/viewtopic.php?f=1&t=145853
Beginners' how-to Type 4 build thread ---> http://shoptalkforums.com/viewtopic.php?f=1&t=145853
-
BugUgly

- Posts: 116
- Joined: Thu Oct 02, 2008 8:59 pm
Re: Cheap Junk 1971 Build
Watching eagerly...we'll take what we can get!
-
Brent69

- Posts: 28
- Joined: Fri Oct 28, 2011 9:31 pm
Re: Cheap Junk 1971 Build
I know this guy that could use it someday.Clatter wrote:Naw, I got one of those sitting here.Piledriver wrote:...So did you nab the fan housing?
Don't really have much room left to keep stuff these days.
It's at the Pick N Pull in Moss Landing if anyone wants it.
Has the oddball alternator and brackets and whatnot for it, too.
Real treasures, those things;
Trips me out when you see a hot motor with a header on it, and they didn't even bother to get a Vanagon shroud...
Looks like it would be an easier conversion to a better alternator, too.
-
Clatter
- Posts: 2034
- Joined: Sun Apr 28, 2002 1:01 am
Re: Cheap Junk 1971 Build
Brent,
You want me to go and get that for you?
Thought you already had one of those....
Want the alternator, too?
Or are you going to do Pile's CS130 (IIRC?) alt conversion?
I'll go and get it if it's still there.
Never seem to have all my tools and clothes with me when I go by.
I'm always dressed up all 'Handsome Grandson' on my way to the Merrill Lynch building in Carmel!
Speedier than a Fasting Bullet!
Beginners' how-to Type 4 build thread ---> http://shoptalkforums.com/viewtopic.php?f=1&t=145853
Beginners' how-to Type 4 build thread ---> http://shoptalkforums.com/viewtopic.php?f=1&t=145853
-
Clatter
- Posts: 2034
- Joined: Sun Apr 28, 2002 1:01 am
Re: Cheap Junk 1971 Build
Allright,
I've cooled off a bit now.
Man, that pisses me off when that happens.
Artistic inspiration gets pretty sparse here sometimes!
So, I'll try and remember what it was I was saying...
Regarding the case cleaning:
Clean your crap off as best you can before you take it to be tanked.
Don't insult your machinist.
You wouldn't go to the proctologist right after you shat your pants;
Don't bring dirty sludged out parts in for cleaning.
Do the best you can with wire brushes, chisels, Gunk, oven cleaner, car wash, whatever, first.
That case was done in those 'enviro' tanks; first, a 'soak tank' and then a parts washer that works like a dishwater with water and soap.
The soak tank has to be used judiciously, if aluminum or mag gets left in it too long,
smooth mating surfaces can become etched, and possibly eroded away.
The parts washer uses some kind of citrus, and is mostly to wash off the soak tank residues.
Whatever you do, don't let some mouth breather at your FLAPS put your aluminum anything in a traditional 'hot tank';
It would get ruined in short order.
A regular hot tank at most 'Murrican car places are for ferrous metals only.
Even with the two-step process done here, there are inevitably little spots that didn't get 100% clean.
Especially if the stuff was outside for 10 or 20 years.
Especially if it was all deep coated in baked-on grime for the whole time, too.
A dentist's pick, some scraping, and rags soaked in carb cleaner can remove the rest of the little missed spots.
No matter the method used, some will be left after any automatic processes.
Once again, it is the responsibility of the builder to make sure everything is correct.
And, another example of something a guy working on the clock would never waste his time with.
Just one more reason a home-cooked motor is the way to go...
Here's a useful tool - Fine Scotch-Brite!

Used bearings, Before and after.

This is why we like these things,

Go ahead and try to find some German KS Std/Std mains new...
Who would have ever guessed that we would re-use bearings in a rebuild??
If they measure out OK, they will get scuffed off with some fine steel wool, and away we go.
Many builders will take and scuff the coating off of new bearings during assembly,
So, if they clean up, why not?

Better post this up,
Don't want it to go all blank on me when I hit 'submit' again...
I've cooled off a bit now.
Man, that pisses me off when that happens.
Artistic inspiration gets pretty sparse here sometimes!
So, I'll try and remember what it was I was saying...
Regarding the case cleaning:
Clean your crap off as best you can before you take it to be tanked.
Don't insult your machinist.
You wouldn't go to the proctologist right after you shat your pants;
Don't bring dirty sludged out parts in for cleaning.
Do the best you can with wire brushes, chisels, Gunk, oven cleaner, car wash, whatever, first.
That case was done in those 'enviro' tanks; first, a 'soak tank' and then a parts washer that works like a dishwater with water and soap.
The soak tank has to be used judiciously, if aluminum or mag gets left in it too long,
smooth mating surfaces can become etched, and possibly eroded away.
The parts washer uses some kind of citrus, and is mostly to wash off the soak tank residues.
Whatever you do, don't let some mouth breather at your FLAPS put your aluminum anything in a traditional 'hot tank';
It would get ruined in short order.
A regular hot tank at most 'Murrican car places are for ferrous metals only.
Even with the two-step process done here, there are inevitably little spots that didn't get 100% clean.
Especially if the stuff was outside for 10 or 20 years.
Especially if it was all deep coated in baked-on grime for the whole time, too.
A dentist's pick, some scraping, and rags soaked in carb cleaner can remove the rest of the little missed spots.
No matter the method used, some will be left after any automatic processes.
Once again, it is the responsibility of the builder to make sure everything is correct.
And, another example of something a guy working on the clock would never waste his time with.
Just one more reason a home-cooked motor is the way to go...
Here's a useful tool - Fine Scotch-Brite!
Used bearings, Before and after.
This is why we like these things,
Go ahead and try to find some German KS Std/Std mains new...
Who would have ever guessed that we would re-use bearings in a rebuild??
If they measure out OK, they will get scuffed off with some fine steel wool, and away we go.
Many builders will take and scuff the coating off of new bearings during assembly,
So, if they clean up, why not?
Better post this up,
Don't want it to go all blank on me when I hit 'submit' again...
Last edited by Clatter on Fri Oct 25, 2019 1:21 pm, edited 1 time in total.
Speedier than a Fasting Bullet!
Beginners' how-to Type 4 build thread ---> http://shoptalkforums.com/viewtopic.php?f=1&t=145853
Beginners' how-to Type 4 build thread ---> http://shoptalkforums.com/viewtopic.php?f=1&t=145853
-
Clatter
- Posts: 2034
- Joined: Sun Apr 28, 2002 1:01 am
Re: Cheap Junk 1971 Build
Here's a few small random things...
Got my case back from Carr Parts.
Jim decked the case registers for me.
Unlike a typical thou or two to clean up,
This one got .010", because those nasty dings/nicks needed removed.
There is still a bit of them showing, but nothing to interfere.
Want to save as much deck as you can for posterity.

Some stuff back from tanking and/or blasting.

SLR turned these over like same day(!)
Bam! and they were back...
OG German lifters re-done for $20 and a few bucks shipping,
How can you beat that?
They even smell good!

Rod bearings, cam bearings, and two cans of brake parts cleaner,
$74 at my local NAPA.

Better post up again....
Got my case back from Carr Parts.
Jim decked the case registers for me.
Unlike a typical thou or two to clean up,
This one got .010", because those nasty dings/nicks needed removed.
There is still a bit of them showing, but nothing to interfere.
Want to save as much deck as you can for posterity.
Some stuff back from tanking and/or blasting.
SLR turned these over like same day(!)
Bam! and they were back...
OG German lifters re-done for $20 and a few bucks shipping,
How can you beat that?
They even smell good!
Rod bearings, cam bearings, and two cans of brake parts cleaner,
$74 at my local NAPA.
Better post up again....
Last edited by Clatter on Fri Oct 25, 2019 1:23 pm, edited 1 time in total.
Speedier than a Fasting Bullet!
Beginners' how-to Type 4 build thread ---> http://shoptalkforums.com/viewtopic.php?f=1&t=145853
Beginners' how-to Type 4 build thread ---> http://shoptalkforums.com/viewtopic.php?f=1&t=145853
-
Clatter
- Posts: 2034
- Joined: Sun Apr 28, 2002 1:01 am
Re: Cheap Junk 1971 Build
Well, here's a subject I've been meaning to pontificate upon for a long time.
The Achilles heel of our motors; the exhaust manifold-to-head interface.
Exhaust leaks at the port are especially bad, folks.
There are huge forces at work against that gasket;
Giant pressure differences created, as the rapidly moving air column down the exhaust gets stopped by the valve slamming shut.
Air getting sucked in there creates a lean condition, like an afterburner, making a very hot spot.
A hot spot in a bad place.
People will often surface the manifolds flat, to try and get them to seal tight.
And they will sometimes take too much off, causing the mounting ears to hang up before the gasket is tight.
This, along with other issues...
Anyhow,
Ready to start assembling springs and retainers/keepers?
Not so fast...
Time for a few test-fits first.
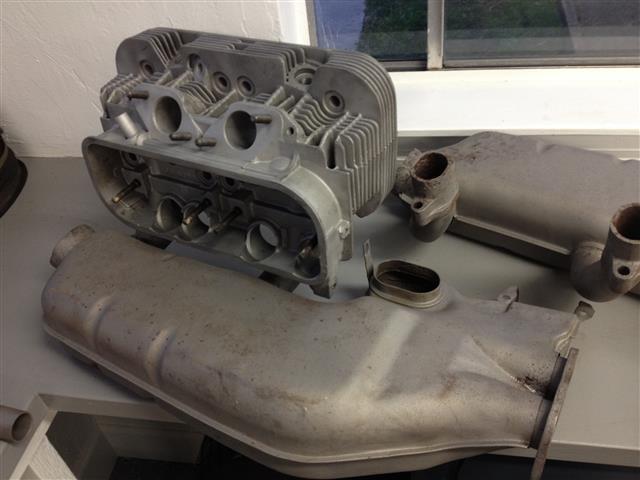

Look real carefully at how the manifold fits the gasket seating area...
I really like to remove the gasket and make sure the manifold will seat in past where the gasket would be.
Ideally, the manifold would be real close to seating, even without the gasket (copper oval ring).
Here we have an unusually nice fit between this head and this manifold.
What we like to see - the port and manifold lining up nicely.
Square to each other; gap very small and even all the way around.
Dark iron manifold and light aluminum head, have to look closely:


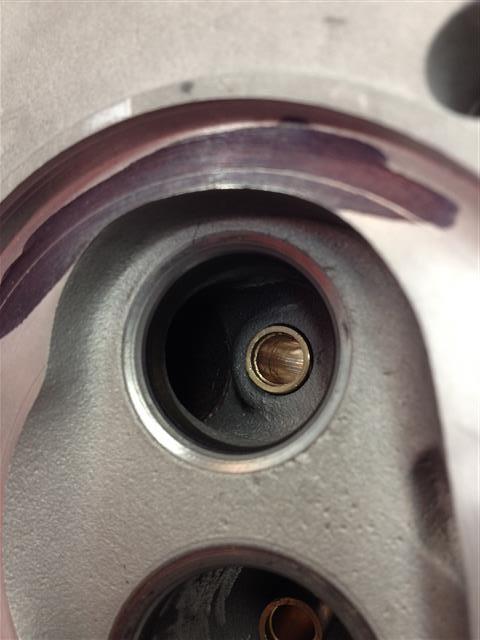
Here is an example of a head that lived for a long time with a badly-aligned exhaust manifold.
See how it was chewing away at the edge?
This one had to have been leaking...

Another motor I did a while back;
Not so easy, this one...
The manifold didn't fit the heads well at all.
See the 'witness marks' where the manifolds didn't fit right?

Look how they were missing their target, and causing leaks.
Bad News.

These manifolds got weld bead/lap built-up on the sides, to 'move over' the mounting surface.
Then, they were surfaced flat; On a surface grinder.
Wish I coulda seen how they jigged it up.
I sure do miss Ellsworth Brothers... RIP.

Final finishing/fit of the manifold was up to me.
Test-fitting to head and gasket, grinding and grinding, to get it all to fit right...

Every time I hear someone say:
"Just take a big flat file and get them all fitted up" it makes my eyes roll.
Here's a few for good measure:
Here's another fit problem I had with a set of 411/412 pipes;
The holes were too close together, so they got 'grown' a bit by sleeving.

Notice that they got sleeved, instead of just butt-welded.
That way any welding slag/rod/bead, is kept out of the flow.

Here's another thing that always bugged me.
No sense in having big blobs of welding right in the way of the flow, right?
This also shows some of the welded area near the head gasket/mounting surface.

So, anyways, I always get my manifolds to seal tight to the head.
After assembling the valves/springs/retainers/keepers, I take and pressure-test the seal by installing the manifold.
Without any glue, gasket in place, nuts only snugged a bit,
I blow (by mouth) into the end of the pipe.
If no air can escape at all, then we can assume it will be good when glued and tightened.
There are other issues that relate to this head/exhaust area.
They too have a whole story/song and dance, which I might get to later.
There is "pullstud" syndrome, where the exhaust studs pull out of the head.
Oversized 'step' studs are available to help this.
Also there are instances where the alignment of the studs can be off.
Occasionally, you can increase the size of the holes in the manifold mounting 'ears' to make more clearance for the studs.
Anything you can do to make the exhaust ports match smoothly to the manifold is going to help performance.
Making sure the heads seal up to the manifolds is essential to the life of the motor, IMHO.
Otherwise, you are asking for an exhaust leak at the port.
And that means trouble, folks....
The Achilles heel of our motors; the exhaust manifold-to-head interface.
Exhaust leaks at the port are especially bad, folks.
There are huge forces at work against that gasket;
Giant pressure differences created, as the rapidly moving air column down the exhaust gets stopped by the valve slamming shut.
Air getting sucked in there creates a lean condition, like an afterburner, making a very hot spot.
A hot spot in a bad place.
People will often surface the manifolds flat, to try and get them to seal tight.
And they will sometimes take too much off, causing the mounting ears to hang up before the gasket is tight.
This, along with other issues...
Anyhow,
Ready to start assembling springs and retainers/keepers?
Not so fast...
Time for a few test-fits first.
Look real carefully at how the manifold fits the gasket seating area...
I really like to remove the gasket and make sure the manifold will seat in past where the gasket would be.
Ideally, the manifold would be real close to seating, even without the gasket (copper oval ring).
Here we have an unusually nice fit between this head and this manifold.
What we like to see - the port and manifold lining up nicely.
Square to each other; gap very small and even all the way around.
Dark iron manifold and light aluminum head, have to look closely:
Here is an example of a head that lived for a long time with a badly-aligned exhaust manifold.
See how it was chewing away at the edge?
This one had to have been leaking...
Another motor I did a while back;
Not so easy, this one...
The manifold didn't fit the heads well at all.
See the 'witness marks' where the manifolds didn't fit right?
Look how they were missing their target, and causing leaks.
Bad News.
These manifolds got weld bead/lap built-up on the sides, to 'move over' the mounting surface.
Then, they were surfaced flat; On a surface grinder.
Wish I coulda seen how they jigged it up.
I sure do miss Ellsworth Brothers... RIP.
Final finishing/fit of the manifold was up to me.
Test-fitting to head and gasket, grinding and grinding, to get it all to fit right...
Every time I hear someone say:
"Just take a big flat file and get them all fitted up" it makes my eyes roll.
Here's a few for good measure:
Here's another fit problem I had with a set of 411/412 pipes;
The holes were too close together, so they got 'grown' a bit by sleeving.
Notice that they got sleeved, instead of just butt-welded.
That way any welding slag/rod/bead, is kept out of the flow.
Here's another thing that always bugged me.
No sense in having big blobs of welding right in the way of the flow, right?
This also shows some of the welded area near the head gasket/mounting surface.
So, anyways, I always get my manifolds to seal tight to the head.
After assembling the valves/springs/retainers/keepers, I take and pressure-test the seal by installing the manifold.
Without any glue, gasket in place, nuts only snugged a bit,
I blow (by mouth) into the end of the pipe.
If no air can escape at all, then we can assume it will be good when glued and tightened.
There are other issues that relate to this head/exhaust area.
They too have a whole story/song and dance, which I might get to later.
There is "pullstud" syndrome, where the exhaust studs pull out of the head.
Oversized 'step' studs are available to help this.
Also there are instances where the alignment of the studs can be off.
Occasionally, you can increase the size of the holes in the manifold mounting 'ears' to make more clearance for the studs.
Anything you can do to make the exhaust ports match smoothly to the manifold is going to help performance.
Making sure the heads seal up to the manifolds is essential to the life of the motor, IMHO.
Otherwise, you are asking for an exhaust leak at the port.
And that means trouble, folks....
Last edited by Clatter on Fri Oct 25, 2019 1:25 pm, edited 3 times in total.
Speedier than a Fasting Bullet!
Beginners' how-to Type 4 build thread ---> http://shoptalkforums.com/viewtopic.php?f=1&t=145853
Beginners' how-to Type 4 build thread ---> http://shoptalkforums.com/viewtopic.php?f=1&t=145853
-
Tony Z

- Posts: 1244
- Joined: Wed Aug 30, 2000 12:01 am
Re: Cheap Junk 1971 Build
Something that I was taught years ago and still practice all the time is annealing of copper gaskets. People look at me like I am crazy, but I never install copper gaskets without annealing them first.
Heat the copper up with a torch (camping gaz torch if fine) until it flows red, then drop it into a bucket of water. Some gaskets even make a popping sound as they anneal (I think its cool and funny at the same time).
Sometimes the gasket will warp or deform slightly
Doing this makes the gasket so soft you can shape / pull / bend them in nearly any direction you want with little more effort than looking at them.
This also allows them to be crushed onto their mating surface filling all irregularities and defects and forming a proper seal.
As they get worked, they work harden and stay in place.
Give it a try with a scrap gasket, you will really be surprised at how malleable it becomes.
-
Clatter
- Posts: 2034
- Joined: Sun Apr 28, 2002 1:01 am
Re: Cheap Junk 1971 Build
Totally right, Tony.
Thanks for adding that; Forgot all about that part.
I do that too.
You can see in my pics of the manifolds I welded, that the annealed gaskets were soft.
That imprint from the misaligned gaskets shows just how soft they were, and how it helped preserve the seal.
This part of our motors can really take some tricks and attention to get right.
Oh, and also forgot the double-nutting trick...
Always double-nut the exhaust studs.
Those copper crush, or crush/ring nuts can mess up torque readings,
and,
They can pull the studs from the heads at removal time.
Speedier than a Fasting Bullet!
Beginners' how-to Type 4 build thread ---> http://shoptalkforums.com/viewtopic.php?f=1&t=145853
Beginners' how-to Type 4 build thread ---> http://shoptalkforums.com/viewtopic.php?f=1&t=145853
-
mdmax72
- Posts: 33
- Joined: Thu Apr 13, 2006 2:26 pm
Re: Cheap Junk 1971 Build
Hi Clatter,
first off following this with great interest. Keep it coming.
Here's a question. I've got some bearings in standard form but they have a "Hi" stamped into the back of the shell with the other markings. Any idea what this represents? Here a picture if it works.
http://i176.photobucket.com/albums/w181 ... 61B110.jpg
Ok need to practice the picture bit then
-
Brent69
- Posts: 28
- Joined: Fri Oct 28, 2011 9:31 pm
Re: Cheap Junk 1971 Build
If you don't mind, absolutely!Clatter wrote:Brent,
You want me to go and get that for you?
Thought you already had one of those....
Want the alternator, too?
Or are you going to do Pile's CS130 (IIRC?) alt conversion?
I'll go and get it if it's still there.
Never seem to have all my tools and clothes with me when I go by.
I'm always dressed up all 'Handsome Grandson' on my way to the Merrill Lynch building in Carmel!
No alternator needed, but any bracketry JIC. I kind of like the idea of using a new alternator with it's own cooling fan, especially in a Type 3. I'll shoot you an email.
Anyway, this thread is awesome. Lots of little details I haven't even thought about yet.
-
Clatter
- Posts: 2034
- Joined: Sun Apr 28, 2002 1:01 am
Re: Cheap Junk 1971 Build
Max(?) 
Those bearings have the KS logo,
Kolbenschmidt (sp?) Is the good brand.
Supposedly there were some slightly-less tasty ones made with this logo,
But you are probably unlikely to see them.
I would repeat my caveat that my posting this doesn't mean that used bearings are really a great idea.
Bearings were typically always replaced at rebuild time for a reason.
Any time there was a failure in the motor, any trash in the oil would imbed itself into the bearings.
Even a motor that was reasonably well-cared-for could have had dirty oil enough times to foul the bearings.
Be advised that the bearings I decided to clean up were not from a motor that had previously experienced a failure.
When that motor came apart, the heads were near perfect, the cylinders not scored, etc.
Apparently the motor had been retired because the car it was in was wrecked, or taken apart or ...?
I didn't give the correct warnings to people about the conditions in which a used set of bearings would ever be considered.
FWIW, YMMV, etc.
Show us what they look like all shined up!
(And how they measure out, of course... I'll get to that soon....)
Speedier than a Fasting Bullet!
Beginners' how-to Type 4 build thread ---> http://shoptalkforums.com/viewtopic.php?f=1&t=145853
Beginners' how-to Type 4 build thread ---> http://shoptalkforums.com/viewtopic.php?f=1&t=145853
-
mdmax72
- Posts: 33
- Joined: Thu Apr 13, 2006 2:26 pm
Re: Cheap Junk 1971 Build
Don't panic Clatter.
Not going to be using these bearings even though they look in good shape. Just tore an engine down and came across this bearing with the "Hi" stamped in and was just curious as to what it represented. Just though I'd ask as you mentioned bearings etc. Just being curious, that's all.
Regards
Not going to be using these bearings even though they look in good shape. Just tore an engine down and came across this bearing with the "Hi" stamped in and was just curious as to what it represented. Just though I'd ask as you mentioned bearings etc. Just being curious, that's all.
Regards