T4 Tear Down / Rebuild in Jax FL

This is the place to discuss, or get help with any of your Type 4 questions.
User avatar
analogtherapy
Posts: 80
Joined: Sat Apr 22, 2017 6:45 am

Re: T4 Tear Down / Rebuild in Jax FL

Post by analogtherapy »

Clatter wrote: Mon Aug 14, 2017 1:11 pm MMmmmMMMmm, That's some nice looking stuff all clean like that.

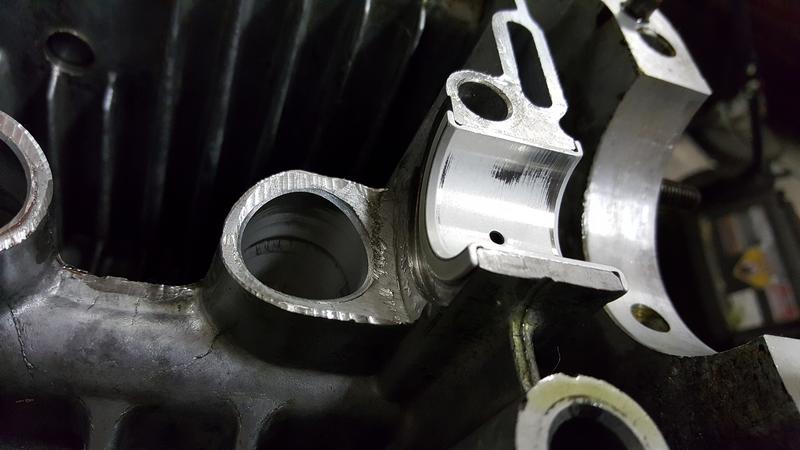
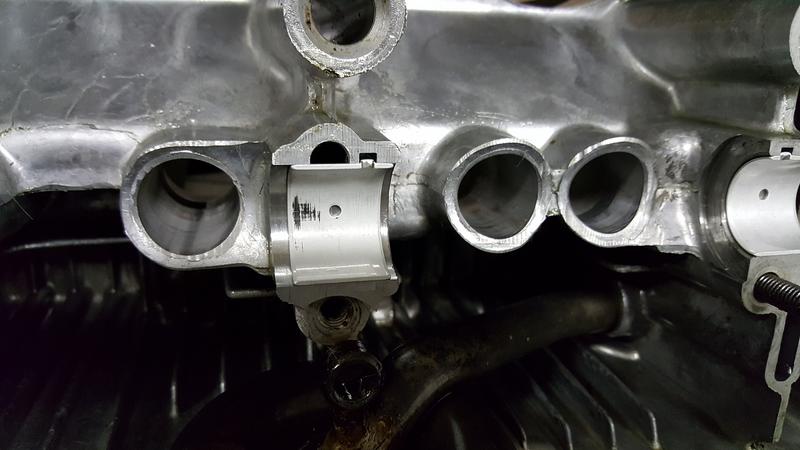
Love them lifter bore sleeves..

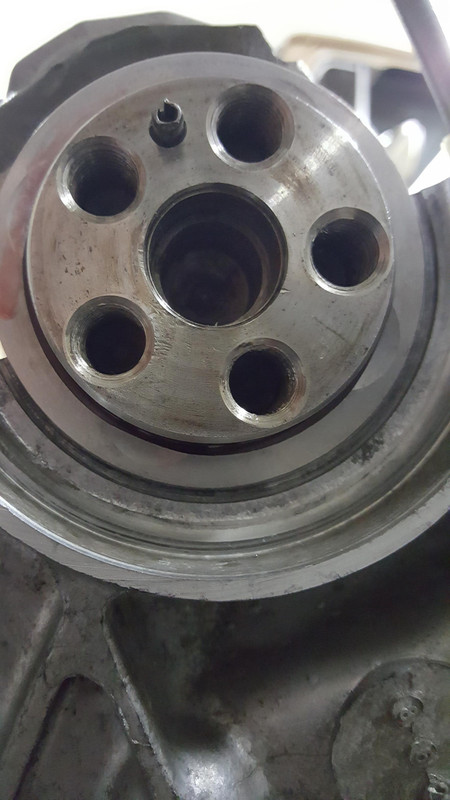
Did you ever have your crank/flywheel/pressure plate/fan spin-balanced as an assembly?
That's worth doing for sure, when you have everything apart like this..

Don't forget to check your oil pump out,
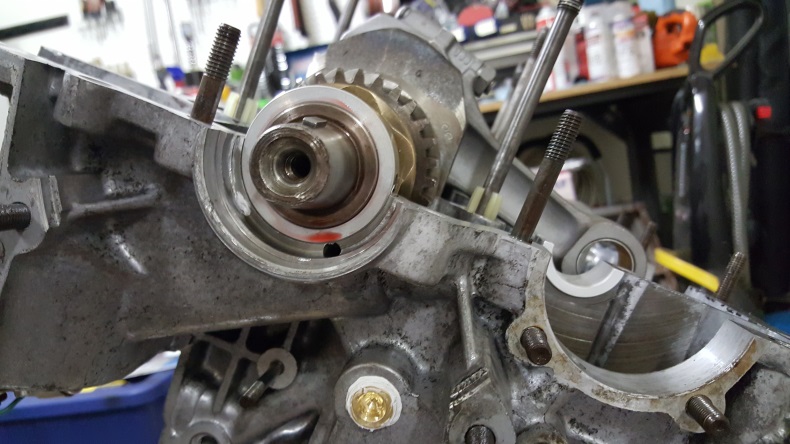
And make sure your timing mark is er, marked accurately.

FWIW, I have never had any luck whatsoever getting paint or powder or polish or anything to stick to a mag fan shroud long term.
Thanks Clatter! I feel like I've cleaned cleaned and more cleaned! I would like to add a tip for anyone who might not know: I wanted to make sure the oil galleys were clear of metal debris, so I took both case halves outside and used a garden hose to flush them out. Sure enough, there were several pieces of metal chips/flakes that were large enough to make me glad for flushing them :shock:

Oh, and yep, got the whole assembly balanced. Crank/flywheel/pressure plate/fan, and bolts. And rods and pistons balanced.

So, question...

I just got both case halves mated, with a thin coat of Permatex form a gasket. I put my flywheel on so I could more easily rotate the crankshaft to check for any binding. So....how easily should it turn? Mine turns, and doesn't feel like it's binding. But it does feel tighter than it did when turning it prior to both case halves being on it (which sounds completely reasonable, but...I'm just a bit paranoid at the moment).
User avatar
analogtherapy
Posts: 80
Joined: Sat Apr 22, 2017 6:45 am

Re: T4 Tear Down / Rebuild in Jax FL

Post by analogtherapy »

I'll add this: In Jake Raby's video he turns his using the rotor on the distributor. Mine won't do that.

I can turn it using just the fan hub. It's not what I would call an "easy" turn, but I can turn it with one hand.

I'm pretty sure that I seated the bearing dowels correctly. I took photos at the time showing the front and rear main bearings seated as far as they could go. If these were seated correctly, I would think that both of the two other bearings were seated correctly as well (or the case itself wouldn't seal correctly/cleanly). Is that a reasonable conclusion?

Image

Image

FYI: The crank journals only got a polish, and the bearings are STD inners, .020 outer. Case received an align bore of .020.
Last edited by analogtherapy on Thu Apr 26, 2018 9:28 am, edited 1 time in total.
User avatar
analogtherapy
Posts: 80
Joined: Sat Apr 22, 2017 6:45 am

Re: T4 Tear Down / Rebuild in Jax FL

Post by analogtherapy »

Update: I removed all case hardware, and separated the halves.

I noticed some faults right off the bat.

1) I had applied a bit too much form-a-gasket near the cam plug, and some had worked its way into the closest cam bearing.

2) The No 1 main bearing seemed a bit sluggish to turn by hand. It's possible that some of the form-a-gasket worked it's way into it as well. I'll clean it up, and give it a fresh coat of lube. BTW, I'm using Ultra Slick Engine Lube.

3) I think this may be the real issue: I had a local shop press on the crankshaft gears. When they did this, they put the No 3 main bearing on, and used white grease. I thought the white grease was too thick, and it made the bearing a bit harder to spin compared to the others. So I poured a bit of Ultra Slick into the bearing. But it seems to have made it tackier, because just trying to spin that bearing is noticeably more difficult than the others.

So, is there any way to flush the white grease out, and start fresh without having to have the shop pull the gears and remove the bearing? If not, I guess I'll be making another trip there.
User avatar
sideshow
Posts: 3428
Joined: Mon Oct 27, 2003 11:00 am

Re: T4 Tear Down / Rebuild in Jax FL

Post by sideshow »

White grease is not a bad choice, a classic in the industry. Any of the aftermarket super-ultra-bling-lube I notice to have a high film strength, I see no harm in minor amounts being used. Unless it is going into storage, plain oil works fine on the crank.

Any aerosol spray oil will flush a lot of it out, marvels mystery is a favorite of mine. But why?

And no signs of "new" dowel pin dents typically means it seated ok, but look to make sure after the line bore that the case side of the hole is deep enough to prevent pinching.
Yeah some may call it overkill, but you can't have too much overkill.
User avatar
Clatter
Posts: 2034
Joined: Sun Apr 28, 2002 1:01 am

Re: T4 Tear Down / Rebuild in Jax FL

Post by Clatter »

I'm kind of a nut for these things,
But with the bearings available today, you can never be too sure.
Main bearing tolerances these days are VERY suspect!
Don't think it's like the old days where you just install them..!

I put just the cam in, and torque the case bolts, and check (wack) it for end play and free turning all by itself.

Also put the crank in the bearings, no rods or cam, and check that way.

Obviously, with no glue, and also with just a bit of light oil.

I'd be blasting away all the white grease and lube you used with carb cleaner and compressed air.
(Not that there's anything wrong with white grease or the stuff you used)
You just want to get good feel.
Again, light oil..

Dowel pins can be too long,
The dowel pin hole in the bearing can be too shallow,
And, like 'Sideshow' said, the line-bore can make your pin holes shallow in the case.

So, be sure to check for a 'witness mark' where the pin might be pinching..
You might see it as a shiny, or silver spot on the bearing where it rides on the crank journal..

I even like to check the spin of the crank with the main case bolts at 5 or10 ft. lbs. or some other light number,
And make sure it's the same, or very close, to how it feels torqued to spec..

The mains are the hardest thing to get perfect now that bearing tolerances have gone to China junk random specs.

You might also consider using a plastigauge on the center main?

Also make sure the two halves of the center main are not proud of the case parting line.
Look and feel with a straightedge..
Torque the case halves with just the main shells in place.
look at the parting line to make sure the halves aren't being held apart.
It will look like the spread center main in the pic in my cheap junk build.
Have had to shave the ends of the center main shells at the parting line lately - sand the ends of the shells on wet/dry because they were too big/long..

Bearings can totally suck and blow sometimes nowadays.
Make very very sure you are not getting handed a steaming pile of 3rd world garbage disguised as bearings!
Speedier than a Fasting Bullet!

Beginners' how-to Type 4 build thread ---> http://shoptalkforums.com/viewtopic.php?f=1&t=145853
TZepeSH
Posts: 303
Joined: Tue Nov 02, 2004 10:55 pm

Re: T4 Tear Down / Rebuild in Jax FL

Post by TZepeSH »

How did you get that engine case so clean? I washed mine in the dishwasher and it is nowhere near so clean. I like your work!
User avatar
analogtherapy
Posts: 80
Joined: Sat Apr 22, 2017 6:45 am

Re: T4 Tear Down / Rebuild in Jax FL

Post by analogtherapy »

sideshow wrote: Tue Aug 15, 2017 8:49 pm White grease is not a bad choice, a classic in the industry. Any of the aftermarket super-ultra-bling-lube I notice to have a high film strength, I see no harm in minor amounts being used. Unless it is going into storage, plain oil works fine on the crank.

Any aerosol spray oil will flush a lot of it out, marvels mystery is a favorite of mine. But why?

And no signs of "new" dowel pin dents typically means it seated ok, but look to make sure after the line bore that the case side of the hole is deep enough to prevent pinching.
OK, thanks sideshow! Will do.
User avatar
analogtherapy
Posts: 80
Joined: Sat Apr 22, 2017 6:45 am

Re: T4 Tear Down / Rebuild in Jax FL

Post by analogtherapy »

Clatter wrote: Wed Aug 16, 2017 11:18 pm I'm kind of a nut for these things,
But with the bearings available today, you can never be too sure.
Main bearing tolerances these days are VERY suspect!
Don't think it's like the old days where you just install them..!

I put just the cam in, and torque the case bolts, and check (wack) it for end play and free turning all by itself.

Also put the crank in the bearings, no rods or cam, and check that way.

Obviously, with no glue, and also with just a bit of light oil.

I'd be blasting away all the white grease and lube you used with carb cleaner and compressed air.
(Not that there's anything wrong with white grease or the stuff you used)
You just want to get good feel.
Again, light oil..

Dowel pins can be too long,
The dowel pin hole in the bearing can be too shallow,
And, like 'Sideshow' said, the line-bore can make your pin holes shallow in the case.

So, be sure to check for a 'witness mark' where the pin might be pinching..
You might see it as a shiny, or silver spot on the bearing where it rides on the crank journal..

I even like to check the spin of the crank with the main case bolts at 5 or10 ft. lbs. or some other light number,
And make sure it's the same, or very close, to how it feels torqued to spec..

The mains are the hardest thing to get perfect now that bearing tolerances have gone to China junk random specs.

You might also consider using a plastigauge on the center main?

Also make sure the two halves of the center main are not proud of the case parting line.
Look and feel with a straightedge..
Torque the case halves with just the main shells in place.
look at the parting line to make sure the halves aren't being held apart.
It will look like the spread center main in the pic in my cheap junk build.
Have had to shave the ends of the center main shells at the parting line lately - sand the ends of the shells on wet/dry because they were too big/long..

Bearings can totally suck and blow sometimes nowadays.
Make very very sure you are not getting handed a steaming pile of 3rd world garbage disguised as bearings!
Lot's of good suggestions. Thanks Clatter. I'll be giving it another go in the next couple of days, and will report back.
User avatar
analogtherapy
Posts: 80
Joined: Sat Apr 22, 2017 6:45 am

Re: T4 Tear Down / Rebuild in Jax FL

Post by analogtherapy »

TZepeSH wrote: Wed Aug 16, 2017 11:34 pm How did you get that engine case so clean? I washed mine in the dishwasher and it is nowhere near so clean. I like your work!
Haha! Thanks! Yea this was a multi-stage cleaning. Pre-machine work, it was 1) engine de-greaser and a scrub brush. 2) pressure washer. Then the machine shop gave it a bath, and after that, it got a run in the house dishwasher. :D
User avatar
analogtherapy
Posts: 80
Joined: Sat Apr 22, 2017 6:45 am

Re: T4 Tear Down / Rebuild in Jax FL

Post by analogtherapy »

Well, after a few test mockups, I believe I may have determined the reason for the tight rotation of the crank I was experiencing after partial assembly (cases bolted together): tight fitting cam bearings. After fitting, and turning the crank/cam over multiple times by hand, shiny polished spots can be seen on the cam bearings. When placing the cam into the thrust side of the case (case open) the cam spins freely. When joining both case halves and only lightly tightening the 6 through bolts by hand, the cam is noticeably tighter and does not spin freely.

Here are shots of the problem bearings (the ones with the larger polished areas):

Image

Image

My question is: what's the best way to go about smoothing these out and getting a better fit? I've read that using a small amount of fine lapping compound in the bearing saddles, and then spinning the cam and allowing the cam to do the work is one way. Using emory cloth by hand is another.

Thoughts?
Last edited by analogtherapy on Thu Apr 26, 2018 9:29 am, edited 1 time in total.
User avatar
Lo Cash John
Posts: 1089
Joined: Thu Jun 14, 2001 12:01 am

Re: T4 Tear Down / Rebuild in Jax FL

Post by Lo Cash John »

Just for kicks, have you thought about trying a different set of bearings first? Always try to replace or modify the part which is disposable or cheapest to replace should you F-up.
User avatar
Piledriver
Moderator
Posts: 22520
Joined: Sat Feb 16, 2002 12:01 am

Re: T4 Tear Down / Rebuild in Jax FL

Post by Piledriver »

I'd also take a mic to the cam and see where the issue lies.
Is there any dirt or corrosion behind the bearings?
Was the block welded to fix the oil pickup bolt "syndrome"?
Is there any evidence that someone partially pooched it ala same "syndrome?
Addendum to Newtons first law:
zero vehicles on jackstands, square gets a fresh 090 and 1911, cabby gets a blower.
EZ3.6 Vanagon after that.(mounted, needs everything finished) then Creamsicle.
User avatar
analogtherapy
Posts: 80
Joined: Sat Apr 22, 2017 6:45 am

Re: T4 Tear Down / Rebuild in Jax FL

Post by analogtherapy »

Lo Cash John wrote: Thu Sep 28, 2017 8:59 am Just for kicks, have you thought about trying a different set of bearings first? Always try to replace or modify the part which is disposable or cheapest to replace should you F-up.
Hey man! Yea, I've ordered a different brand of bearings, just waiting on them to arrive at this point.
User avatar
analogtherapy
Posts: 80
Joined: Sat Apr 22, 2017 6:45 am

Re: T4 Tear Down / Rebuild in Jax FL

Post by analogtherapy »

Piledriver wrote: Thu Sep 28, 2017 6:59 pm I'd also take a mic to the cam and see where the issue lies.
Is there any dirt or corrosion behind the bearings?
Was the block welded to fix the oil pickup bolt "syndrome"?
Is there any evidence that someone partially pooched it ala same "syndrome?
No dirt, and no visible evidence of a T4 syndrome fix.
User avatar
Clatter
Posts: 2034
Joined: Sun Apr 28, 2002 1:01 am

Re: T4 Tear Down / Rebuild in Jax FL

Post by Clatter »

If a different set of bearings doesn't do the trick..
(make sure they are different - lots of places sell the same stuff).

You can open the bearings up on the ID slightly with fine steel wool.

More common is oversized cam journals, as was said before.
Have seen people take a thou or two off of the cam OD a couple of times now.
Use different grits of emery cloth for this - easier on a lathe for sure.
Take it down close to size with rougher grits, then polish to a fine shine.

See why this is so much harder to do now?
Used to be that you just put these together!
Now, you have to check, and often adjust, everything.
Speedier than a Fasting Bullet!

Beginners' how-to Type 4 build thread ---> http://shoptalkforums.com/viewtopic.php?f=1&t=145853
Post Reply