Page 3 of 4
Re: My '74 2.0 Restoration introduction...
Posted: Wed Dec 30, 2015 9:21 am
by falcor
Engine harness done.
Oil pressure on cranking 1 bar.
Spark on all four cylinders. (and my new timing light was DOA)
Re: My '74 2.0 Restoration introduction...
Posted: Thu Dec 31, 2015 6:22 am
by aircooledtechguy
falcor wrote:Engine harness done.
Oil pressure on cranking 1 bar.
Spark on all four cylinders. (and my new timing light was DOA)
Don't toss out your light. I don't know why it is, but most inductive timing lights have a hard time sensing the pulse from an EDIS or COP (LS2) type coil through the spark plug wires. You usually have to use the power input wire going to the coil in the harness to get the signal, then is sees the signal and works just fine.
Trons; I don't understand them. . .

Re: My '74 2.0 Restoration introduction...
Posted: Thu Dec 31, 2015 8:14 am
by falcor
Thanks Nate, I'll check that tip next year...

Happy new year everyone!
Re: My '74 2.0 Restoration introduction...
Posted: Fri Jan 01, 2016 8:14 am
by falcor
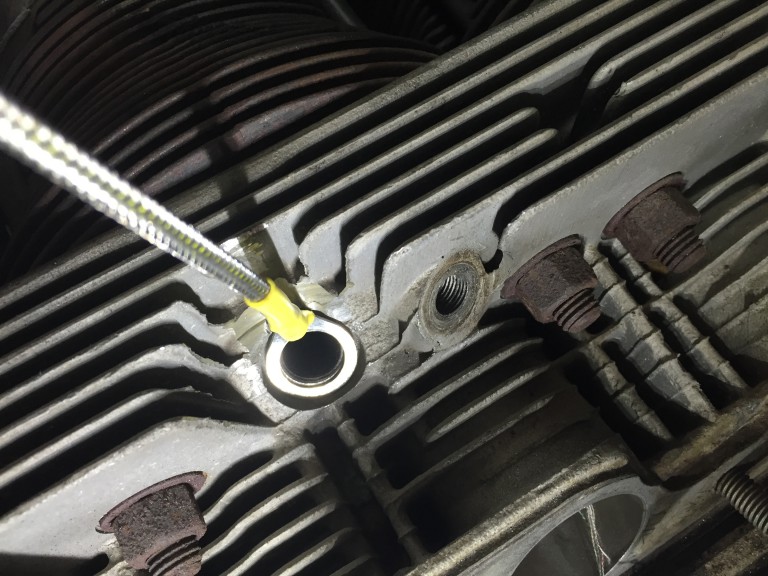
I've been sitting on two type K temp sensors for awhile pondering wether to put them on the engine this time round or wait till I build a new engine. Well with too much time on my hands today suddenly my engine had lost the engine tins (engine still in the car) and I dug out the dremel and started making a small cutout for the temperature sensor wiring at the top of the spark plug recess.
Re: My '74 2.0 Restoration introduction...
Posted: Mon Jan 04, 2016 9:22 pm
by falcor
Re: My '74 2.0 Restoration introduction...
Posted: Tue Jan 05, 2016 10:19 am
by aircooledtechguy
Looking good. Steady progress marching on. Your car is really coming together nicely.
Re: My '74 2.0 Restoration introduction...
Posted: Fri Jan 08, 2016 9:57 am
by falcor
Thanks Nate.

Re: My '74 2.0 Restoration introduction...
Posted: Sun Jan 17, 2016 9:42 am
by falcor
https://youtu.be/8FGpixyAc0w Its alive!

Granted firing it up revealed a few issues to be solved.
1. The new hi torque starter doesnt disengage quick enough, you can hear the slight whine in the beginning of the video till it disengages. Not sure what can be done to fix this.
2. Turning the key off doesnt kill the engine, it keeps running and I have to kill it via the laptop interface to the ecu. I'm not sure why this happens.
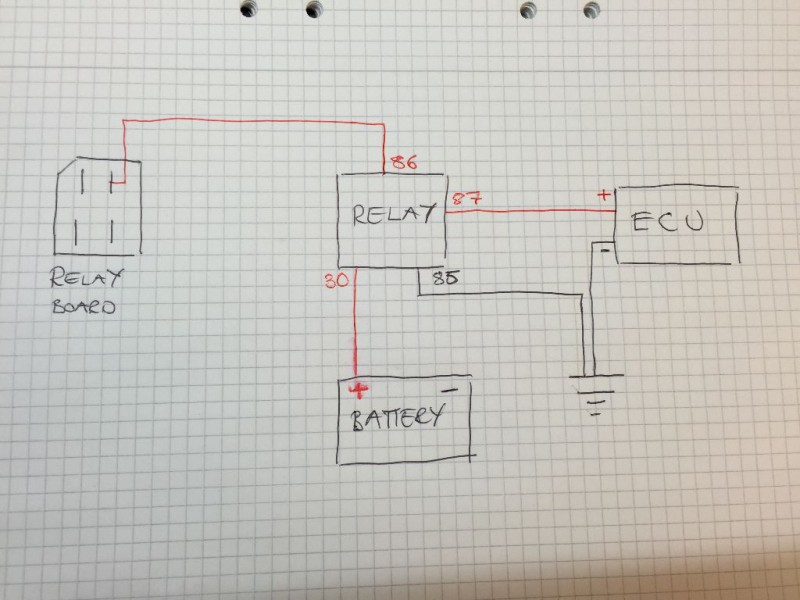
This is how I've hooked up the ecu, switched power from the post on the relay board to a separate relay that controls the power to the ECU.
3. Third issue is an oil leak from the left side valve cover. Sucks having to pull the heat exchanger down to get access and fix it. Do I need to drain the oil before removing the valve cover?
Re: My '74 2.0 Restoration introduction...
Posted: Sun Jan 17, 2016 10:46 am
by Piledriver
Something is up with the power, obviously: The setup in the ms manual works.
I would expect the relay board should do things precisely that way if wired properly.
IT would logically be supplying power to the ECU.
(I skipped the relay board as I like to see how its wired and use standard parts store relays)
The ECU power must be isolated by its own main relay controlled by the key.
That relay can control the other relays + side of their coils, enabling them.
ECUs only pulls to ground to control things, but in the "off' state the I/Os is "not defined" can pull enough current to turn on a relay if it has coil power applied, thus the need to isolate the 12v to the relay control coils.
(This is a common scenario, not just MS ECUs)
The switched power from the ignition switch should power a main relay, which should apply power to the MS, relay coil + for the fuel pump and ignition coil power coils only when key on.
I have 4 relays mounted: Main, ign coil power, AC clutch, injectors and a spare.
I have 12 ga power feeds to the main and the ign relay direct from the battery, the fuses are post relay, but pre-relay is probably more ideal.
***************
You should never have to drop the HX to pop the valve cover off.
You may have the bail on upside down if it isn't clearing, if you look carefully at the bail design the middle section will lay flat on the HX when down if on right.
An alternate method is to use a long screwdriver and pop the end of the bail out of its hole in the head after unlocking it, and then removing the bail. This is sometimes easiest.
The valve cover may just need gently pried up/down/sideways a bit to seat (with bail on), some heads or the covers may need some "adjustment"... In particular, AMC heads gasket surfaces sometimes run a tad large.
Re: My '74 2.0 Restoration introduction...
Posted: Sun Jan 17, 2016 11:05 am
by falcor
I'm not running MS but Maxxecu....the Maxxecu is controlling the stock 914 fuel pump relay on a dedicated output channel.
The relay in the sketch powers up a separate fuse box that powers both the ecu and supplies +12v to the LS2 coils.
The relay board in the sketch is the stock 914 engine bay board and the pin there has switched power but something seems to be causing it to have permanent
power aslong as the alternator is charging it seems?
Re: My '74 2.0 Restoration introduction...
Posted: Sun Jan 17, 2016 11:15 am
by Piledriver
OK, but the basic explanation still applies, the ECU power and other relays + side needs an ign key controlled isolation relay so NONE of them have +12v control power to their relay coils when ECU power is off.
Any ECU I/Os (~always pull to ground to control things) are "undefined" when its off or while initializing, so the "main relay" setup works as a master control power kill to all other relay coils under ECU control.
If they have no relay coil power, they cannot backfeed the ECU via the relays I/O line.
(potentially very bad for the ECU if they do)
The ECU MUST get power first, even if only by a few milliseconds.
The MS2extra or MS3 install schematic shows what's needed.
Your ECU installation schematic should be very similar electrically.
Re: My '74 2.0 Restoration introduction...
Posted: Mon Jan 18, 2016 8:09 am
by falcor
http://forums.pelicanparts.com/porsche- ... -stop.html
This is exactly the problem I'm having, alternator is backfeeding thru the alternator light and keeps the power relay pin energized.
Pressing the brake pedal kills the engine....lol
Re: My '74 2.0 Restoration introduction...
Posted: Tue Jan 19, 2016 3:40 am
by Piledriver
That need a 5 cent diode to fix, just goes in the line with heatshrink over it all.
IIRC the lamp is grounded to the marked end of the diode points at the lamp IIRC, but it's late.
(current moves from - to +, as electrons have a - charge)
The as-drawn schematic would likely do same without the isolation relay as described, but the brake light does indicate the main issue.
Re: My '74 2.0 Restoration introduction...
Posted: Tue Jan 19, 2016 4:31 am
by falcor
Got the diode on my lunch break. Will try to get it installed tonight and report back.
Re: My '74 2.0 Restoration introduction...
Posted: Tue Jan 19, 2016 10:36 am
by falcor
Diode mod worked perfectly.