Lee's ride
-
ntsqd

- Posts: 2291
- Joined: Tue Jan 30, 2007 11:58 am
Years ago I ran into a similar thing w/ my 'glas body. This is the reason that I always wanted to do away with the mounting flange altogether. My idea was to raise the pan's flange up to about the rear 'shelf' of the body over the t/a, and fill in btwn the original flange & the new flange with a trestle-like square tube structure - then skin it with light gauge sheetmetal welded on.
Cross-threaded is tighter than Lock-tite
-
jweir

- Posts: 401
- Joined: Mon Apr 06, 2009 8:35 am
Re: Lee's ride
Thanks for posting this up Lee! I followed your advice by cutting the kerfs on the inside of the "moon" piece and extending the side rails to the end of the pan. Using two bits before the step bit made the step bit drill alot easier as well. The most labor went into the "moon" piece for sure, probably 12-14 hrs. I used 2" exhaust tubing and I still had to open up the back end to fit the nose piece of the tranny.
You do not have the required permissions to view the files attached to this post.
-
Ol'fogasaurus
- Posts: 17760
- Joined: Mon Nov 13, 2006 10:17 pm
Re: Lee's ride
Jweir, I am delighted to hear that the string was of value to you. I am currently making another body lift (http://www.shoptalkforums.com/viewtopic ... lack+buggy and I am doing it similar to how you approached your lift; e.g. leaving the side rails long in the rear and making the rear cross pieces the shorter ones. I am not sure which, if any one of them is the best way to go but the job you have done looks pretty darn good. Congratulations on attacking and, especially, finishing your first body lift.
(chatter) I did some other things different on the pan I am now working on such as the four holes (shown in posts in the URL above) were made so there was a stud plate and pin allowing the stud plate to float around the slots in the body. I am using the EMPI lower beam supports and I added the bolts to ease fitment. I also put studs (no through bolt hole, only in the lower tube surface) in place of the normal body bolts in the rear of the lift as the body I have does not, nor cannot use the rear holes because of the way the body is molded. So far, it has worked out OK but I am now almost at the point of welding the lift together. The bolts fit very tight in the pan’s body mount support channel I made. It had “crush sleeves” added and does not allow a whole lot of jockeying around. It could turn out to be not one of the best ideas I have been given but it may turn out OK too; too soon to tell.
The idea of vertically cutting and raising the upper part of the tub is one way I also considered but I have not done much fiber glassing and especially, not of the magnitude needed for this task. Also, either the pan needs to be strengthened along the outer body mount perimeter (like I did in the above URL) or a bridged tube frame has to be built. There are now several bodies (or at least one) where the fenders have been raised four inches. I was sent something that said; according to the Manx club, a four inch lift is the ideal height to have. I am not sure about that figure unless they were talking about swing axles only; this is because I still have to use the stock bump stops in the rear to keep the tires and body separated. I do not have access to the full compression travel available because of the body (fenders) being in the way. I forget just how much travel I lose but it is enough to cause thought about.
I once saw photos of a glass buggy with what looked like a lift that had to be a foot high. Looked weird to say the least but if it had long travel suspension….
I think if I were to build another, dedicated off-road, glass buggy, I would again use an older buggy body, section it and add the filler piece to the tub portion to raise the fenders/top half of the body then build a tubular, or maybe a rectangular tube, frame. I would add some lift to the frame also as a round tube would need to have some support, besides the cage to keep it from flexing around the perimeter of the pan/frame too much. To use a stock pan is one heck of a lot of extra work and you are still limiting yourself interior wise by the pan’s tunnel.
From what I think I know now; it is only for the pan’s serial number on the tunnel and the matching title that dictate the use of the pan in an off-road build. Think of how much extra seating and foot room that the tunnel takes up.
Lee
-
Ol'fogasaurus
- Posts: 17760
- Joined: Mon Nov 13, 2006 10:17 pm
Re: Lee's ride
http://www.shoptalkforums.com/viewtopic.php?t=105659
I haven’t posted on my blue buggy for a long time, 2006 to be exact and a lot has happened to it since. I had a front beam modified to have adjusters added as I was told it was a big deal which is what I was under the impression of when I started my beam build http://www.shoptalkforums.com/viewtopic ... 8&t=136514; a lot of the extra I did was partly because of this and partly because of who I am; e.g., partly anal on some things.
I also changed shock absorbers from Monroe/NAPA in front (Nissan Pulsar “post and eye” style rear shocks on the ball-joint beam) and white KYBs in the rear. They worked OK until I got into a situation where I over taxed them and they proved not worth having on the buggy. After doing a bunch of research I ended up with some Bilstein 6100 series of shocks at all four corners. I have since been in similar situations where the other shocks failed and the Bilsteins worked great.
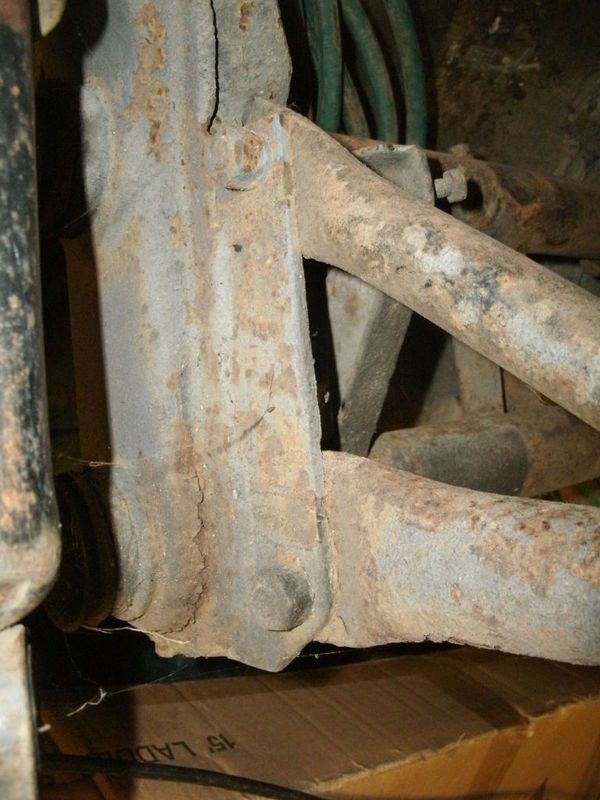
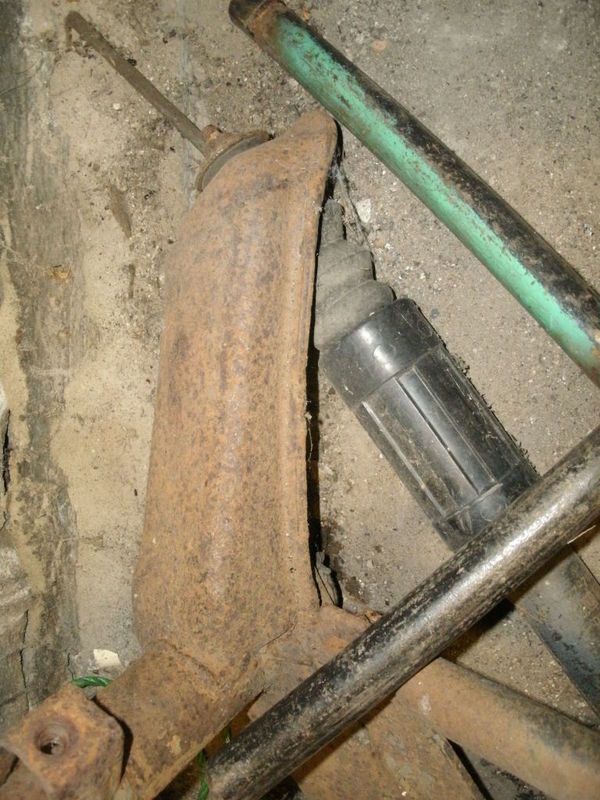
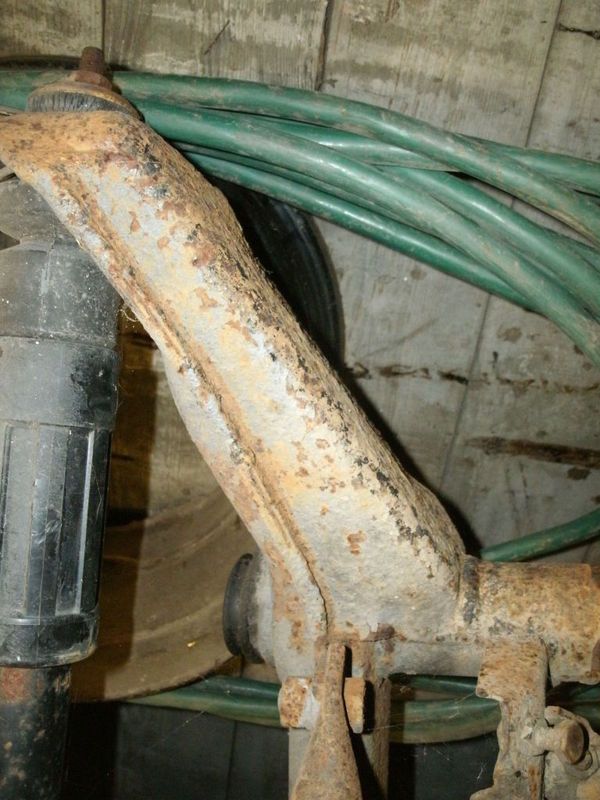
Getting back to the beam build: the beam I started working on turned out to be rotting out from the inside so I had to abandon it. I had the hook and pin stops in place, welded up the seams on the towers and had done some fixing of rust. During the welding of the seams I found more rust coming through and that kept on and on. I finally took a small hammer to the metal and by tapping with the round end (ball-peen or pick style body hammer) I found some solid area and some dead areas which meant that there was going to be some more rust ho I had just finished adding the adjusters in and started putting the spring packs in when the rust problems came to light. I have since started on another beam I have laying around but I did inspect this one better than the other one before I started.
I am going to use Thing trailing arms and spindles for the strength (see the beam build for description here) and there was a discussion on the Thing beam and I found out from birddog1148 that the Thing beam I had seen was missing parts.
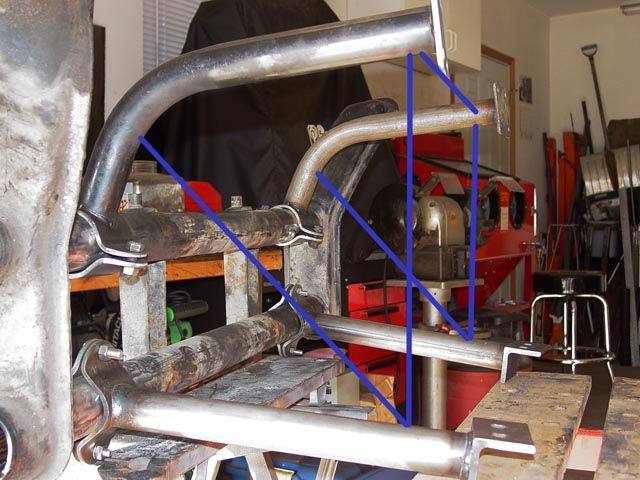
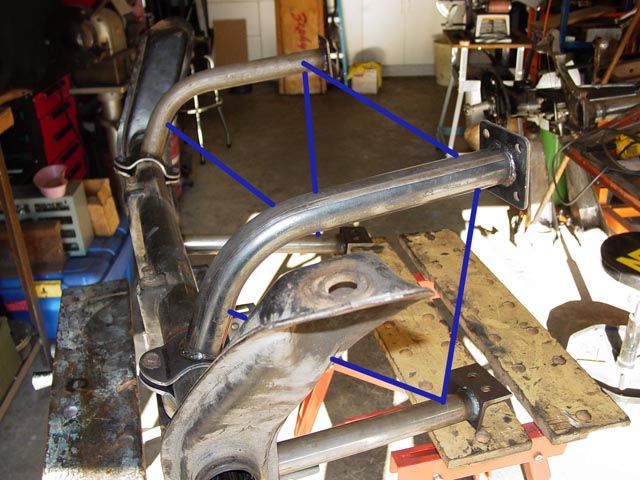
If I use the lower arm that Bugpack sells these are the two options I have.
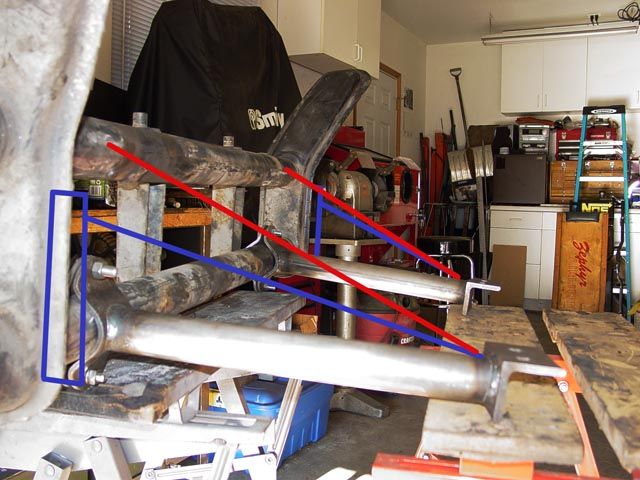
The blue lines are loosely based on what the Thing engineers did and the red line is based on available clamps and tube similar to the Thing engineers design. What I don’t like about it is that all the outside loading goes down to the two bolts under the pan and they are in slotted holes on the bracket and the pan.
 http://www.berrienbuggy.com/oldsite/id63.htm
This is the pan Barrien sells; I like this idea so I am (currently) planning on something like this.
 http://www.manxchassis.com/
This is the Dave Barrett pan which I also like but I already have the Bugpack parts so I am heading in that direction.
The upper tube will fasten to a bracket on the other side of the fire wall and that will be connected to the front hoop by a tube with a disconnect located close to the front hoop so the cage can be taken out easily if necessary.

This is what I am planning on using for the disconnect.
Lee
Edited to add info on the Barrien and the Barrett square tube pans.
I haven’t posted on my blue buggy for a long time, 2006 to be exact and a lot has happened to it since. I had a front beam modified to have adjusters added as I was told it was a big deal which is what I was under the impression of when I started my beam build http://www.shoptalkforums.com/viewtopic ... 8&t=136514; a lot of the extra I did was partly because of this and partly because of who I am; e.g., partly anal on some things.
I also changed shock absorbers from Monroe/NAPA in front (Nissan Pulsar “post and eye” style rear shocks on the ball-joint beam) and white KYBs in the rear. They worked OK until I got into a situation where I over taxed them and they proved not worth having on the buggy. After doing a bunch of research I ended up with some Bilstein 6100 series of shocks at all four corners. I have since been in similar situations where the other shocks failed and the Bilsteins worked great.
Getting back to the beam build: the beam I started working on turned out to be rotting out from the inside so I had to abandon it. I had the hook and pin stops in place, welded up the seams on the towers and had done some fixing of rust. During the welding of the seams I found more rust coming through and that kept on and on. I finally took a small hammer to the metal and by tapping with the round end (ball-peen or pick style body hammer) I found some solid area and some dead areas which meant that there was going to be some more rust ho I had just finished adding the adjusters in and started putting the spring packs in when the rust problems came to light. I have since started on another beam I have laying around but I did inspect this one better than the other one before I started.
I am going to use Thing trailing arms and spindles for the strength (see the beam build for description here) and there was a discussion on the Thing beam and I found out from birddog1148 that the Thing beam I had seen was missing parts.
If I use the lower arm that Bugpack sells these are the two options I have.
The blue lines are loosely based on what the Thing engineers did and the red line is based on available clamps and tube similar to the Thing engineers design. What I don’t like about it is that all the outside loading goes down to the two bolts under the pan and they are in slotted holes on the bracket and the pan.
http://www.berrienbuggy.com/oldsite/id63.htmThis is the pan Barrien sells; I like this idea so I am (currently) planning on something like this.
http://www.manxchassis.com/This is the Dave Barrett pan which I also like but I already have the Bugpack parts so I am heading in that direction.
The upper tube will fasten to a bracket on the other side of the fire wall and that will be connected to the front hoop by a tube with a disconnect located close to the front hoop so the cage can be taken out easily if necessary.
This is what I am planning on using for the disconnect.
Lee
Edited to add info on the Barrien and the Barrett square tube pans.
-
Ol'fogasaurus
- Posts: 17760
- Joined: Mon Nov 13, 2006 10:17 pm
Re: Lee's ride
On the last trip to the dunes I mentioned that I had lost the RR brake on my buggy. I went to bleed the brakes as they didn't feel right; I started on the RR and I got a hard pedal and a couple of dirty drops of brake fluid into the catch bottle. The LR wasn't much better but the turning brake handle did work OK. On the RR things were locked up. Since I had had troubles with the RR before the final guess was that the RR caliper was bad so after the last trip I spend $80+ globnicks on a early type III rear caliper.
I finally got around to putting the caliper on today and when we went to bleed the brakes things were worse so I went into town and picked up a double handle turning brake ($176) and while there the owner (of The Bug Germinator mentioned the soft likes; *^%&Y*. how many times nave I mentioned that to others
I went home and pulled the hard line off the caliper and yup, that was it; when the brake was pressed or the turning brak handle was applied nothing. I had a soft line here and changed it out and wha-la, the brakes are back.
I think the last time the soft lines were changed was back in the mid-90s/
Lee
-
Ol'fogasaurus
- Posts: 17760
- Joined: Mon Nov 13, 2006 10:17 pm
Re: Lee's ride
There has been a lot of discussion regarding this buggy on my other build. I think I need to move some of the discussion over here (cross-reference) and maybe start another thread on the Kit Car forum as it could have some affect on what kit car builders might look into assuming what I want to do works (it may not but I have to look into the idea).
Regarding side impact protection I am going to try something new but I still have a lot of research to do on it assuming that it is possible. It will require some new tools ( ) and learning how to use them and how to use them best.
I also plan, at the next time down at the dunes, to take some relationship pictures with all kinds of toys down there as compared to my sand only buggy (not fully street legal anymore).
Anyway, this is a reopening of this thread... for what it is worth.
Regarding side impact protection I am going to try something new but I still have a lot of research to do on it assuming that it is possible. It will require some new tools (
I also plan, at the next time down at the dunes, to take some relationship pictures with all kinds of toys down there as compared to my sand only buggy (not fully street legal anymore).
Anyway, this is a reopening of this thread... for what it is worth.
-
bajaherbie

- Posts: 9959
- Joined: Sat Jul 15, 2006 7:07 pm
Re: Lee's ride
1. just don't call 'em treebars
2. I would rather have the impact a few inches away from my seat , not right next to my side.
3. your double panel sounds interesting but I bet "the side impact bars" would be stronger. (notice I didn't call them treebars?)
4. its just fiberglass, drill a hole. but making them removable would take more fab work.
7. the bottom tube could be angled up a few degrees to help combat the bottoming out.
Of all the paths you take in life, make sure a few of them are dirt.
-
Ol'fogasaurus
- Posts: 17760
- Joined: Mon Nov 13, 2006 10:17 pm
Re: Lee's ride
1) Herbie, I am not sure if you noticed but we have more than a few trees around here.bajaherbie wrote:1. just don't call 'em treebars
2. I would rather have the impact a few inches away from my seat , not right next to my side.
3. your double panel sounds interesting but I bet "the side impact bars" would be stronger. (notice I didn't call them treebars?)
4. its just fiberglass, drill a hole. but making them removable would take more fab work.
7. the bottom tube could be angled up a few degrees to help combat the bottoming out.

The tree I nailed here is not around anymore as too many toys have had it jump out at them either going up (most common) or down the dune access road. I don'[t ride this trail any more as the quads cannot follow the rules and not only tear up and down the access but as fast as they can go. There have been many collisions here between quad and quads and quads and rails. A girl was almost killed at the opening when some quads came flying out of the access road and hit her. It was touch and go for a while as to whether she would make it or not. All the rails that I am aware of who still use this access have tree bars with floors on them.
2) Me too but... see #1 and remember if they are set far enough out then it is possible that the jackknife entrance between the body and the cage made worse (remember, I am old and not that limber any more).
3) To make the side impact bars they are not only heavy but they guys put floors on them to give more shear support.
4) It is not quite that easy Scott. You need to have fasteners and the seats would be in the way as the seats are as far to the rear as possible so I can work the pedals. Remember, like the rail guys, I basically sit on the floor so I am down pretty low now days.
Last edited by Ol'fogasaurus on Sun Sep 13, 2015 9:19 am, edited 1 time in total.
-
Ol'fogasaurus
- Posts: 17760
- Joined: Mon Nov 13, 2006 10:17 pm
Re: Lee's ride
Ok, lets try this for the 4th time this morning.
 '
'
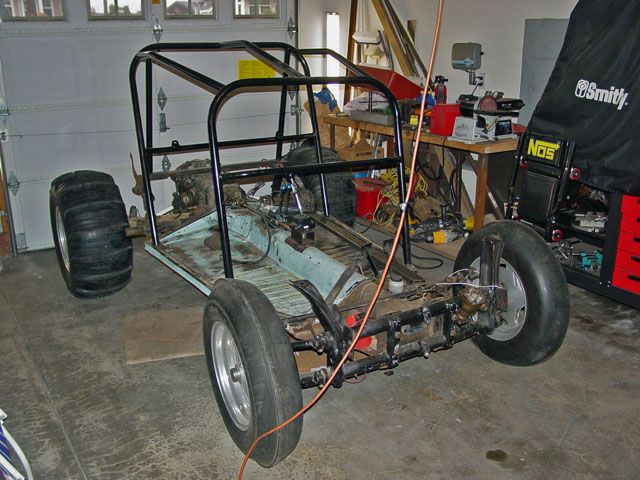
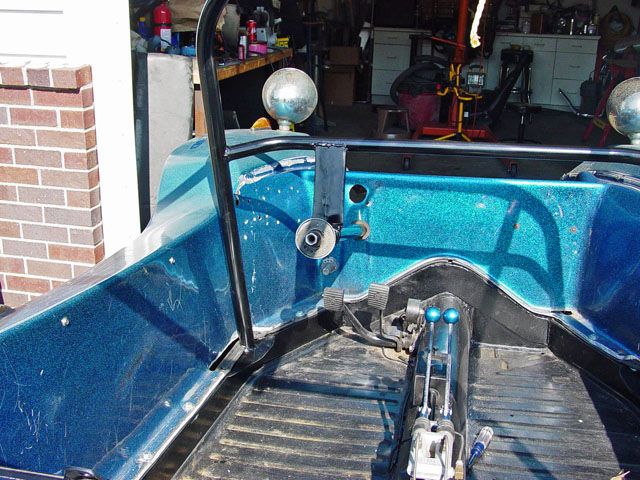
After the cage was built I tore the body off the pan to start a bunch of modifications; mostly to build the body lift.
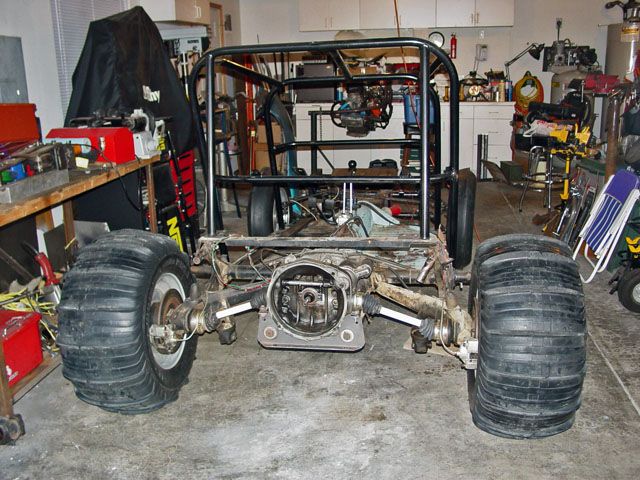
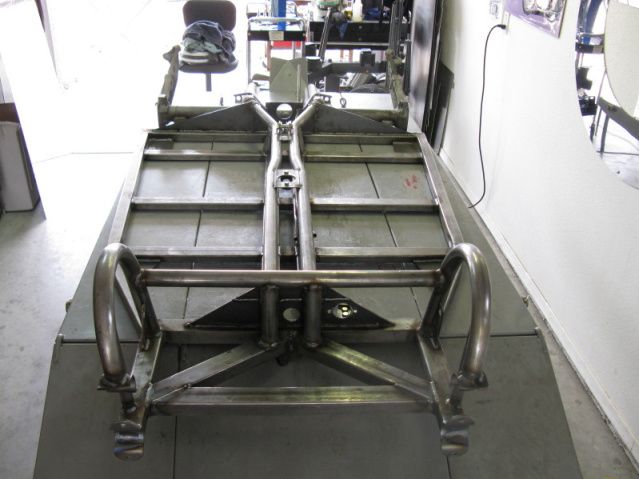
This shows the rear of the pan but what I wanted you to see was the extrusion that runs between the shock mount horns. This is how they used to do it back in the 90s and before.
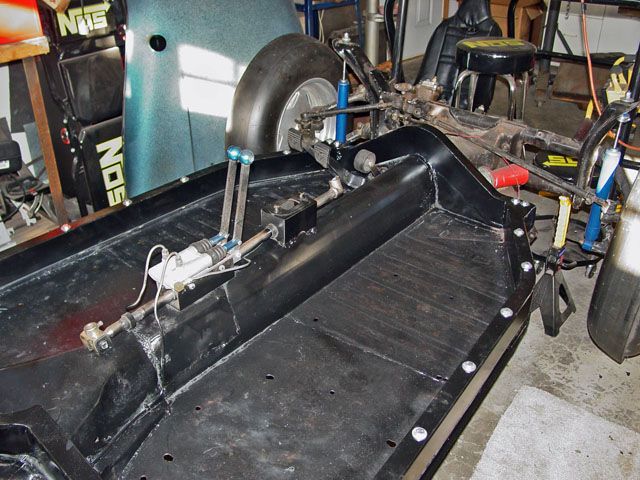
The body lift was completed....
And the cage was reunited with the pan but on top of the body lift. I had to make adapters for the rear down bars so they would fit back on top of the cross extrusion.
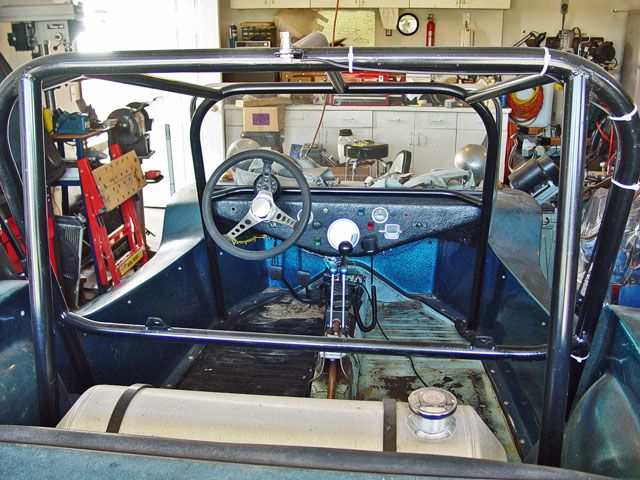
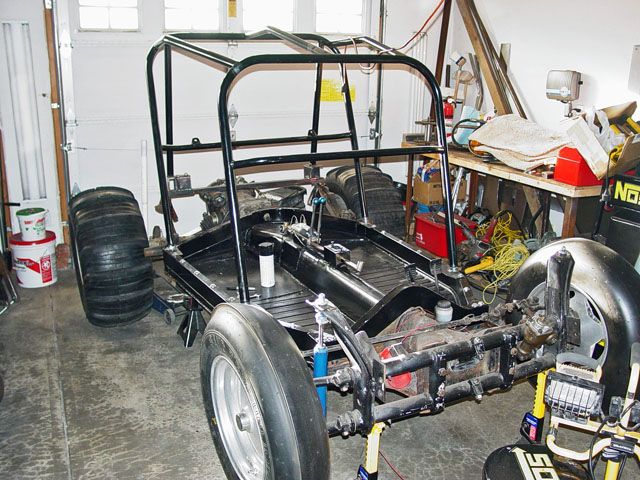
A shot of the cage in place.
This is how the A-pillar foot fits on the body lift. I had been told years ago that fiberglass does not like to be compressed so I cut the mounting flange away from where the cage fit to the body lift. I am still arguing with myself over that.
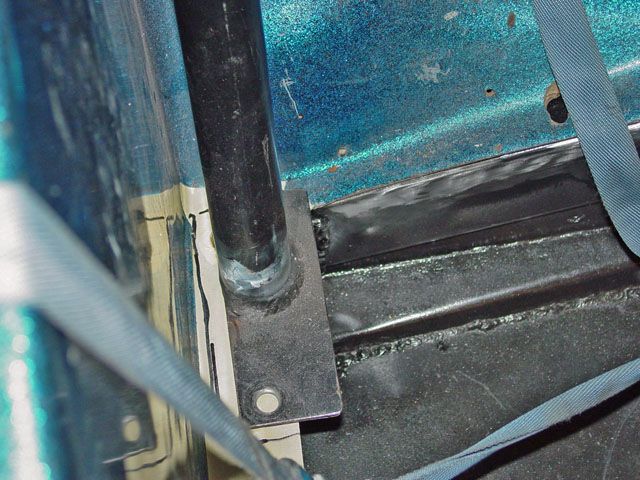
This shows the B-pillar mount. Were the black line on the tape is is where the foot fits on the body lift. You can get an idea in these two pictures just how close to the body the cage sits. I seem to remember that I could barely get my fingers between the body and the cage tubes.
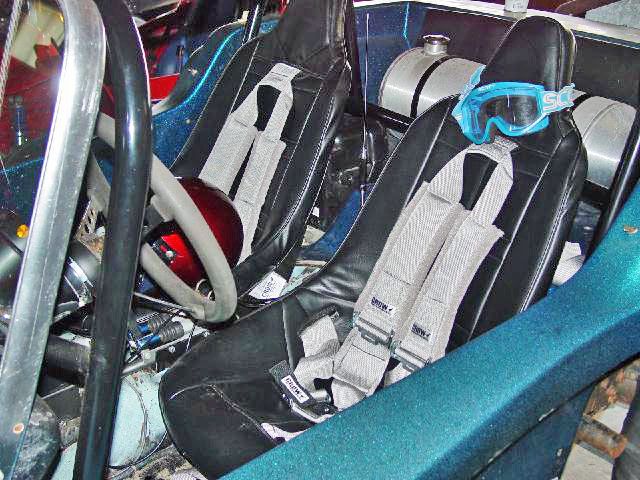
Again, just how close the seats fit to the body sides.
For what it is worth.
Lee
 '
'After the cage was built I tore the body off the pan to start a bunch of modifications; mostly to build the body lift.

This shows the rear of the pan but what I wanted you to see was the extrusion that runs between the shock mount horns. This is how they used to do it back in the 90s and before.

The body lift was completed....

And the cage was reunited with the pan but on top of the body lift. I had to make adapters for the rear down bars so they would fit back on top of the cross extrusion.


A shot of the cage in place.
This is how the A-pillar foot fits on the body lift. I had been told years ago that fiberglass does not like to be compressed so I cut the mounting flange away from where the cage fit to the body lift. I am still arguing with myself over that.

This shows the B-pillar mount. Were the black line on the tape is is where the foot fits on the body lift. You can get an idea in these two pictures just how close to the body the cage sits. I seem to remember that I could barely get my fingers between the body and the cage tubes.

Again, just how close the seats fit to the body sides.
For what it is worth.
Lee
-
Ol'fogasaurus
- Posts: 17760
- Joined: Mon Nov 13, 2006 10:17 pm
Re: Lee's ride
It dawned on my today that rectangular tube might be used instead of the proposed built-up stuff I have been talking about. I had some 1 X 2 rectangular tube at one time that might work. I will have to see what is available now days and do some measuring on the buggy seats vs. the side of the buggy for clearance.
I think I am still going to look into the bead rolled and joined flat stock as a back-up plan.
Lee
I think I am still going to look into the bead rolled and joined flat stock as a back-up plan.
Lee
-
uh60ce
Re: Lee's ride
Saw this on tos and thought of what you're trying to come up with.
If I were adding side impact protection to my buggy (hell, it doesn't even have roll over protection let alone side !) I'd probably run with something like that myself since I have the same problem your buggy appears to have ... no room between the seats and the body for the bars.
If I were adding side impact protection to my buggy (hell, it doesn't even have roll over protection let alone side
-
Ol'fogasaurus
- Posts: 17760
- Joined: Mon Nov 13, 2006 10:17 pm
Re: Lee's ride
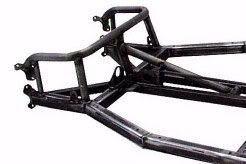
Larry, you just crossed the line... so-to-speak. Something like that would be the way to go but I don't think I have time left for that.  One of the reasons my black buggy is going down the road.
If I were to do a hand built chassis I... no, I don't want to start those thoughts as I have enough to think about and the wife wants me to stop buying tools to bend and cut metal with. I see so many things wrong with a tube chassis like that even with the bridgework... crap! here I go again.
Anyway, thanks for the pictures and trying to help but age is catching up with me (I'll know more later today) and starting a new project with a different body, for right now, is out of the question.
Lee
If I were to do a hand built chassis I... no, I don't want to start those thoughts as I have enough to think about and the wife wants me to stop buying tools to bend and cut metal with.
Anyway, thanks for the pictures and trying to help but age is catching up with me (I'll know more later today) and starting a new project with a different body, for right now, is out of the question.
Lee
-
uh60ce
Re: Lee's ride
I didn't realize being helpful was crossing a line....
shows what I know. ..
I just liked how it sat close to the body and looks like it could be done as an add on to an existing cage, kinda like tree bars, only close in.
shows what I know. ..
I just liked how it sat close to the body and looks like it could be done as an add on to an existing cage, kinda like tree bars, only close in.
Last edited by uh60ce on Tue Sep 15, 2015 2:27 pm, edited 1 time in total.
-
bajaherbie
- Posts: 9959
- Joined: Sat Jul 15, 2006 7:07 pm
Re: Lee's ride
That's what I suggested originally... not as extreme but close to the body like that. Wouldn't knock your shin on them and wouldn't drag on the ground when stuck in the sand.
Of all the paths you take in life, make sure a few of them are dirt.
-
Steve Arndt
- Posts: 7404
- Joined: Sat Mar 10, 2001 12:01 am