I sent my copper Hurst bus shifter to a guy in Florida and he shortened it by several inches. My shift shaft is above the tunnel and the new shifter height makes it about 2" above my single handle turning brake handle. I would have install dual handles but there isn't much room between the seats.
Sent from my SM-G920R4 using Tapatalk
Ol'fogasaurus black buggy
-
bajaherbie

- Posts: 9959
- Joined: Sat Jul 15, 2006 7:07 pm
Re: Ol'fogasaurus black buggy
Of all the paths you take in life, make sure a few of them are dirt.
-
Ol'fogasaurus
- Posts: 17758
- Joined: Mon Nov 13, 2006 10:17 pm
Re: Ol'fogasaurus black buggy
Thanks Herbie! The distance between the seats is part of the problem as well as the long ~6" of seat travel.bajaherbie wrote:I sent my copper Hurst bus shifter to a guy in Florida and he shortened it by several inches. My shift shaft is above the tunnel and the new shifter height makes it about 2" above my single handle turning brake handle. I would have install dual handles but there isn't much room between the seats.
Sent from my SM-G920R4 using Tapatalk
The wet snow and mid-20s temperature here is gone but it is a cold wet, mid-30s day out and even though our garage is attached it isn't that warm inside it. I may head out later today, with the camera, and dissect the shifter.
My wife is watching the weather for her youngest son as he travels from the coast to Bend OR so she keeps talking to me about it. Can't get much done that way.
-
Ol'fogasaurus
- Posts: 17758
- Joined: Mon Nov 13, 2006 10:17 pm
Re: Ol'fogasaurus black buggy
I bit the big one and tore the EMPI shifter apart; I took several pictures. Again, Photobucket is not working with me again so as soon as I can get it to I will post pictures. It might be that I am using a Jetpack from Version (we travel a lot so it works best for us except for this anyway) and it doesn't work fast enough to work with "the bucket".
The Hurst/EMPI/Latest Rage shifter is very simple and well thought out. Its funny, I had a LR trigger shifter and this EMPI shifter one on a rail and the other on my blue buggy. When the rail was to be sold I switched them back and forth a couple of times to see which one I would keep. The funny thing is that they are basically the same but one worked better on the buggy and the other worked better on the rail... go figure! My LR shifter had the words HURST ground, but not completely, off.
What I did find out is that the shifter is not a tube but a rod with a channel milled down of the front of it plus it has a sleeve installed around it. It wouldn't surprise me that the bend is put in after the assembly of the main components. It looks like I should be able to bend the bus shifter w/o too much worry.
I didn't seen any sort of welding so all the joins must be pressed together. The trigger unit slides down the track with a wire attached to it by a hook in the wire. The other end of the wire in turn is hooked to what looks like a washer with a slot carved in it for the other end of the wire to hook over. The two hold each other together tightly. There is a spring under the head of the washer and it sits on another washer with a protrusion in the side of it. The is for the spring to ride in on one end and the other end is on a flanged boss with a dimple in it to center the spring. The spring is loaded as you put the assembly together.
The washer that the wire from the trigger is hooked to rides on a gate that is attached to the mounting body and has a pin spring that causes the gate to close. You pull on the trigger and the gate lifts, let go of it and it is free to drop with the help of the pin wire of course. There is an arc on the gate that the washer rides on so no contact is lost during shifting.
The two nylon halves of the pivot hold the pivot pins on the ball in place and have some kind of lube on them. They are soft and easily damaged so you have to be careful to not only keep the shifter clean but putting heat to the rivets trying to get them off (guess how I found that out).
The pictures will help this make more sense and I think I will change the title of this string to something having to do with the pictures that I hope to post.
Lee
-
Ol'fogasaurus
- Posts: 17758
- Joined: Mon Nov 13, 2006 10:17 pm
Re: Ol'fogasaurus black buggy
Each time I think I have a way around the problem of bending the shifter handle it either gets expensive or I get wary of damaging the shifter to where its of no use.
I was getting ready to drain my compressor so while waiting for air to get out I went over to my buggy and climbed in it.
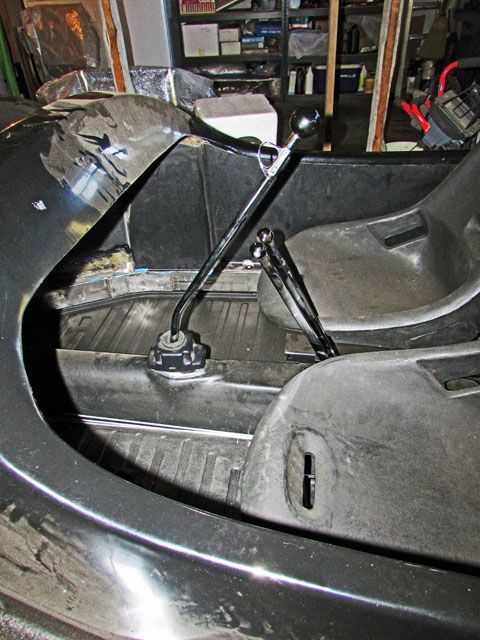
I moved the turning brake handles back to where they sit over the e-brake hole then played with the sifter. Where the seat is now I could move slide the whole assembly to the rear a spot or two and be OK with the shifter and the turning brake handle as shown. What I would have to do would be to limit the forward most point that the seat track would go then the problem with the seat hitting the side of the buggy would be diminished but hopefully it wouldn't be too much for the shorter people in the group.
Things would be a bit closer than I would like but that may not be all that bad either. I have to get things tightened down when we get back and go from there. Also, depending on where the seat has to go towards the center of the pan I might be able to get by with not having to make the remote mount for the turning brake cylinders. It still might be a good idea to keep the idea of the remote reservoir but there are "cons'" to it too. No matter what, it is going to be a close thing.
Lee
My opinion is worth slightly less than what you paid for it.
My opinion is worth slightly less than what you paid for it.
-
Ol'fogasaurus
- Posts: 17758
- Joined: Mon Nov 13, 2006 10:17 pm
Re: Ol'fogasaurus black buggy
I'm on hold for on this build for a while but still thinking about it. i am at odds with the steering connection problems so I am starting to look into a rack and pinion setup. I was told that the Geo Metro R&P was almost a bolt in swap but it is a side steer with a big angle for the connection.
I think, because I am going to be running a BJ beam and the fairly limited amount of suspension travel I will be getting... and using, that an end link box should be OK (steering geometry) but still have a couple of questions. At ~ $160 dollars for the Geo rack it is approaching the cost I am running into (and the unsurity of this being that it is/would be a critical but cobbled up hook-up of the steering to the box) of hooking up the stock steering box that i have been fighting with for a while; the big problem being the low approach angle of the steering shaft to the steering box because of the body's low hood/firewall (I hope this makes sense).
I have a universial that has 36 splines at one end and a smooth bore for a 7/8 steering shaft at the other end while the VW steering box is splined for 48 splines. To use the stock box it requires the box's input shaft to be shortened and a Mickey Mouse cobble up of the stock rag female connector to weld in adapter (this bothers me a lot!!!!) for the universal. The other way is to disassemble then take the steering box's worm gear shaft to a machine shop and have it resplined to 36 splines which is going to be big bucks (we're talking about a couple hunderd Globnicks here); if I break another steering box like i have done twice already this could get expensive.
A R&P with 36 splines in the input shaft seems to be fairly common in R&P boxes which would allow me to keep and use the universal I have, the matching "pillow block" (I may need another pillow block and universal but that is another problem to come) and the quick disconnect steering wheel adapter.
So... any thoughts or input would be appreciated and considered very strongly.
Thanks Lee
-
Piledriver

- Moderator
- Posts: 22520
- Joined: Sat Feb 16, 2002 12:01 am
Re: Ol'fogasaurus black buggy
I thought the center link Chevy J body R&P was the hot ticket.
Maybe that's for highway use....
Maybe that's for highway use....
Addendum to Newtons first law:
zero vehicles on jackstands, square gets a fresh 090 and 1911, cabby gets a blower.
EZ3.6 Vanagon after that.(mounted, needs everything finished) then Creamsicle.
zero vehicles on jackstands, square gets a fresh 090 and 1911, cabby gets a blower.
EZ3.6 Vanagon after that.(mounted, needs everything finished) then Creamsicle.
-
Ol'fogasaurus
- Posts: 17758
- Joined: Mon Nov 13, 2006 10:17 pm
Re: Ol'fogasaurus black buggy
Not sure what the Chevy J body is. I sold my 25th and last Chevy about 1967.
Update:
OK, spoke too soon: https://en.wikipedia.org/wiki/GM_J_platform
Thanks for the input. Now to get measurements on the rack and the beam plus the spline count
Lee
Update:
OK, spoke too soon: https://en.wikipedia.org/wiki/GM_J_platform
Thanks for the input. Now to get measurements on the rack and the beam plus the spline count
Lee
-
Ol'fogasaurus
- Posts: 17758
- Joined: Mon Nov 13, 2006 10:17 pm
Re: Ol'fogasaurus black buggy
Pile, have you used the "J" rack on a BJ bug beam before? After seeing all the different companies/models that use it I am less reticent on it's use in an off-road buggy.
If you have done this, how did you mount it to the beam?
Any mods to the frame head?
Thanks again for the input.
Lee
If you have done this, how did you mount it to the beam?
Any mods to the frame head?
Thanks again for the input.
Lee
-
Piledriver
- Moderator
- Posts: 22520
- Joined: Sat Feb 16, 2002 12:01 am
Re: Ol'fogasaurus black buggy
Only seen it used/mentioned here previously.Ol'fogasaurus wrote:Pile, have you used the "J" rack on a BJ bug beam before? After seeing all the different companies/models that use it I am less reticent on it's use in an off-road buggy.
If you have done this, how did you mount it to the beam?
Any mods to the frame head?
Thanks again for the input.
Lee
It has come up on several occasions, in the ORF.
Addendum to Newtons first law:
zero vehicles on jackstands, square gets a fresh 090 and 1911, cabby gets a blower.
EZ3.6 Vanagon after that.(mounted, needs everything finished) then Creamsicle.
zero vehicles on jackstands, square gets a fresh 090 and 1911, cabby gets a blower.
EZ3.6 Vanagon after that.(mounted, needs everything finished) then Creamsicle.
-
Ol'fogasaurus
- Posts: 17758
- Joined: Mon Nov 13, 2006 10:17 pm
Re: Ol'fogasaurus black buggy
Thank you for the good memory! I missed that I guess.
-
dustymojave

- Posts: 2312
- Joined: Mon Dec 01, 2008 9:08 pm
Re: Ol'fogasaurus black buggy
I think Pile is thinking of the rack for the Chevy Beretta/Corsica. That is a center-load rack used by several people and there are a number of threads about it here and on TOS. But to use it for a VW beam, the rack housing needs to be cut apart, the center part of the housing and rack flipped so the tie rod connections are on the other side. Then the housing needs to be TIG welded back together. Those racks are often available new for less than $100US.
Richard
Lake LA, Mojave Desert, SoCal
Speed Kills! but then...So does OLD AGE!!
Tech Inspection: SCCA / SCORE / HDRA / ARVRA / A.R.T.S. OffRoad Race Tech - MDR, MORE, Glen Helen BajaCup
Retired Fabricator
'58 Baja with 955K Miles and counting
Lake LA, Mojave Desert, SoCal
Speed Kills! but then...So does OLD AGE!!
Tech Inspection: SCCA / SCORE / HDRA / ARVRA / A.R.T.S. OffRoad Race Tech - MDR, MORE, Glen Helen BajaCup
Retired Fabricator
'58 Baja with 955K Miles and counting
-
Piledriver
- Moderator
- Posts: 22520
- Joined: Sat Feb 16, 2002 12:01 am
Re: Ol'fogasaurus black buggy
That one looks the same, later J body version hit came up first
Sounds like a lot of work... but may be worth it if you have a buddy that welds aluminum.
Knew I saw a how-to somewhere... I was considering this for the T3 until I found a very low mile factory steering box that adjusted for zero play on center while still smooth (with new grease filling, the 45 year old factory load was all krunchy)
Was also looking at it for a Super Beetle swap, which is front steer.
They can be had in manual or power versions.
http://www.blindchickenracing.com/how_t ... errack.htm
That's a very useful site.
Addendum to Newtons first law:
zero vehicles on jackstands, square gets a fresh 090 and 1911, cabby gets a blower.
EZ3.6 Vanagon after that.(mounted, needs everything finished) then Creamsicle.
zero vehicles on jackstands, square gets a fresh 090 and 1911, cabby gets a blower.
EZ3.6 Vanagon after that.(mounted, needs everything finished) then Creamsicle.
-
Ol'fogasaurus
- Posts: 17758
- Joined: Mon Nov 13, 2006 10:17 pm
Re: Ol'fogasaurus black buggy
A bit less than a month then the long drive (~1800 miles) back home.
This is what I finished today. They are to be sold next year to help with the cost of the pottery club which goes through a lot of supplies. You buy the clay ($40 for 25#s of clay) and the club supplies the glazes and under glazes. The park pays for the cost of running the kilns. The park has roughly 3000 sites and germinate places to stay.
We think this is going to be our last year Snowbirding so it will be house maintenance all year long now.
You do not have the required permissions to view the files attached to this post.
-
Leatherneck

- Moderator
- Posts: 17104
- Joined: Sat Jul 01, 2006 6:47 pm
Re: Ol'fogasaurus black buggy
Your quite the Artist Lee. What route will you be taking up north?
-
Ol'fogasaurus
- Posts: 17758
- Joined: Mon Nov 13, 2006 10:17 pm
Re: Ol'fogasaurus black buggy
I do not consider myself as an artist as I am learning how to do some things as I try them... with some help from others. What I am learning I am passing on so I am seeing others trying different levels of hand painting on their pottery.Leatherneck wrote: ↑Thu Mar 02, 2017 5:50 pm Your quite the Artist Lee. What route will you be taking up north?
I could be considered as mild version of a sketch artist or a sketch cartoonist (I got out of hand doing that a couple of time which was not good) maybe but most of the stuff I did as a "drafter" at work were either line drawings (orthographic [aka three-view], descript, isometric, axonometric [could be considered as a mechanical form of Trig. CAD works in Axonometric], etc.) or sketches to clarify or make a point during discussions/meetings. I also got my self in trouble doing them outside of clarification
Painting on pottery (underglaze on green ware and or under glaze on bisqued pottery) is, as I have been told, is not like oil or watercolors. For example; under glaze is fairly transparent and required multiple coats for some colors over others. I also have found out that an undercoat (primer) of white makes the color more brilliant and keeps pottery color variations at bay (I use white clay only). There some things things about it are similar to each according to people who do either or both but thank you for the compliment.
We take 10 to Quartzite then 58 to Bakersfield joining I-5 in that area then use it thru CA, OR, then through WA to home. About 5 days driving the MH towing a dink.
When we get back home we have some storm damage to fix... mainly the gate that the MH sits behind before I can get back to the black buggy.
Updated for clarification.