Ol'fogasaurus black buggy

Offroad VW based vehicles have problems/insights all their own. Not to mention the knowledge gained in VW durability.
Ol'fogasaurus
Posts: 17761
Joined: Mon Nov 13, 2006 10:17 pm

Re: Ol'fogasaurus black buggy

Post by Ol'fogasaurus »

The more that I look at it the more I find; hence, I quit looking for the rest of the day.

The body and pan are sitting on the rotisserie which is high enough that I can sit on a stool and look at what is going on (or at least try to). The front firewall has been installed at an angle; this makes the radius for the flange touch the lift in one small point which in turn, creates the big gap on the side rails (two fingers wide at the worst). The front of the body mounting flanges is narrow doesn’t want to match the lift; it is part of the one piece firewall which have the forward mounting flanges for the side and the Napoleon’s hat section. It is hard to tell just what would happen if I was able to get the firewall section out and installed properly. Because of the warping of the body lift, some of the fitment problems are from that small section (the first and longest bend) that is not a perfect fit… my problem there.

I have never worked with fiberglass but I guess I am going to have to learn now. Luckily I have a friend who has done a bunch of it so that will help. Maybe if I get good enough, I can make a glass tonaneau cover for the back of the buggy. I had just lined up an older long back sand rail that I wanted but now that is out of the question (lack of storage room [and my wife saying nothing more until that Is gone] wise). (a bunch of not very nice words here :lol: )

It is so bad it is kind of funny; in a sad/tragic way.

Lee
User avatar
turbobaja
Posts: 2826
Joined: Fri Sep 14, 2007 4:56 pm

Re: Ol'fogasaurus black buggy

Post by turbobaja »

Lee,
Sounds like some hard times you're dealing with over there. There's just something about fiberglass parts that always seems to dissapoint when it comes to fit and finish. I wonder if some of these places just ruff-out a half dozen molds and start making parts as fast as possible or what?? No 2 parts are exactly alike, therefore, it's unique :lol: .

I kinda like RyanB's idea to "lower" the body onto the lift. Just enough to get the mounting surfaces to line up. You could cut a clean line around the perimeter, removing the mounting flange entirely, while matching the body to the lift profile. Hell, do like David and angle the body a little one way or the other if need be, shift it around to get the front firewall to fit better. Then you have to figure out how to remount the body to the lift, maybe some angled metal/aluminum brackets, or you could try glassing the original flange back on if indeed it is able to be lowered enough to work. I think, like you said, getting some suspension under that thing and cycling a few tires will help give you an idea of what you're working with.

Have you considered selling the body and pan seperately? Assumeing you need to get rid of both to get your hands on a rail. If you're set on getting rid of it, I know I'd have a hard time putting much more of my time or money into it. I bet if you can get this body sitting right on that lift you're gonna want to keep it :D .
Karl

DON'T QUIT
Ol'fogasaurus
Posts: 17761
Joined: Mon Nov 13, 2006 10:17 pm

Re: Ol'fogasaurus black buggy

Post by Ol'fogasaurus »

I looked at sectioning the firewall and putting it back together but since it is at an angle tipped forward (the bottom is angled back) it would make the miss-match worse. Right now, the mounting lip is just touching the Napoleon’s hat, if I sectioned it, it would not even tough the pan. I would have to section the firewall and shorten it up then cut the lip and pull it down to match the seal area. I just went out and measured the angle of the firewall and it is at 15 degrees from vertical and that is a lot of distance.

I also though about selling the pan and body separately but I guess I am not a quitter, at least this much of one. I could sell the body and cut the pan up for the torsion bars setup but I have a lot of time and money in the new pan halves and other stuff I did to it.

In '93 I paid a little over $1800 for the body, now I would be lucky to get a couple of hundred; assuming I could sell it. I tried to sell it once before and the only offer I got was from someone who was making those Bar-b-ques that look like Chev engines. He wanted to cut it up and only use the front end but the body was too small to fit it. No other calls than that.

Right now I am leaving it alone (it is use to that) and every once-in-a-while, I go out and look at it and see if I can come up with something different than cutting the top of the firewall then finding and re-cutting cutting all the seams involved, and this style of body has a lot, so everything can slide together properly then re-glass seams. It doesn’t do much good to loose my temper, you don’t think clearly then.

Image

In this picture you can see one of the seams (diagonal line with a sag to it) as it comes across and slips into the pocket (which is another problem). The top of the firewall goes to the hood and is glassed in pretty neatly. If the firewall was in the proper place, higher in the hood, the firewall would sit much higher. I don’t know if he forgot to trim the firewall as he slid it into the pocket or did not trim it enough but I am going to have to figure how to get the whole thing apart.

Image

Right now, the car is back to this except there is a three inch spacer in place and big gaps.

Lee
User avatar
CentralWAbaja
Posts: 4278
Joined: Fri Feb 05, 2010 9:05 pm

Re: Ol'fogasaurus black buggy

Post by CentralWAbaja »

Man Lee, I wish I could offer up something to help.

The only thing more frustrating than making mistakes yourself... Is dealing with somebody elses mistake or shotty work.

I never have messed with these glass buggies, so hard to comment or even follow along, for that matter.

Does this seem like this was all done at the time of manufacturing or is this a case of "Some assembly required" and somebody not knowing what they were doing ...or a combo of both?

My only real experience with fiberglass stuff other than a baja kit and bath fixtures, has been my truck canopies. And yea I have bought the most expensive ones as well as the cheap stuff and I am always amazed at how good every thing looks on the outside but when it gets down to where they meet the truck bed the mounting flanges have all left a bit to be desired as far as fit.

Anyway... hang in there.... and try not to let this be a momentum killer. I guess this could be a great opportunity to learn something new. If you do start modifying the fiberglass...I will be paying attention.
It is not Mickey Moused.....It's Desert Engineered!
Ol'fogasaurus
Posts: 17761
Joined: Mon Nov 13, 2006 10:17 pm

Re: Ol'fogasaurus black buggy

Post by Ol'fogasaurus »

It always helps to have another set of eyes look at things. My oldest step-son took time from his busy schedule to take a look at the problem. I had rolled the rotisserie, with body in place, outside before he came for more “looking at” room. Once we reset the body on the pan (we had been sliding it back and forth while checking things) we found some things I had missed. In the rear, there is a molded in bucket/pocket (not deep but there) for the spring plates and I was putting my hand in that pocket when aligning the rear of the body to the body lift. When using the ends of the body, it made a difference; not much but enough to throw the alignment off some. I don’t remember seeing a pocket there on a glass buggy before but it is a good idea. The main inner body piece and the outer (main/visual) body (three piece body) seem to be OK, it is the front piece that is driving the problems. When we checked the front again, the 1 ½ to 2 inches were less than that but still off more than you would want.

I front, it is looking like cutting the flanges off at the top of the radius, fitting the body in place, bolting the body in its final location then glassing in new flanges w/radiuses’ might be the easiest way to salvage things. I had thought about it this morning but had dismissed it pretty early on but talking it over with him, it started to sound better and easier (I need to talk with the guy who is going to help me doing the glassing before the cut off tool comes out). I think I will make the cut at the top of the radius of the flange. It will be the firewall flange (Napoleon’s hat) and the flanges in the front to the inner body join in the last picture I posted. The gap now is about a good inch and that is close to the top of the radius. Once the cut is made and things drop down and level out, we will know more.

When I took delivery of my body it had just come out of the molds then the join only a day before; because of this, there was a lot of warping of the rear mounting flanges during curing. The side body mount flanges, with the exception of the front which I have already talked about, seem to be OK. While fixing the hole I made for the 091 nose cone, I will cut off and make new flanges for the body mounting bolts that are in the rear cross-piece. I was debating on glassing in some metal into the new flanges help with the support of the rear body mounting but I am not sure if I need it.

Just for giggles, I’ll try to take a picture of the body sitting on the lift tomorrow.

Lee
User avatar
Leatherneck
Moderator
Posts: 17104
Joined: Sat Jul 01, 2006 6:47 pm

Re: Ol'fogasaurus black buggy

Post by Leatherneck »

Lee, glad you got some help on this one. Cool thing about working with metal, wood and Fiberglass is you can make it do anything with enough time and effort put into it. Have fun!
Ol'fogasaurus
Posts: 17761
Joined: Mon Nov 13, 2006 10:17 pm

Re: Ol'fogasaurus black buggy

Post by Ol'fogasaurus »

My friend came up from Issaquah this morning to look at the body to see what could be done. He and I ended up going though all the arguments I had gone though two days before. We discussed and I pointed out, he pointed out, and ended up saying that the lip/mounting flange on the front cowl section would have to be cut off and a new lip would have to be formed. Of all the different ways to fix the problem, this is probably the easiest. It means that the new lip will have to be formed from the inside so I will have to make a wheel mount for my jack stands to sit on and then put the pan down on it after cutting the flanges off. The body lift will have to be finished completely before that is done also.

After a lot of discussion; he didn’t feel that cutting the whole cowl out and re-installing it would be anywhere near the easiest answer after especially after I noticed that the inner piece of the three piece body looks like it is not installed correctly either. The inner body panel goes all around forms the rear seal and is the rear firewall. We noticed that the main/inner body piece has a place that the front cowl fits in (like a puzzle); but the cowl piece is not installed clear to the top of its mounting lip on the outer body. The inner body section is installed up tight against the main outer body’s gunnels, but the cowl section does not fit to the top of its piece built into the outer body. I think the guy who built it just got into too big of a hurry (I suddenly had to be in his area for a funeral and wanted to pick it up rather than have him come across state to deliver it or to ship it to me).

You might be interested that I ground off the corner of the front firewall, the points that were hitting the body lift, and just by taking about an eighth of an inch, it dropped the body’s side mount flanges about a quarter to a half of an inch closer to the body lift.

The upside of this is that it will allow me to make a better fit on the Napoleon’s hat area so there is a gain there. The whole body will match only this frame some of which is good and some of which is bad. I have only one more fairly small thing to do to the frame (make a boss/mount for the two through frame hydraulic tube connectors) which can be done after all the fitting of the body and body lift are done. Something I need to see if I can do.

Anyway, the damage is done and now to fix it… that is after I amuse myself in sulking and having a good; heart felt, pressure relieving TT (Aka.. pitching/throwing a fit)… assuredly to relieve the stress (I don’t throw things when I get irked; you break or ruin stuff that just costs you more money to fix or replace).

Now, the question is; what to do first. Finish welding the body lift together and gusseting the joins, make the rolling bases for the stands, modify the body stand to support the body when I slide it forward (and put a counter balance weight on the rear of the stand, or cut the flanges off (the later two being tied together). I just had an epiphany (easier to say than spell), get some plywood and put it across the top of the body stand (good lord; how simple especially compared to what I was prepared to do).

I forgot to add that ; (I forget which of you said it) but no two fiberglass bodies coming out of the same mold are the same; that is a true statement. Many of them have multiple pieces that go together which can change things again. As they setup and cure there can be more movement. I've talked to enough guys about this but I guess, I never thought it would happen to me (yeah.. right he said sarcastically). It looked so good all these years then...

I’m posting all this to maybe help someone else; assuming that they read it and remember it.

Lee
Ol'fogasaurus
Posts: 17761
Joined: Mon Nov 13, 2006 10:17 pm

Re: Ol'fogasaurus black buggy

Post by Ol'fogasaurus »

I am finally well enough from the flu that I had enough strength to lift the body lift up and flip it over to do the final welds on the bottom (I couldn’t do it earlier in the week). I still am still having problems relearning how make a nice straight bead and the fumes from the welding get me into a coughing (part of the flu as I pulled a couple of chest muscles hacking and coughing last week and the week before) fit. I still have to clean up a couple of welds that are visible from the outside and one or two that are not hands or feet friendly plus I need to open up the four end bolt holes that go across the rear cross-piece a bit, but the hard part (I hope) is now over. Once the bolts are opened up and the two blind bolts are pinned so they can float some, I can cut the body and make the new mounting flanges and the flanges that go across the Napoleon’s hat.

This is a nasty virus so get your shots early as it is supposed to hang around for up to 3 plus weeks. A friend of ours daughter had it worse than me; one day she could not lift herself off the floor (she slept there as it was too hard to get into bed), the next day it was gone and she was the bright eyed, bushy tailed girl with an attitude she has always been. This flu is a strange thing.

Lee
User avatar
Leatherneck
Moderator
Posts: 17104
Joined: Sat Jul 01, 2006 6:47 pm

Re: Ol'fogasaurus black buggy

Post by Leatherneck »

Lee I am glad you are feeling better. I haven't got a flu shot since getting out of the Corps and haven't had the flu since. Hope my luck keeps up. Take care of yourself Lee.
User avatar
Sneaks
Posts: 1652
Joined: Thu Apr 26, 2007 8:32 am

Re: Ol'fogasaurus black buggy

Post by Sneaks »

Done yet?
:mrgreen:
Ol'fogasaurus
Posts: 17761
Joined: Mon Nov 13, 2006 10:17 pm

Re: Ol'fogasaurus black buggy

Post by Ol'fogasaurus »

Close, maybe 10 to 20 thousand hours left. :oops:

Lee
User avatar
turbobaja
Posts: 2826
Joined: Fri Sep 14, 2007 4:56 pm

Re: Ol'fogasaurus black buggy

Post by turbobaja »

Ol'fogasaurus wrote:Close, maybe 10 to 20 thousand hours left. :oops:
Well, you're retired right? What else is there to do? :P :lol:

I'm glad to hear you're feeling better. Having the Flu is such a bummer, especially when you've got something that needs to get worked on, but your body can't do any work :x .

I've had good luck parking a fan nearby when welding in ~tight spaces where the fumes have nowhere else to go but in your face for a while. Just turn up the regulator on your shielding gas a little and keep your stand-off to a minimum, welds cans still be made cleanly with a little breeze passing by, and your lungs and chest muscles will thank you :D .

If I lived a little closer to you I would have come over there and put a couple hundred feet of rope to good use flipping that body lift over :lol: , of course I probably would have come down with the Flu a couple weeks later too :shock: .

Here's hoping your progress is smooth and healthy!
Karl

DON'T QUIT
Ol'fogasaurus
Posts: 17761
Joined: Mon Nov 13, 2006 10:17 pm

Re: Ol'fogasaurus black buggy

Post by Ol'fogasaurus »

Putting the rope on the rotisserie might be a good idea. Get that thing spinning like a fan just might help some with the fumes but then all I would be able do would be spot weld each time the area passed by. I do not use my time well, that is for sure. One thing you will find out about retirement is that you can (and will) be busier than you are when you have a job (wifie-poo makes sure of that) and a hobby. It is both fun and sad to what others are doing when they retire.

Actually, the pan is very close to being where I want it before I can assemble it and it goes down the road. I still have one thing I feel I need to build (I know what I want but am not quite sure how to do it. I had the major piece made but I put it somewhere and can’t find it. I was pretty sure where I put it but I guess not). This has become a (learning) project rather that what I was really excited over; I really wish now that I had connected with something like STF when I was younger than so late in life. I am not going to mount the seats or the turning brake as it will be up to the buyer (if any) to locate them where he or she wants to sit.

Lee
Ol'fogasaurus
Posts: 17761
Joined: Mon Nov 13, 2006 10:17 pm

Re: Ol'fogasaurus black buggy

Post by Ol'fogasaurus »

I did get started working on fixing the body for the black buggy to fit onto the body lift today; the more I got into it the worse things became. Today was a windless day and the heavy dew did not burn off until later this am. I had to wait some for the moisture to lift as it was pretty slippery on the concrete. If it didn’t frost this am, it was very close to it.

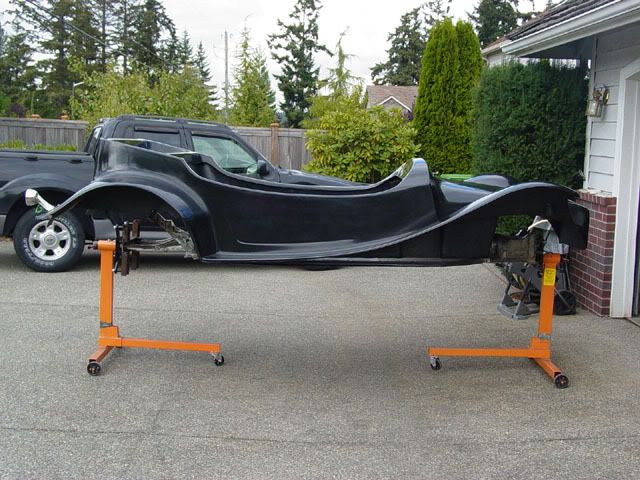
I started out at about 9:00 AM, rolling the pan and the body stand out then cleaning and rearranging the garage; then I modified the body carrying stand that I built years ago by adding a new cross-piece to allow the body and the body lift to slide forward to clear the front of the stand’s frame; this was done for better access to the Nepoleon's hat and the side mount flange areas. After modifying the stand, I finagled the body lift off the rotisserie and on to the wood stand and under the body.

Using an air powered cut-off tool 3-inch, an air saw, an angle grinder with a green (40 grit I think) sanding disc on it, a mask, mechanic’s style gloves and safety glasses (which I discarded as they immediately sucked and collected all the fiberglass dust to them) and an air blow off tool I got into whacking up the forward lower surfaces of the body;

Image

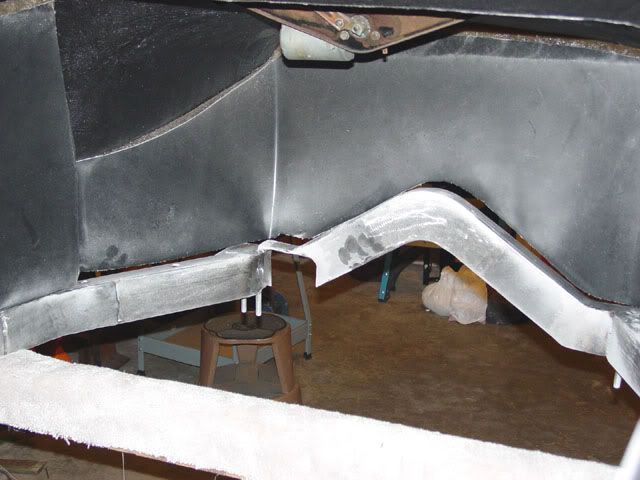
e.g., I removed the Nepoleon’s hat mounting flange and forward side mounting flanges, then cut up on the front fire wall about an inch to lower the front of the body down onto the body lift and generally making a mess in the front of the house. Once I got things somewhat lowered down and roughly fitting I stood back and: Oh $&%*t, the rear body mount flanges (which I already knew were pretty bad to start with) were worse than expected and holding the passenger side up off the lift.

Image

Image

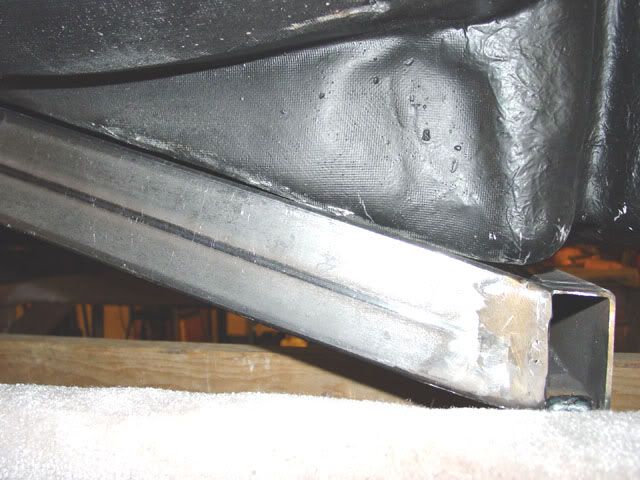
The angles of the flanges did not match the frame (I was aware of the warping of the flanges but the angle difference which I though was small was larger than anticipated. It wasn’t until I had slid the body towards the rear that this became obvious. Time to give up and do some honey-do’s; like repairing broken concrete which was much more exciting.

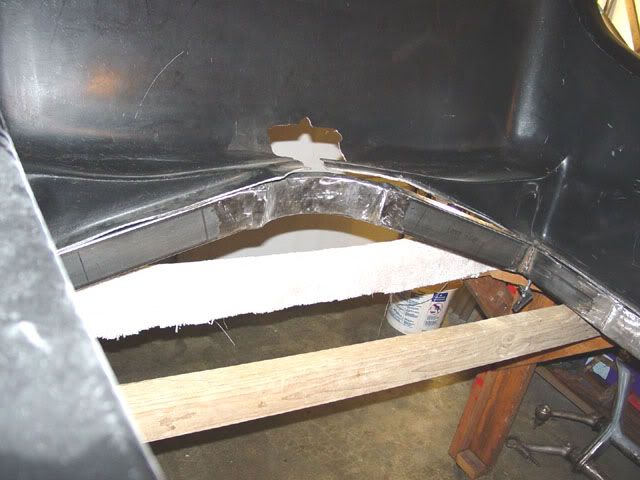
After working outside from about 9:00 am, I finally had enough at about 1:30 pm and called my friend who was going to help me glass the body back to fit the lift and called tomorrow’s glassing session off. Tomorrow I will cut the rear cross mount flanges, which were already slated to be modified, just not as much as they are going to have to be and make new spherical radius to get the body to sit down on the body lift.

Image

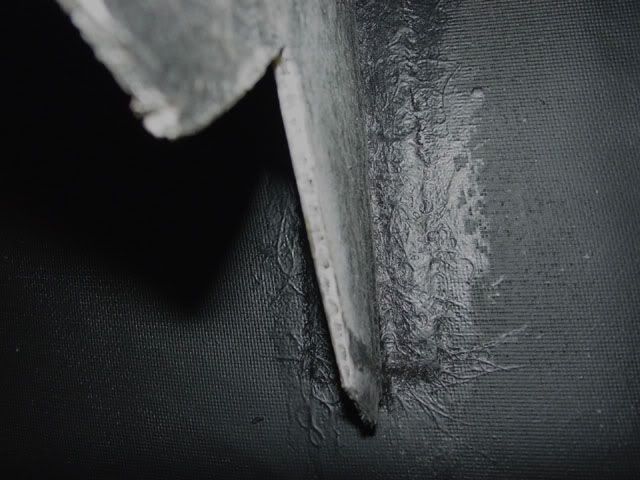
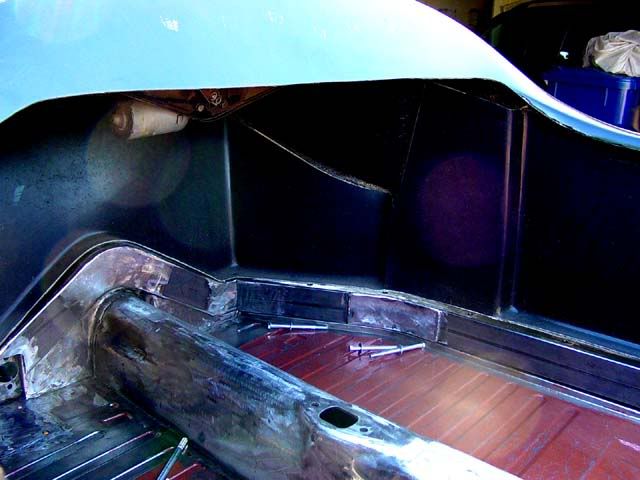
The front fire wall is different type of fiberglass than I have seen in the aftermarket automotive industry as it is hollow and looks almost like a honey comb material. We used glass impregnated (e.g., pre-preg) paper honey comb in aerospace but it required an autoclave to heat the resin up so that it would flow. I don’t think this is paper honey comb… but it sure looks a lot like it. This was taken at the rear inner fender well and shows a little what the material looks like. My camera was too close and the flash washed out most of the detail but maybe you can get an idea of what it is.

This is where I am right now.Lee
Ol'fogasaurus
Posts: 17761
Joined: Mon Nov 13, 2006 10:17 pm

Re: Ol'fogasaurus black buggy

Post by Ol'fogasaurus »

Spent another 4 plus hours on the buggy today working mostly on the rear portion of the passenger compartment to make the flanges (cut them off) fit the contour of the rear cross-piece. I had to wait for the fog to lift and the sun come out before I could move the body outside. It was nice and clear out, with no wind again so it ended up looking like a tractor in a field disc-ing with the dust in a ball over head. As the dust fell, it was all over everything and I would have stayed pretty clean as I was under the body’s rear if it hadn’t been for all the dust coming up from the underneath blown by the air tool’s exhaust and thrown off by the air tools cutting or sanding surfaces.

When I started this lift, I knew that the rear was not a great fit to start with, mostly because the flanges were so badly warped and the angle was wrong as compared to the pan itself. I could maybe had pulled the flanges down and got a half way decent fit if over the years they continued to move every so slightly and finally take a set where things were not usable. In order to use the 1 ½ X 3 rectangular tube for the lift, without sectioning it or making two sides and a bottom, I did the math (trig) and I came up with a difference in width (on the diagonal) of either .01 or .03 per side, I forget which (a total width difference of .02 to .06) which I thought was not enough to worry about; obviously I was wrong. After removing the flanges and cutting the flanges at the top of their radius’s and slightly changing the angle of the drop, mostly on the outside end or the diagonal I got the body to almost fit but there was still a big enough gap between the side flanges and the lift. I didn’t feel I could pull the flanges down to the lift this way and I needed to figure out what else to trim.

I had worried about the spherical radius and how big it was but after looking last night (see the pictures I posted) I initially thought they were not that bad (for those who don’t know what a spherical radius is; imagine two walls of a room and the floor meeting. Between each of the walls and the floor there is a radius; at the corner where the walls meet there is also a radius. Where the three radiuses meet there will be a spherical radius which is (more or less) ball shaped even it the radiuses are not the same). I ended up trimming the corner of the side flange in the rear to the rear radius of the cross-piece and ended up notching the side flange the width of the body lift. That got me closer but then the spherical radius became the problem.

I jacked the body up on the passenger side using a piece of 2 X 4, on its side, to raise and block the body up then I took my 1/2 inch wide air belt sander and knocked some of the outside (bottom) of the spherical radius off as that was stopping the body from dropping down and sitting on the flanges all the way down to where the front flange was removed. I ended up doing this on both sides. With the flanges now touching, there are enough gaps to qualify this as either a block house or the arrow firing ports/slots in a castle. I think that the gaps can be handled by the gasket so I am not going to spend a lot of time with them.

I then started on getting the gel coat off so we could glass to glass. Over all, I am feeling better and after talking to my friend who has worked with fiberglass (and sending him pictures), even though there is/will be still some additional trimming to the body for fit and radius’s that will need to be done we now have a starting place that we can sort of trust and do a good job rather than do a phony build up to the existing body mount which would look horrible to someone who may be interested in it otherwise. That inch plus of fiberglass would put a heck of a load on the bolt head which is also not a good idea; it would most likely (stress) break the fiberglass before too long.

Anyway, a long boring tale and I hope someone gains from it. Lee
Post Reply