Well, my new project is a 1990 Vanagon, that has a rod knock. Long term plan is a 3.0 H6 Subie and 5 speed, but I need to use it as a driver asap because I sold my Fox, so I've got an extra 'good' 2.1 that came from a syncro. Pulled the heads because it's out and I've got a gasket set on the shelf.
Basic plan:
Mill gasket surface and combustion chamber of heads a bit (haven't measured yet) to raise compression to around 9.5:1
Mild port work
3 angle valve job
1.25 rockers (bottom end staying together, so stock 2.1 cam)
Enlarge the plenum (sim to as Pile did on his MS T4 engine, I believe) - will shorten runners to compensate, hopefully they still line up
Slightly larger throttle body - part to take advantage of more flow, part to get away from throttle shaft/wear issues on vanagon ones
S&S Header, Dynomax turbo muffler, maybe a cat if I have a good 2 or 2.25" one laying around.
I'd think about going much higher on compression if I wanted to use an old water injection setup, but this is really just a filler engine that might be used a year or two. That said, I want the most from the least - the best reliable power with the least amount of input. I don't mind cutting and welding up the plenum and making a throttle body flange on there, or fabbing some little exhaust stuff. I don't want or need to tear apart the case, because I am not an expert there and would likely extend my timeline a lot more than I want.
Opinions, pitfalls, etc?
Simple 2.1 Wasserboxer upgrades
-
gearheadgreg
- Posts: 298
- Joined: Fri Mar 08, 2013 5:25 pm
-
gearheadgreg
- Posts: 298
- Joined: Fri Mar 08, 2013 5:25 pm
Re: Simple 2.1 Wasserboxer upgrades

Best garage helper ever.

Cleaned up a bit.

Heads pulled:

Kinda carboned up, some pitting.

Found some extra silicone hose I will use just to replace the old hoses


Now - if I wanted to have some fun, I'd bolt on the Weber 40s or 44s sitting around with these ported manifolds to wake it up. Might need more cam, though...

-
gearheadgreg
- Posts: 298
- Joined: Fri Mar 08, 2013 5:25 pm
Re: Simple 2.1 Wasserboxer upgrades
Oh, I forgot to mention, I will likely remove the factory water-to-oil cooler/heat exchanger. I will replace it with a thermostat sandwich plate and an oil cooler with a fan. Likely on the Drivers side, to make plumbing easier.
-
Piledriver

- Moderator
- Posts: 22520
- Joined: Sat Feb 16, 2002 12:01 am
Re: Simple 2.1 Wasserboxer upgrades
The factory MV cam is around the same specs as a web 86.
(I still have a custom reground stock cam with web86 intake/1600DP exhaust, for Miller Cycle setup I have yet to get to)
The CR is going to be hard to hit, 5.5 SCAT rods and shaved MV pistons will probably do it, but the bores will have to be honed a tad to eliminate even the slightest ring step.. The better rods are good insurance, the second most common cause of death for an MV (after losing coolant/overheating) is egged out rod big ends>ventilated block.
I'm not sure you can flycut enough to do what you are seeking, the seats are right there, chamber is only ~15cc, most volume is in the piston dish.
Addendum to Newtons first law:
zero vehicles on jackstands, square gets a fresh 090 and 1911, cabby gets a blower.
EZ3.6 Vanagon after that.(mounted, needs everything finished) then Creamsicle.
zero vehicles on jackstands, square gets a fresh 090 and 1911, cabby gets a blower.
EZ3.6 Vanagon after that.(mounted, needs everything finished) then Creamsicle.
-
gearheadgreg
- Posts: 298
- Joined: Fri Mar 08, 2013 5:25 pm
Re: Simple 2.1 Wasserboxer upgrades
RE: the compression - yeah, I kinda thought that, and looking at the pistons in person, I kinda realize it. I guess I'll just get whatever I can from simple head machining and porting and valve/seat work, and call it good. Not pulling the pistons or cyls at this point. If I was, it would likely be a 2.2 instead. If I wasn't kinda set on the H6, I might do a real wasserboxer build, but I think this is just my "most with the least" theme until the 3.0L comes along.
Thanks!
Thanks!
-
Piledriver
- Moderator
- Posts: 22520
- Joined: Sat Feb 16, 2002 12:01 am
Re: Simple 2.1 Wasserboxer upgrades
The EZ3.0 swap might be cost effective vs even a stock (full) rebuild if you can do all your own fabrication.
Addendum to Newtons first law:
zero vehicles on jackstands, square gets a fresh 090 and 1911, cabby gets a blower.
EZ3.6 Vanagon after that.(mounted, needs everything finished) then Creamsicle.
zero vehicles on jackstands, square gets a fresh 090 and 1911, cabby gets a blower.
EZ3.6 Vanagon after that.(mounted, needs everything finished) then Creamsicle.
-
gearheadgreg
- Posts: 298
- Joined: Fri Mar 08, 2013 5:25 pm
Re: Simple 2.1 Wasserboxer upgrades
Yeah, this 2.1 is just a quickie stop gap, because I don't have the space and time yet to do the swap. Bottom end is not coming apart. Need to sell 4 cars (2 of them mine) and do an engine swap on the son's Forester before the van can have lots of down time! Phew. Makes me tired just thinking about it. Anyway, onward and upward.
I think I will have the heads machined, just to clean them up and get a smooth surface, and any incremental compression increase will just be gravy. Should have noticed the crazy piston dish right away!
I think I will have the heads machined, just to clean them up and get a smooth surface, and any incremental compression increase will just be gravy. Should have noticed the crazy piston dish right away!
-
buildabiggerboxer
- Posts: 621
- Joined: Wed Mar 25, 2009 12:50 pm
Re: Simple 2.1 Wasserboxer upgrades
I've had up to .030" head cuts done, don't forget the gasket face gets the same amount, and the valves move closer to the Pistons by that amount, you may need to add some chamfer back to the chamber edge to help the o ring go in safely.
-
gearheadgreg
- Posts: 298
- Joined: Fri Mar 08, 2013 5:25 pm
-
gearheadgreg
- Posts: 298
- Joined: Fri Mar 08, 2013 5:25 pm
Re: Simple 2.1 Wasserboxer upgrades
Say - have you thought about machining just the sealing ring area in the combustion chamber? Yes, the gasket surface and the chamber the same amount, of course. But - if you are just removing material from the sealing ring area, would tighten up the deck that same amount. Of course, I haven't measured deck height yet, so this might be undoable, just wondering.buildabiggerboxer wrote:I've had up to .030" head cuts done, don't forget the gasket face gets the same amount, and the valves move closer to the Pistons by that amount, you may need to add some chamfer back to the chamber edge to help the o ring go in safely.
-
gearheadgreg
- Posts: 298
- Joined: Fri Mar 08, 2013 5:25 pm
Re: Simple 2.1 Wasserboxer upgrades
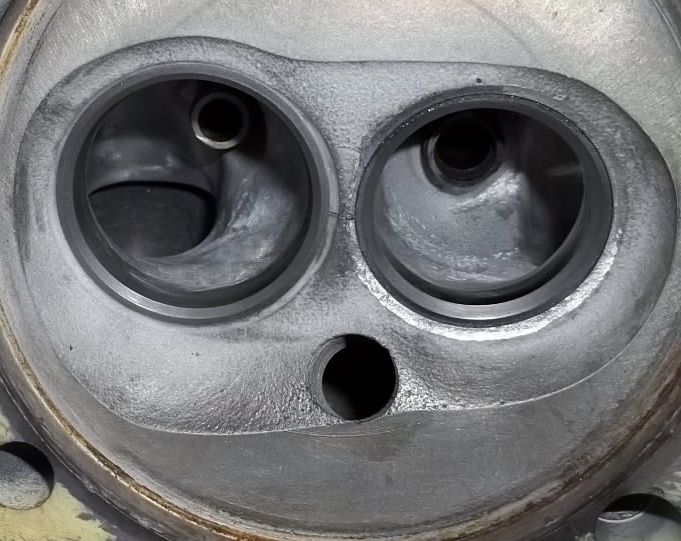
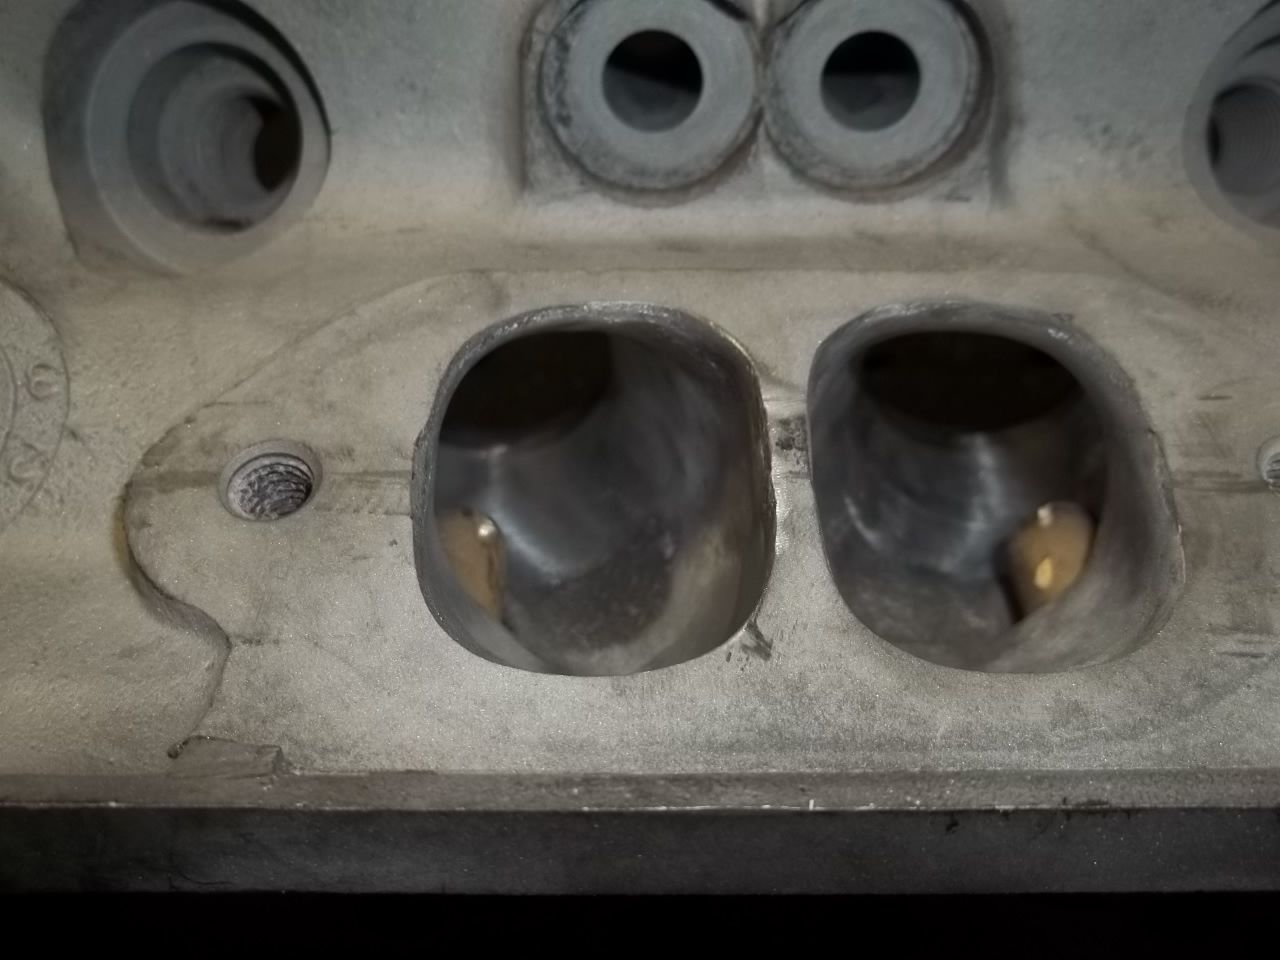
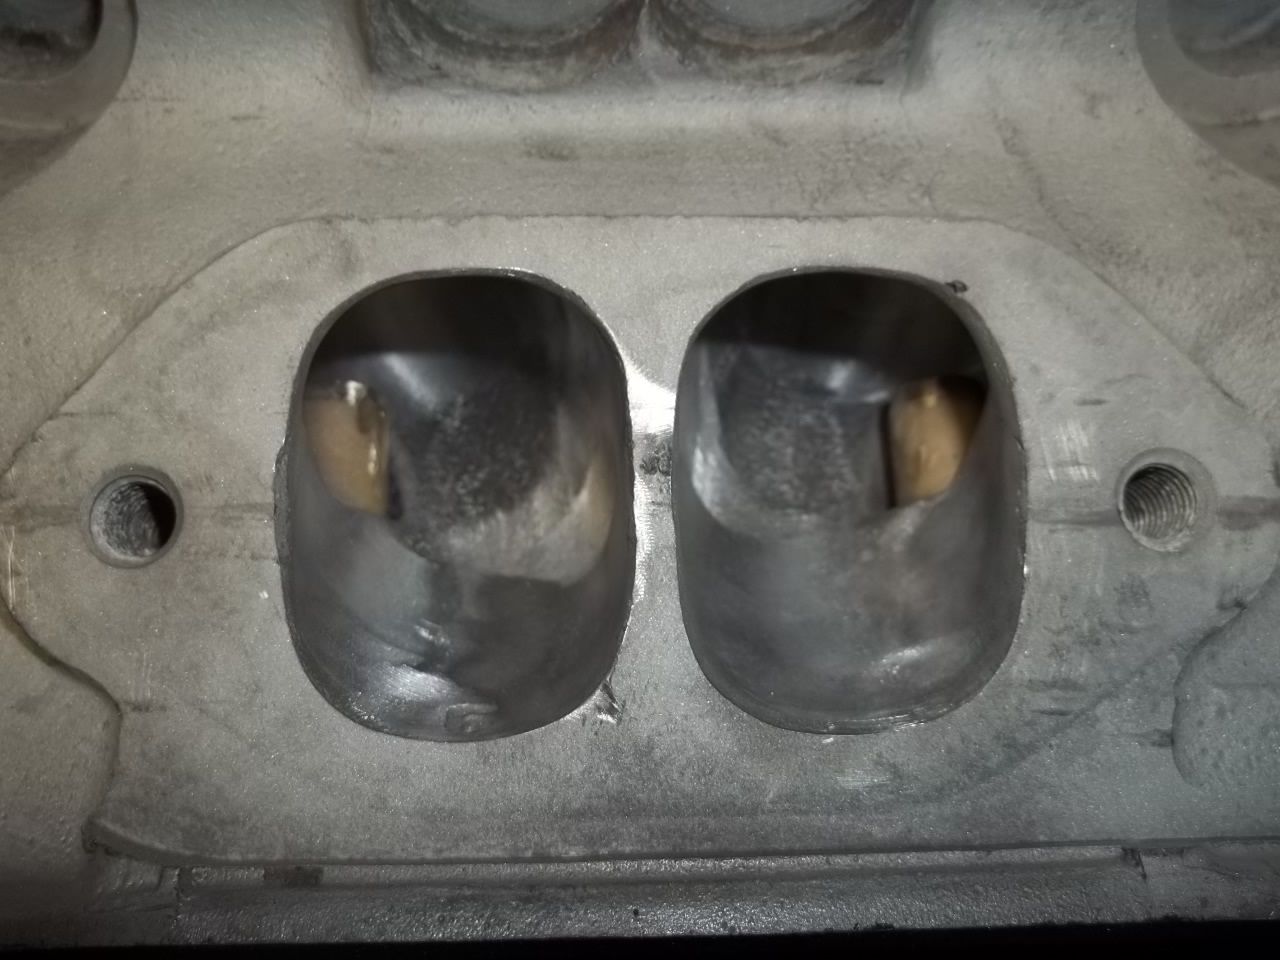
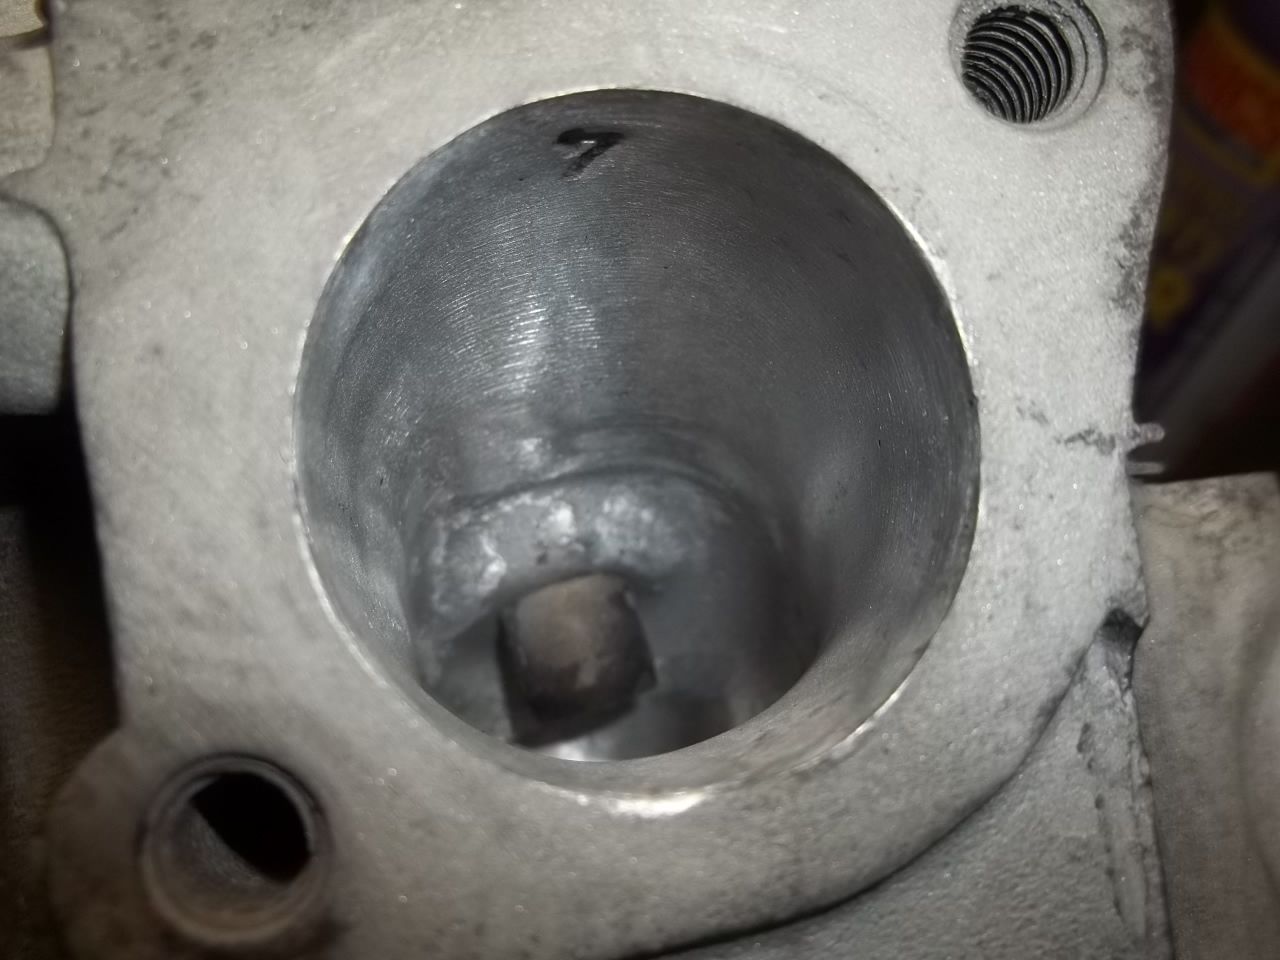
Well, at least there's some progress. I media blasted (lightly) the heads, and tanked them. There are cracks between the seats, but I am going to run them anyway. I also cleaned up the ports a little bit. I was surprised how bad the casting were, in terms of port vs. seat location, and how different one head was to the other, in terms of casting flash and seams, etc.
All I did was a cleanup job, really, to reduce the flash and smooth some of the seam and sharp transition stuff. I'll hope it gives me 3-5 hp. The valve job will likely be worth more!
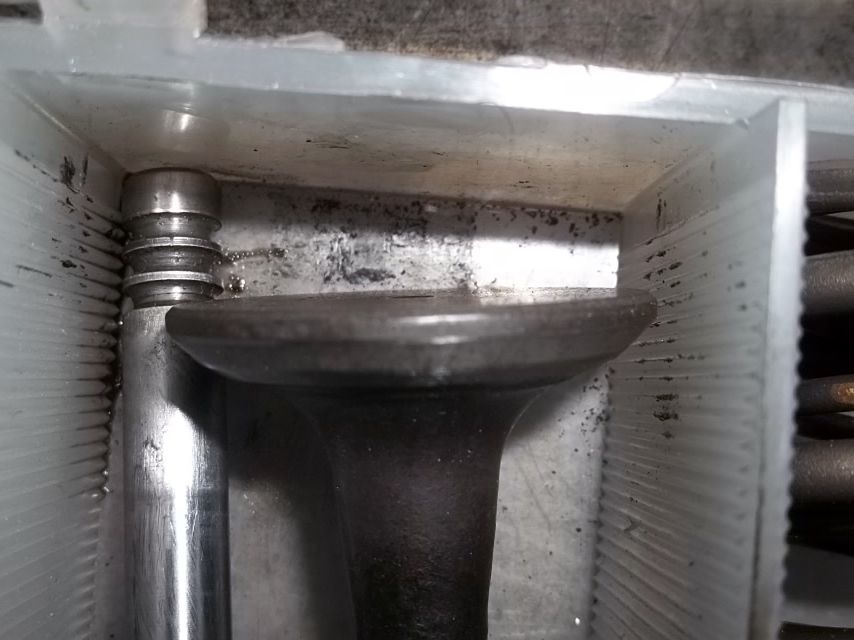
Here's a pic showing the crack mentioned, and the surprising amount of valve shrouding on the exhaust valve seat in the combustion chamber. I used a dull round cutter ball with a slightly smaller valve on the seat (to protect the seat) to knock down the shrouding.
After a bit of grinding:
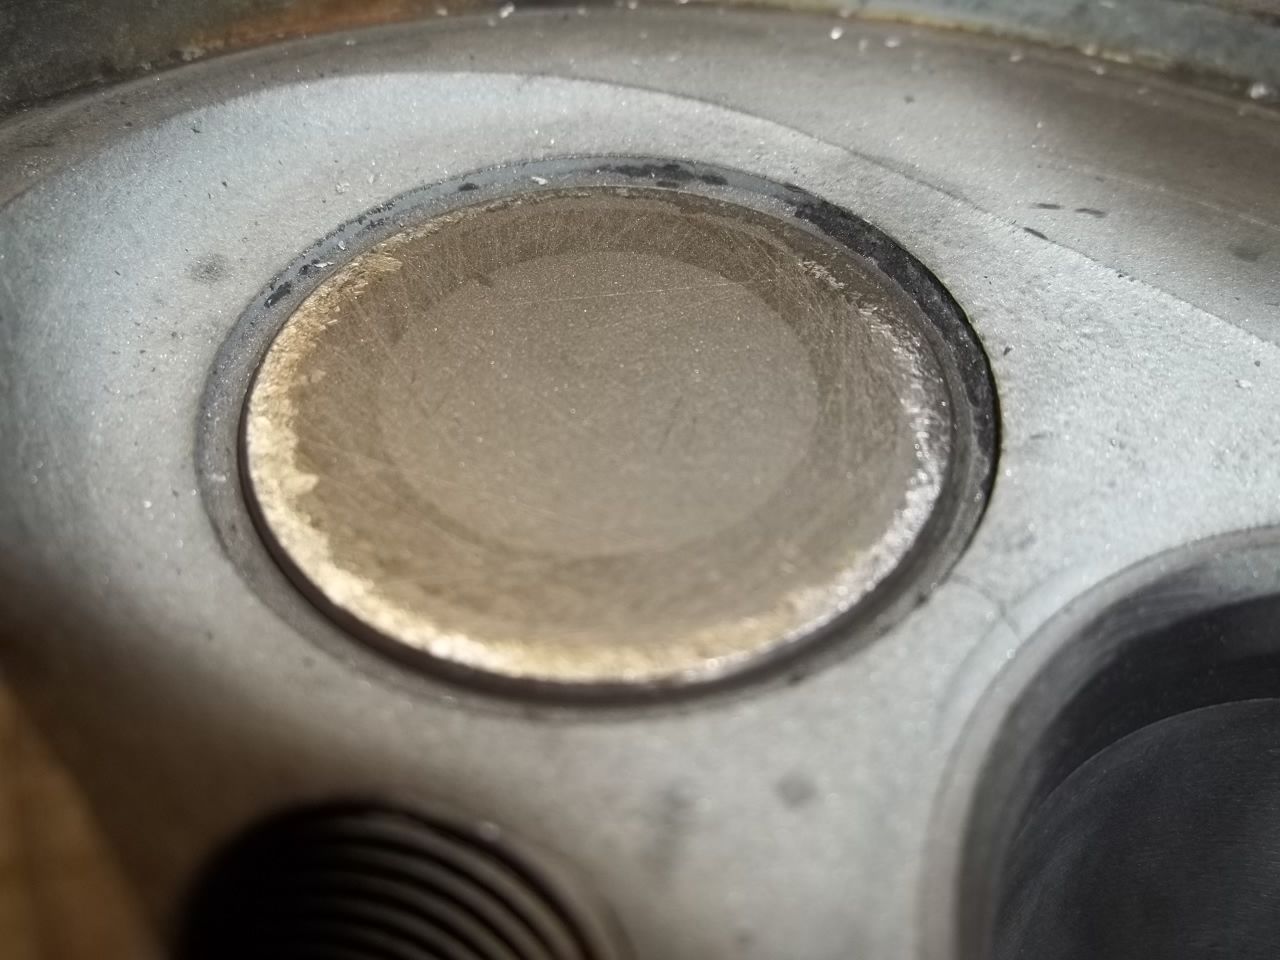
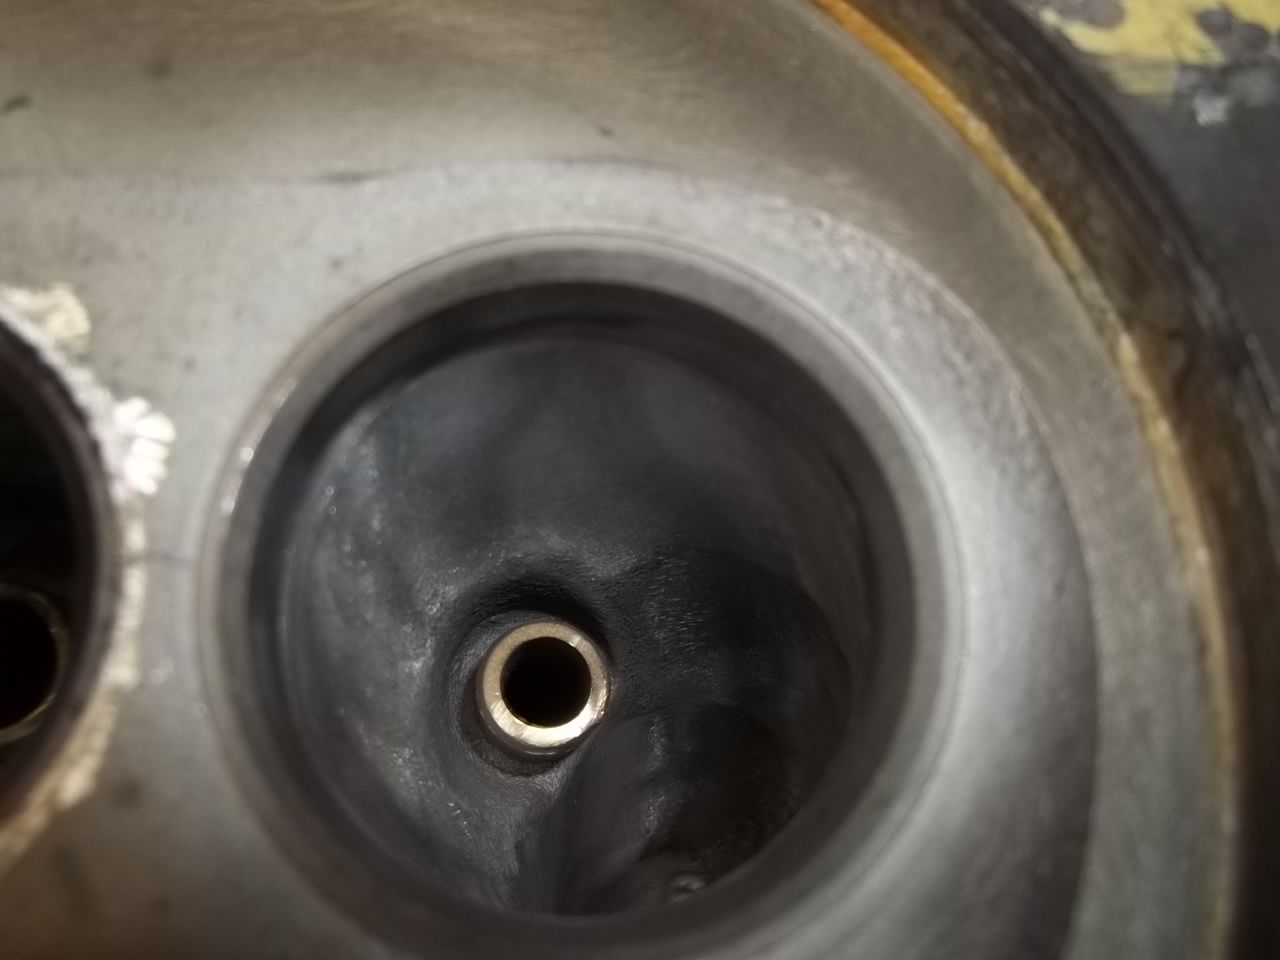
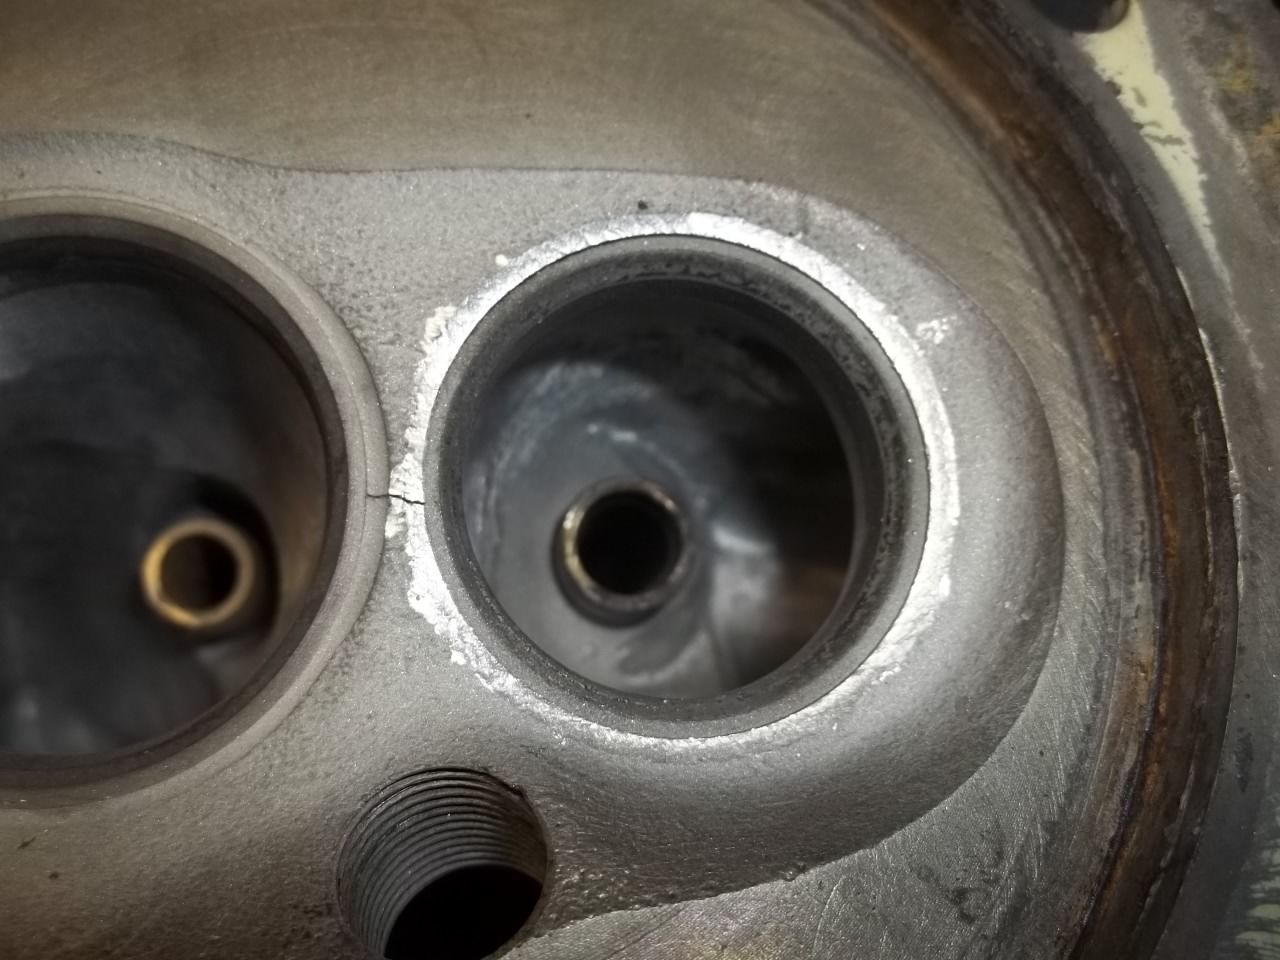
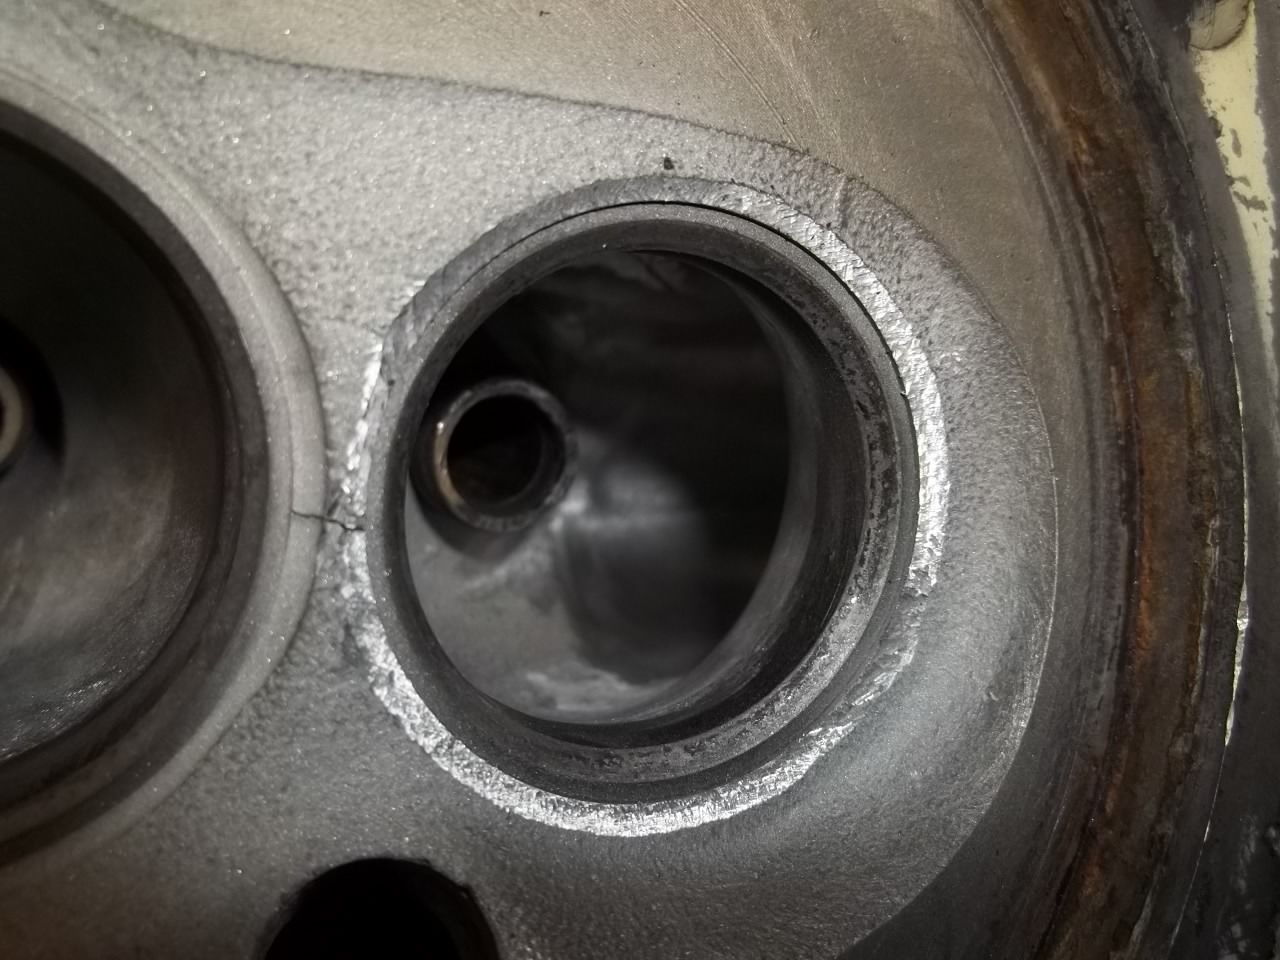
The intake ports from the manifold flange:
From the intake seat:
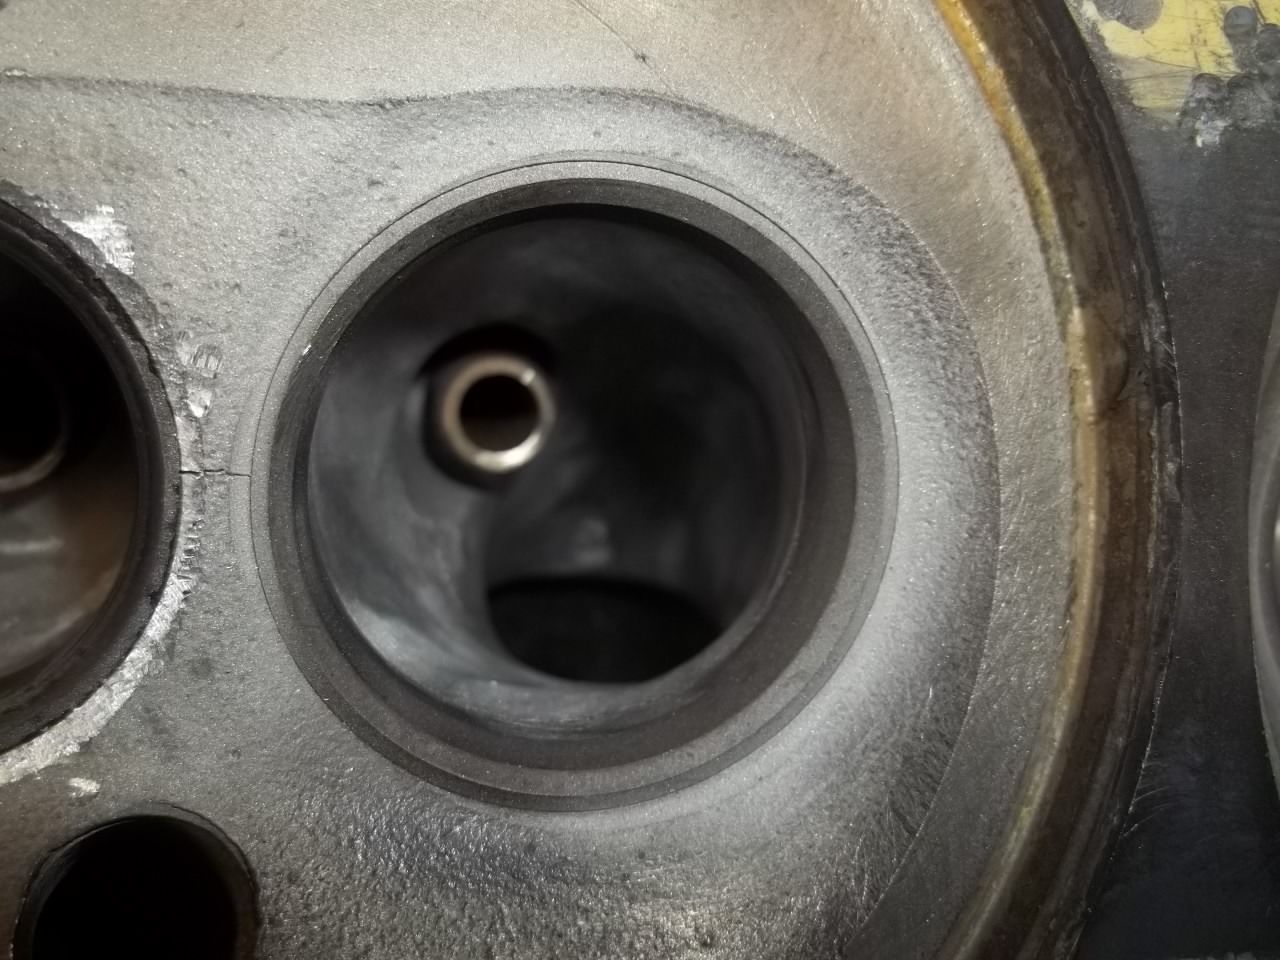
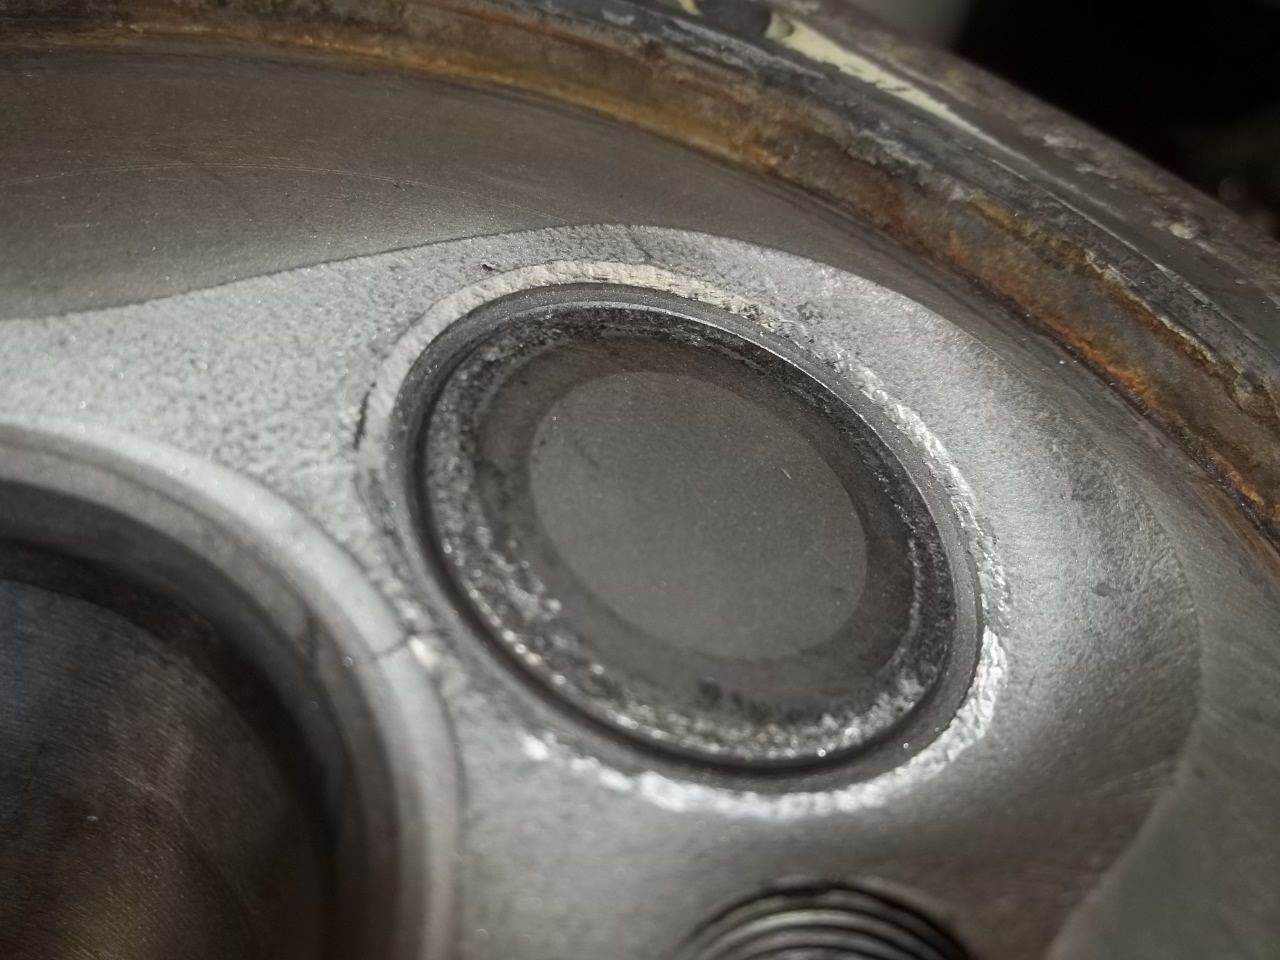
Exhaust port from the heater flange:
From the exhaust seat:
All I did was a cleanup job, really, to reduce the flash and smooth some of the seam and sharp transition stuff. I'll hope it gives me 3-5 hp. The valve job will likely be worth more!
Here's a pic showing the crack mentioned, and the surprising amount of valve shrouding on the exhaust valve seat in the combustion chamber. I used a dull round cutter ball with a slightly smaller valve on the seat (to protect the seat) to knock down the shrouding.

After a bit of grinding:

The intake ports from the manifold flange:


From the intake seat:


Exhaust port from the heater flange:

From the exhaust seat:


-
riseabove
- Posts: 83
- Joined: Thu Jan 22, 2009 2:50 pm
Re: Simple 2.1 Wasserboxer upgrades
Nice to follow this as im looking to to the same thing in the future. just bringing the performancelevels of these nice engines to what they can produce without braking the bank .
-
gearheadgreg
- Posts: 298
- Joined: Fri Mar 08, 2013 5:25 pm
Re: Simple 2.1 Wasserboxer upgrades
Pictures - not very *good* ones, but at least you get an idea on the valves. I cut the seats to 45 deg, cut the valves to 45 deg, then lapped them in. After lapping them in, I cut the 30 and 60 deg cuts on the valves. Wasn't a lot of room around the lap, especially for the 30 deg top cut on the intake valve, amounted to more of just taking the edge off, but hopefully it pays off. Tomorrow I'll put the other angles on the seats.