Feq2002,
Cheers mate! Much appreciated. And now that I saw the 'positive' of it on the (?) above, it looks REAL GOOD!
Keep up the good work/write-up. This is a top thread!
Cheers!
'70 Beetle Volks-Rod (lots of pix, long d/l!!)
-
Freq2002

- Posts: 813
- Joined: Tue Apr 09, 2002 1:01 am
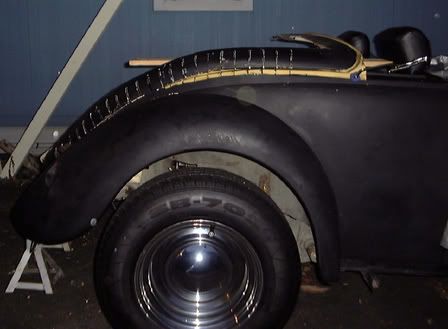
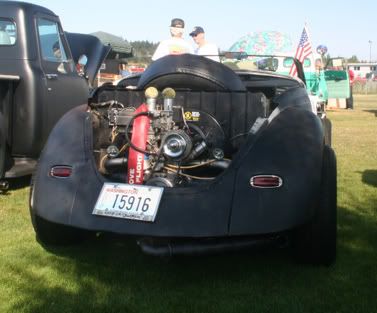
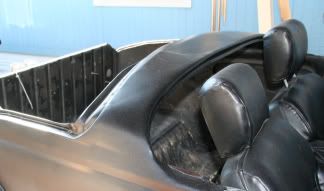
Just a couple better angles of the bomber, gives a better idea on the actual stance of the car.
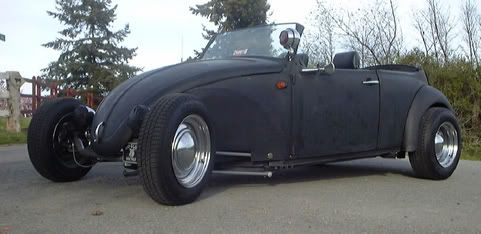
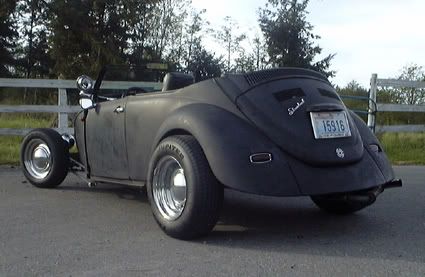
Also get a better view of the dual head spotlight.
Gettin it ready to come apart. Gonna redo the dash & wiring, & start on the rear metal work. Have a donor hood & a trunk frame. Just have to get some raw materials & start cutting/hammering/welding/cusssing/hammering some more/welding/etc.
Hopefully next posts will be of PROGRESS!!
Scary thought that it is,...
-
Freq2002
- Posts: 813
- Joined: Tue Apr 09, 2002 1:01 am
OK, So I slacked off for about 2 mos. I have about 30 days before the next local show, so I finaly got back into the groove & started gettin my stoargae unit ready so I can use it as a shop late at night when I'm awake. This is the main thing that prevents me from working on it as much as I like, not having a garage & being a night owl.
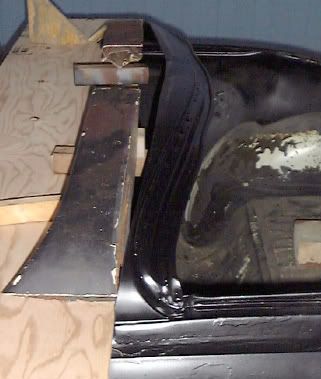
ANYway, I tore into it this weekend & got both rear qtrs cut down:
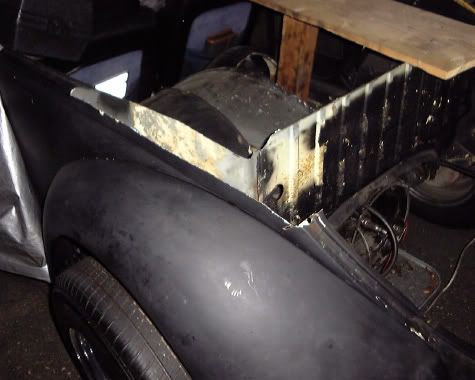
Then using a donor hood & hood fram from another car I did some cutting so I could make the metal take a new form w/o ruining the curves of the original part.
I took the skin out of the center of the hood so that I could change the countours of the sides w/o having to work the center. Once I get it all lined up & set I'll re-skin the center, probably using the metal from the old roof.
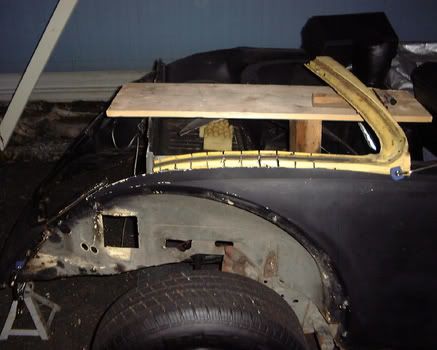
To smooth it out & make a more workable front edge I'm thinking about using the piece I chopped off the top of the windshield. Will have to blend it in, but it has a nice curve & actualy makes a similar line as the hood itself. The lip for the window seal will make it easier to attach the interior trim when I get to that point as well.
Still plenty of room for a roll bar & to lean the seats back a good amount.
Once I get both of the frame sections tacked on & the sides of the hood down I'll start on the wood form I'll need to hold everything in place to skin the hood & fill the cuts. THAT is gonna be fun,...
ANYway, I tore into it this weekend & got both rear qtrs cut down:
Then using a donor hood & hood fram from another car I did some cutting so I could make the metal take a new form w/o ruining the curves of the original part.
I took the skin out of the center of the hood so that I could change the countours of the sides w/o having to work the center. Once I get it all lined up & set I'll re-skin the center, probably using the metal from the old roof.
To smooth it out & make a more workable front edge I'm thinking about using the piece I chopped off the top of the windshield. Will have to blend it in, but it has a nice curve & actualy makes a similar line as the hood itself. The lip for the window seal will make it easier to attach the interior trim when I get to that point as well.
Still plenty of room for a roll bar & to lean the seats back a good amount.
Once I get both of the frame sections tacked on & the sides of the hood down I'll start on the wood form I'll need to hold everything in place to skin the hood & fill the cuts. THAT is gonna be fun,...
-
Freq2002
- Posts: 813
- Joined: Tue Apr 09, 2002 1:01 am
Got a lil burned out on working incessently on the panels & working on someone elses motorcycle for the last couple weeks. So over last weekend I didn't do anything to either of them. Trying to avoid burnout here.
Have been grinding the welds down & am now in the process of slowly beating the panel smooth. As I progress I'm learning things, foremost of wich is like many things I make, I usualy do one for practice & trail & error, then I do another for the final work. Looks like I'll need another donor hood coz this one is a mess. lol All things taken into account tho, it's actualy coming together pretty well.
Have concluded that I'm not gonna make the show this weekend, not with the car anyway. Didn't expect to have too much done, but I cant drive it as is & I'm having difficulties locating a trailer. I cant use the flippin transporters from U-haul or the like, car's too low.
Cant believe how much a simple trailer is around this part of the country. For the price of one I could get 3-4 in the South East. (Something I'm thinking of when I go see the family, could make a tidy profit off that trip. )
)
ANYway,...
What I DID get done was I got a matching spare to go with the car. Not sure where I'll mount it just yet, but I made a cover for it for giggles. Had the materials, so figgured why not?
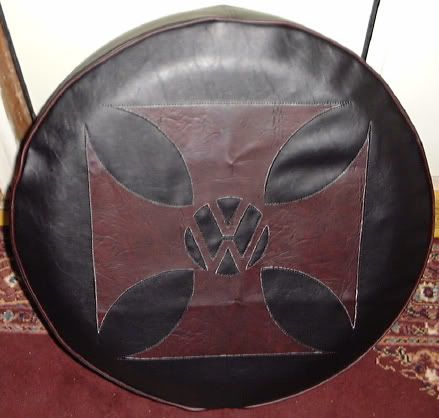
Came out pretty good I think. Havin acess to an industrail grade machine at my workplace helps alot too.[/img]
Have been grinding the welds down & am now in the process of slowly beating the panel smooth. As I progress I'm learning things, foremost of wich is like many things I make, I usualy do one for practice & trail & error, then I do another for the final work. Looks like I'll need another donor hood coz this one is a mess. lol All things taken into account tho, it's actualy coming together pretty well.
Have concluded that I'm not gonna make the show this weekend, not with the car anyway. Didn't expect to have too much done, but I cant drive it as is & I'm having difficulties locating a trailer. I cant use the flippin transporters from U-haul or the like, car's too low.
Cant believe how much a simple trailer is around this part of the country. For the price of one I could get 3-4 in the South East. (Something I'm thinking of when I go see the family, could make a tidy profit off that trip.
ANYway,...
What I DID get done was I got a matching spare to go with the car. Not sure where I'll mount it just yet, but I made a cover for it for giggles. Had the materials, so figgured why not?
Came out pretty good I think. Havin acess to an industrail grade machine at my workplace helps alot too.[/img]
-
Freq2002
- Posts: 813
- Joined: Tue Apr 09, 2002 1:01 am
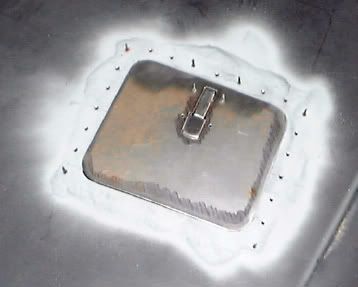
Evolution of a fuel door
I did some rust repairs then fabbed the fuel door I decided to use instead of popping the hood everytime I want to fill it up. Generic design based on common aircraft acess panels.
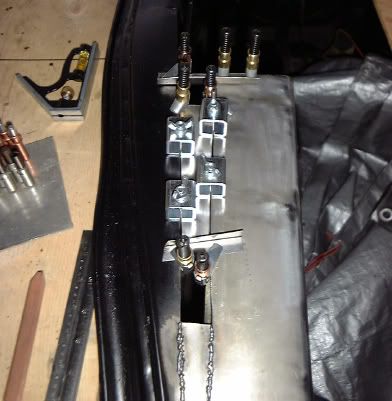
Start with the location, cut the shape out of the panel, cut the door to fit, add backing plates to make it sit flush. I elected to use this aviation panel latch I've had around for years.
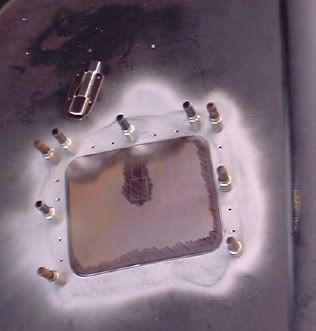
Latch cleco clamped in place for fitting
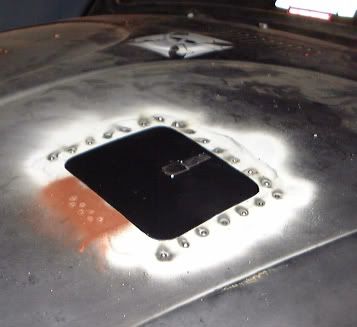
Door with hinge plate & half hinge riveted on, painted with primer & blitz black to keep the bare steel rust free. Ready to instal once the other half of the hinge is placed & riveted

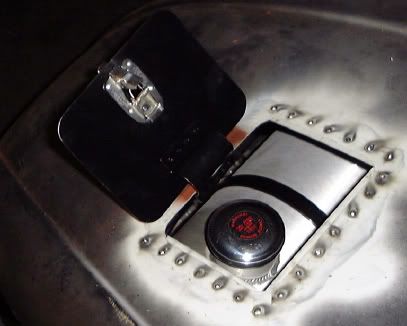
Looking forward from the side with door open. Need to rotate the tank back a couple degrees, but otherwise it's just fine.
Looking at a lower angle from the front. Need to tweak the hinge plate a bit to get the alignment down & get the curve of the panel correct. Then it will come off again to grind the welds on the backing plates, sand & primer until time for paint.
Start back on the rear decklid frame tomorrow. have templates made to match the left side placement, time st start cutting!
Start with the location, cut the shape out of the panel, cut the door to fit, add backing plates to make it sit flush. I elected to use this aviation panel latch I've had around for years.
Latch cleco clamped in place for fitting
Door with hinge plate & half hinge riveted on, painted with primer & blitz black to keep the bare steel rust free. Ready to instal once the other half of the hinge is placed & riveted
Looking forward from the side with door open. Need to rotate the tank back a couple degrees, but otherwise it's just fine.
Looking at a lower angle from the front. Need to tweak the hinge plate a bit to get the alignment down & get the curve of the panel correct. Then it will come off again to grind the welds on the backing plates, sand & primer until time for paint.
Start back on the rear decklid frame tomorrow. have templates made to match the left side placement, time st start cutting!
-
Freq2002
- Posts: 813
- Joined: Tue Apr 09, 2002 1:01 am
Oh yeah, been loads of fun. But as with many projects where I'm having to design & modify as I go, I usualy make two of everything. 1st try is to experiment, 2nd is the finished product.
I jacked up that lid section by cutting bottom up, BIG mistake. I got it welded up just fine but getting the lower edge str8 is makin me nuts. Got the upper frame section done today (pics to come) & am gettin ready to start the opposite side of the hood.
Gonna cut from the top this time & use those nifty sheet metal butt-clamps that Eastwood makes to align the metal for welding. Wont use the big saw except where I need more meat removed. Go thru wire pretty quick fillin in those cuts!
Once I work out the bugs on how to change the shape of this sucker, gonna order another Mexican hood & have at it. Actualy works out because I can use the center section from that to make the fillers.
-
Freq2002
- Posts: 813
- Joined: Tue Apr 09, 2002 1:01 am
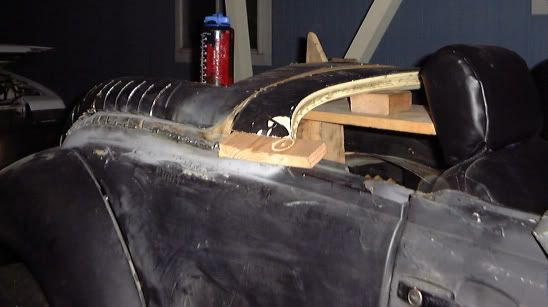
OK, here's a view of the semi-finished product from the left rear.
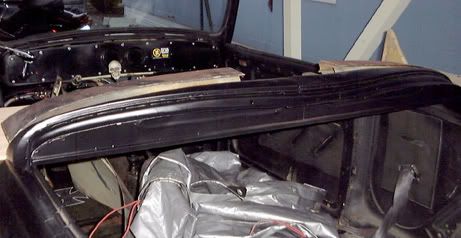
I ran a piece of 1/2" square tubing across the bottom & then made filler panels. Rolled a bead into them to stiffen them a bit, altho I botched the bead a bit (hard to do alone with a hand roller!). All in all, looks pretty decent & makes a very stiff section.
Side view, starting to mock up the windshield bow sections.
Today I started late but got most of the right side bow bent to shape, mounted, & welded in place. The sheet metal clamps from Eastwood are great!
Altho I did try to keep the piece level with the body lines it twisted some while I was welding & I have a slight offset on the filler panel. I am hoping I can hammer it level(ish) opne the welds are ground down & the rest can be masked with a light coat of body filler.
Hopefully tomorrow I can get the other side done & start on the center gap filler. Will be fun as I need to replicate the sheet metal contours entirely by hand. The section is about 12" long too. Think I'll be making a couple of the sharper bends on the brake at work, then form the curves at home.
Oh,... Joy!
-
Freq2002
- Posts: 813
- Joined: Tue Apr 09, 2002 1:01 am
Here's the Bomber at the local car show.
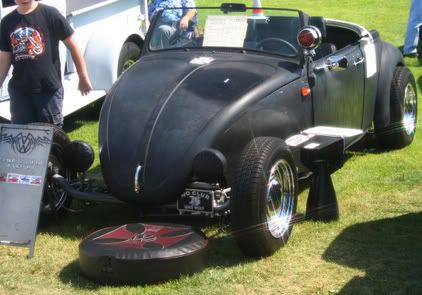
Was a great turn out. 251 cars, largest in the 20 years it's been goin on. People that run it really need to work on how they lay it out tho. Was way too little room where we were, way too much on the other end. Same thing every year too, needta get ahold of the organizers before next year & have a talk about that,...
Due to not getting my time off as planned, I didn't finish the front half of the project before the show. Need to grind the welds down & do some creative hammer/dolly work to even up the pieces before I can make the center filler.
Will post a couple new shots when I get it finished up.
Trailered it there so we could take off to go eat, etc. But I did go for a cruise at sunset. Was very nice & I miss drivin it. Havin the rear hacked off makes a big difference in my rear view mirror, the angle the car sits at made it harder to see behind me over the original window frame.
The Weber is EXTREMELY loud sittin up there with nothing to block it, I can literaly look over my shoulder & see the stacks. So yeah, gettin into it at low RPM's really makes it rumble. & of course, since I caught every single light thru town, I got into it every time. Was fun, got some interesting looks, even from the Sheriff's cruiser I pulled up alongside at one light. I've been thinkin about puttin a stinger on it, between the Weber & a stinger I should be almost as annoying as the fart can ricers! 
Was a great turn out. 251 cars, largest in the 20 years it's been goin on. People that run it really need to work on how they lay it out tho. Was way too little room where we were, way too much on the other end. Same thing every year too, needta get ahold of the organizers before next year & have a talk about that,...
Due to not getting my time off as planned, I didn't finish the front half of the project before the show. Need to grind the welds down & do some creative hammer/dolly work to even up the pieces before I can make the center filler.
Will post a couple new shots when I get it finished up.
Trailered it there so we could take off to go eat, etc. But I did go for a cruise at sunset. Was very nice & I miss drivin it. Havin the rear hacked off makes a big difference in my rear view mirror, the angle the car sits at made it harder to see behind me over the original window frame.
The Weber is EXTREMELY loud sittin up there with nothing to block it, I can literaly look over my shoulder & see the stacks. So yeah, gettin into it at low RPM's really makes it rumble. & of course, since I caught every single light thru town, I got into it every time.
-
Freq2002
- Posts: 813
- Joined: Tue Apr 09, 2002 1:01 am
Yeah yeah, I'm back dammit!
Took a break from all of the auto websites for a couple months. Between work & our other activities I was pretty burned out & with the weather turning to crap it's pretty much slow to no goin on the Bomber these days. ANytime I have the energy to get o9ut there & work it;s raining, & somehow welding in the rain doesn't appeal to me.
ANYway,...
Did get out for the annual Oyster Run motorcycle rally in Anacortes WA. Spousal unit wasn't doin too hot so the bike was out, decidede to pack up the Bomber & go instead. We lucked out & got an awesome parking spot right next to the road block so we set up on the corner & watched em roll in most of the day. OUSTANDING day & so many scoots. & the people watching was sweet too. Starting to get promoters brinin in hotties with nice smiles, better curves, & not much on. Damn the luck! lol

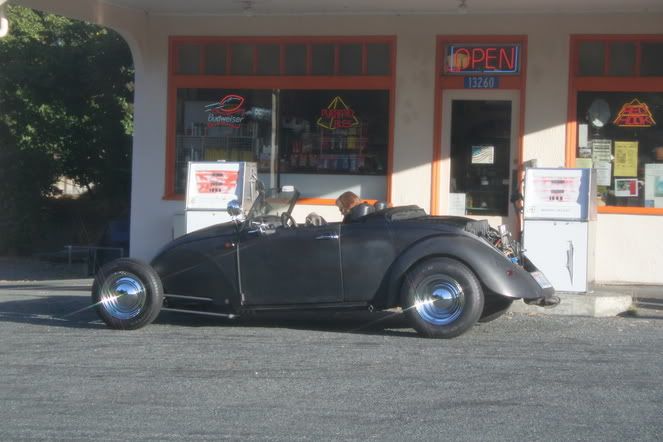
This one was at an old gas station on the way round to the back side of town. Nice lil place, but I missed a great shot. When we pulled up there was a new Porsche Boxter on the other side of the pumps. Woulda made a good side by side shot.
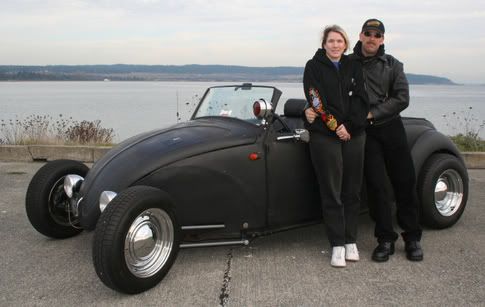
Got a couple shots right before I parked it for the season.
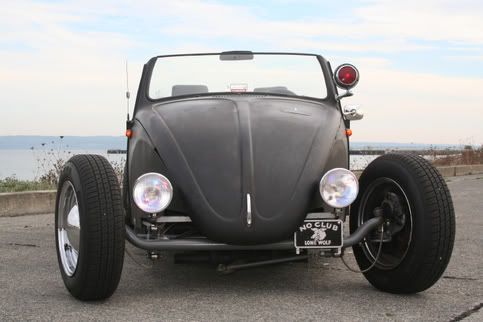
Yep, STILL haven'f pulled the beam & bent the panhard mount up,... But I gotta say, it makes bump steer a LOT of fun! :
Have the gaps on the cabin cross piece welded up, need to smooth the metal & apply filler as needed & thats pretty much done till it's time to paint. Still have to make the filler pieces for the sides of the deck sill next to the firewall to complete the rear exterior metal work. Once I get that done I'll make a cross brace to fit where the firewall is now & then cut it out & make the new one further forward coming up from the fwd edge of the package tray. Once I have all that done & get the deck lid fabbed up I'm gonna start scroungin parts for the engine & turbo.
Days are getting longer again, & spring isn't far away,... Gettin itchy!
ANYway,...
Did get out for the annual Oyster Run motorcycle rally in Anacortes WA. Spousal unit wasn't doin too hot so the bike was out, decidede to pack up the Bomber & go instead. We lucked out & got an awesome parking spot right next to the road block so we set up on the corner & watched em roll in most of the day. OUSTANDING day & so many scoots. & the people watching was sweet too. Starting to get promoters brinin in hotties with nice smiles, better curves, & not much on. Damn the luck! lol
This one was at an old gas station on the way round to the back side of town. Nice lil place, but I missed a great shot. When we pulled up there was a new Porsche Boxter on the other side of the pumps. Woulda made a good side by side shot.
Got a couple shots right before I parked it for the season.
Yep, STILL haven'f pulled the beam & bent the panhard mount up,... But I gotta say, it makes bump steer a LOT of fun! :
Have the gaps on the cabin cross piece welded up, need to smooth the metal & apply filler as needed & thats pretty much done till it's time to paint. Still have to make the filler pieces for the sides of the deck sill next to the firewall to complete the rear exterior metal work. Once I get that done I'll make a cross brace to fit where the firewall is now & then cut it out & make the new one further forward coming up from the fwd edge of the package tray. Once I have all that done & get the deck lid fabbed up I'm gonna start scroungin parts for the engine & turbo.
Days are getting longer again, & spring isn't far away,... Gettin itchy!
-
Freq2002
- Posts: 813
- Joined: Tue Apr 09, 2002 1:01 am
OK, I did a bigger internet burnout than before. I not only haven't been posting on the car sites, I haven't even been looking at them. Missed the whole project pinks thing too!
But ah well, thats how it goes, just been busy as all hell & now that things are slowing down & I'm starting to work on the car again I'm back with updates.
So, here's the poop.
Removed the headlights, steering box, linkage & sterring arm & had them all powder coated prior to the Cruizin the Harbor show. Literaly got it together at midnight the night before! Did everything the same color as the axle except the headlight buckets, got a black wrinkle on those & it all came out great, looks sweet!
I started making a filler/former piece to go up front between the fender panels at the lower nose. Would have them welded on but I got ahead of myself & forgot to insert an access panel so I can unbolt the spring mounts w/o standing on my head. That should be done here in the next couple weeks tho.
Yesterday I started on the gap fillers on the decklid sill & have the passenger side completed, just needs some grinder work & it's good to go. Will probably get the drivers side done today, then I start cutting the donor metal to make the new lid.
Have some pretty cool ideas in store, gonna be pretty labor intensive, but if it all comes together like I visualize it,... Well, it's gonna make me happy anyway.
Still up in the air about puttin in a rumble seat, hasn't been done & would be pretty sweet deal if I pull it off, but then I cant go with the turbo setup I was lookin at,... But then, I can always redesign that too, an advantage to being crazy I suppose!
I'll post some photos later, just hope I dont get burnt out trying to catch up with my reading!
-
Freq2002
- Posts: 813
- Joined: Tue Apr 09, 2002 1:01 am
OK, so I got off my arse & got a couple photos. The local car show is tomorrow, so understandably I have been somewhat busy with things. I spent WAY to much time removing someones sad excuse for a Bondo job from the rear apron and resurfacing the apron. It was prety mangled so it took a few new applications to get it flat, but now it's done properly, not like the previous job. Some schmuck slathered on what looked like an entire can of Bondo & sanded it smooth,... I always thought it weighed too much, guess I was right.
Anyway, I also refinished the frenched tail lights to smooth out the blemishes there, and finished up the fillers in the deck lid frame.
And got both sides of the rear cabin frame done and filled in the low spots as well. Still gonna need some loving before I do the final paint job, but thats some ways off yet. At least it looks better!
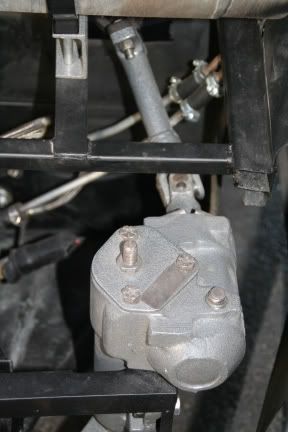
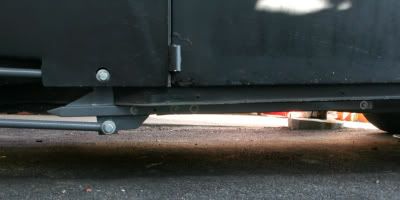
Here you can see the Mustang steering box with the fresh powder coating by the freindly folks at Skagit Powder Coating (shameless plug) with a grey hammertone like the axle, along with the steering linkage and if you look at the blocks supporting the fuel tank I had those done as well.
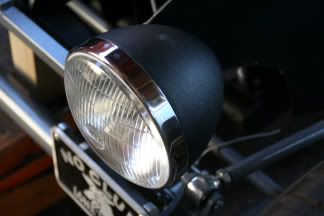
2nd shot is of the headlights, and altho out of focus, the mounting bar I fabbed was also coated to match the axle. The Dietz style headlight buckets look good, but the chrome is crap, so I had them powder coated with a black wrinkle finish. They look sweet, I believe it was a good choice.
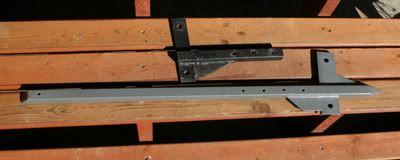
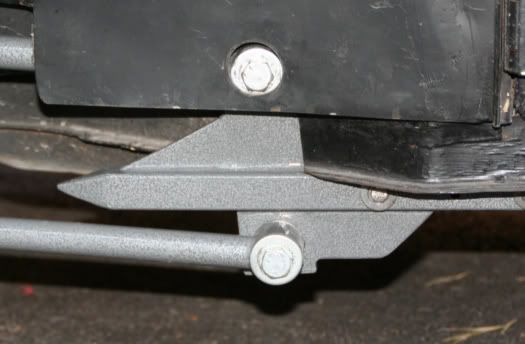
Here was todays project, looking at the photo you can see the 4-link mounts I made for the front axle, I simply made it to slide into the lower frame channel & bolt on. The first models were temporary & pretty ugly. Altho they held up for over 2 years, cant complain. The newer ones are stronger, go further back for stability, and I finished the ends by closing them up topped with the grey hammertone powder coating.
Anyway, I also refinished the frenched tail lights to smooth out the blemishes there, and finished up the fillers in the deck lid frame.
And got both sides of the rear cabin frame done and filled in the low spots as well. Still gonna need some loving before I do the final paint job, but thats some ways off yet. At least it looks better!
Here you can see the Mustang steering box with the fresh powder coating by the freindly folks at Skagit Powder Coating (shameless plug) with a grey hammertone like the axle, along with the steering linkage and if you look at the blocks supporting the fuel tank I had those done as well.
2nd shot is of the headlights, and altho out of focus, the mounting bar I fabbed was also coated to match the axle. The Dietz style headlight buckets look good, but the chrome is crap, so I had them powder coated with a black wrinkle finish. They look sweet, I believe it was a good choice.
Here was todays project, looking at the photo you can see the 4-link mounts I made for the front axle, I simply made it to slide into the lower frame channel & bolt on. The first models were temporary & pretty ugly. Altho they held up for over 2 years, cant complain. The newer ones are stronger, go further back for stability, and I finished the ends by closing them up topped with the grey hammertone powder coating.
-
Freq2002
- Posts: 813
- Joined: Tue Apr 09, 2002 1:01 am
Man o man,... I always feel gulty when I look ay my car. Poor ol beast has been sitting more than anything. just haven't had the gumption to tear into the next stage of the project. That and I have some other items I needed to finish as well.
One is an old square top Coca-Cola machine I'm rebuilding. Got it all stripped out & sent in for powder coating, right now I'm goin in circles trying to eaither a) find a sign shop that will repro the original graphics w/o permission from Coca-Cola Corp., or b) get permission from Coca-Cola Corp to get the graphics made. Assinine proceedure really, but cant be helped. But ah well, will be nice just to have it back together & running again, neat ol beast that it is.
The other project is still pending, but may take precidence over the Bomber,...
I'm needing a trailer to move the Bomber & other items around. BUT, I dont have a place to store it when not in use, having a trailer can be a blessing and a curse.
So I was out driving I saw an old beat up farm truck & had a vision,... Get an older flat bed 2 ton truck, like mid 50's to mid 60's, chop, channel, & drop it, and build a custom slider bed. Similar to the beds on common wreckers, but more purpose built & not nearly as complicated. Done properly the truck could be used for all kinds of hauling, even daily driving with an updated power/drive train, AND I can get my beastie to the places I need it w/o worrying about how it's not finished yet, or not safe to drive over this speed, or, or,... Yanno, typical things one worries about when in the middle of a full on build. Even more fun is the fact I can enter both of them in a show with the Bomber on the back of the truck. Definately different to say the least.
Just need to drop off & talk to the old farmer & see if he wants to part with the dead truck for a grand. Did come across a 5-ton IH set up for heavy work, lil too much beast for my buck tho, otherwise I'm still lookin around.
One of these days I'll quit being such an ADD freak, but in the mean time I'm havin fun!
I dig all cars, whether old, new, hammered out of Japanese tin cans, American iron, or German steel.
Rides:
70 Volksrod "The Black Bomber"
12 Jetta 2.5
56 GMC 370 "Tater"
07 Avalanche
20 Cherokee Trialhawk
05' Harley FLHTCUI
Rides:
70 Volksrod "The Black Bomber"
12 Jetta 2.5
56 GMC 370 "Tater"
07 Avalanche
20 Cherokee Trialhawk
05' Harley FLHTCUI
-
Freq2002
- Posts: 813
- Joined: Tue Apr 09, 2002 1:01 am
I have updates!
OK, what I've been up to,...
*I haven't gotten much further on the Bomber other than completeing the rear metalwork for the deck lid frame, and she's now in storage.
*The reason would be I took my old early 70's Coca-Cola bottle vending machine out of stoarge & stripped it down to parade rest. EVERY part came out and the big components are off at the powder coaters to get refinished. All of the white parts are done, but backordered on the red. lookin forward to getting that old beast up & running again.
* And the big winner is,... I got a new truck! **)
Well, she turned 50 this year, but she's still new dammit!!!
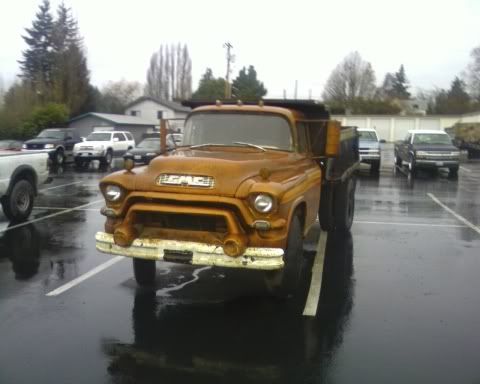
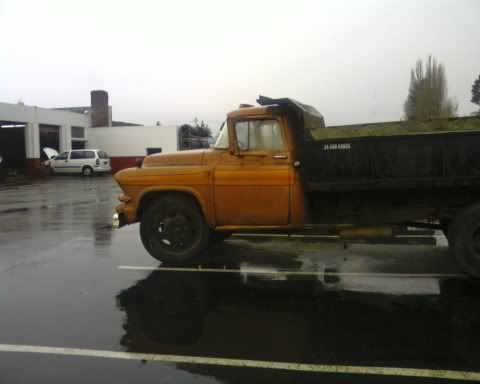
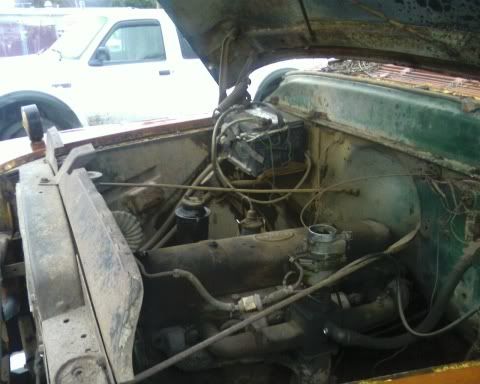
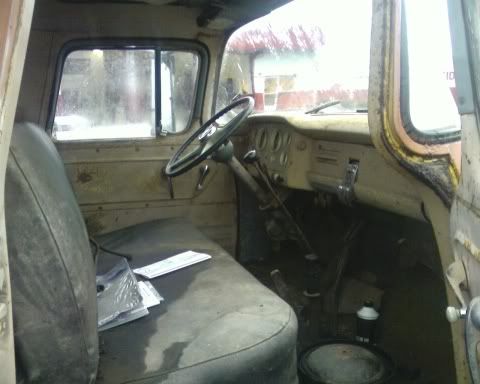
She's a 1956 GMC 2-ton dump truck. I-6, 4-speed w. 2-speed rear, all original and all there! Ugly as sin, but other than the expected rust in the usual places there's very little damage to the sheet metal. Only issue is the brakes are marginal and it's stuck in low (top speed, a blazing 35MPH). Paid a lil more than I wanted to, but the guy wasn't budging for anyone.
Attempted to drive it home, thought better of it after playing with questionable brakes, and had it towed to a tire shop to get the brakes eyeballed and buy her some new shoes. Rubber is on order, and I have decided I really dont wanna have to buy any more, coz 6 heavy truck tires plus tubes HURTS!
Yeah, like I dont have enough crap to spend money on allready,...
Hello, my name is James, and I'm a motorhead.
*I haven't gotten much further on the Bomber other than completeing the rear metalwork for the deck lid frame, and she's now in storage.
*The reason would be I took my old early 70's Coca-Cola bottle vending machine out of stoarge & stripped it down to parade rest. EVERY part came out and the big components are off at the powder coaters to get refinished. All of the white parts are done, but backordered on the red. lookin forward to getting that old beast up & running again.
* And the big winner is,... I got a new truck! **)
Well, she turned 50 this year, but she's still new dammit!!!
She's a 1956 GMC 2-ton dump truck. I-6, 4-speed w. 2-speed rear, all original and all there! Ugly as sin, but other than the expected rust in the usual places there's very little damage to the sheet metal. Only issue is the brakes are marginal and it's stuck in low (top speed, a blazing 35MPH). Paid a lil more than I wanted to, but the guy wasn't budging for anyone.
Attempted to drive it home, thought better of it after playing with questionable brakes, and had it towed to a tire shop to get the brakes eyeballed and buy her some new shoes. Rubber is on order, and I have decided I really dont wanna have to buy any more, coz 6 heavy truck tires plus tubes HURTS!
Yeah, like I dont have enough crap to spend money on allready,...
Hello, my name is James, and I'm a motorhead.