metal band saw

General tips/tricks/tools that could be utilized on any platform.
Ol'fogasaurus
Posts: 17758
Joined: Mon Nov 13, 2006 10:17 pm

Re: metal band saw

Post by Ol'fogasaurus »

http://i218.photobucket.com/albums/cc42 ... 8792f5.jpg

After finding the problem I tore the cart back down to the basic shape. The shows the mounts for the saw itself.

Image

I thought you might be interested in the two different "draft" angles of the main chassis of the saw has. I thought I had made a major boo-boo but the angles all check out to be correct... so far.

I tried to take some pictures of the problem area but I got too much flaring off the bare metal that the pictures are out of focus. The nick turned out not that bad but will have to be strengthened up which I think the gusset will do.

Image

This shows the real problem which is a front to rear sag of ~1/8th inch. Not bad I guess but I didn't want any. The sag is centered in the center of the upright and taking it out causes other problems. I went out the garage over 10 times with different fixes and other than some real major cuts and re-welding together I would end up with a flat piece and other problems. As it stands, I need to finish the welds that need to be done the add gussets at least to the rear uprights.

It maybe a few days before much happens as this is the worst part of my allergy season and I try not to use tools during these times. Sneezing and being rummy are not good things to be when using tools that can hurt. It is a day to day thing.

Lee
Ol'fogasaurus
Posts: 17758
Joined: Mon Nov 13, 2006 10:17 pm

Re: metal band saw

Post by Ol'fogasaurus »

I've got the cart just about done. I still have the handle to finish but it is close to being down.

The pillow block did work up to a point. To get it perfect the block would be ground too thin to last with much more removed but it seems to be comfortable to lift.

its not beautiful but it is serviceable.

The whole cart is painted but for some reason the paint, which is chassis black, has a primer color haze to it in certain light conditions which made it really hard to paint. I don't like the texture to the paint either but it is hard and doesn't seem mark real well once it is set.

I have more pictures if someone wants them otherwise I won't post them.

Lee
You do not have the required permissions to view the files attached to this post.
Ol'fogasaurus
Posts: 17758
Joined: Mon Nov 13, 2006 10:17 pm

Re: metal band saw

Post by Ol'fogasaurus »

I have added a picture of how I gusseted the upright and the main frame to try to take out some of the sag in it.

I had a length or 1 X 3 rectangular tubing in the scrap bin so, using a combination square (as in the picture which is the end piece I have left over) I laid out a triangle allowing the open part to be on the inside. I set my band saw to cut the 45° angle for the first gusset then turned the tube over and cut the other gusset out. I then deburred it and laid it on the main frame and marked the top of the main frame's leg and that part was removed using a cut off tool.

I have the band saw sitting on top of a work table and if you are going to do this make sure that the saw is sitting on the table off-set enough to allow you to open up the saw to put the stock in the clamp. I thought I was OK the first time and when I slowly opened it it started to go over backwards. I was quick enough to grab it and move it forward again but you really have to be on the ball on this one. Open things up slowly!!!

I also cut part way around the radius so that the gusset, like the plans show for the uprights sits flush with the vertical part of the main frame. I then welded the gussets in place. Good welds and some bad looking welds but it is solid and that is what is important.

I also cut the round stock I had laying around with the band saw. I think it is CRES/SS but not your average soft stuff from a box store. This is marine grade stuff given to me probably 15 years ago. After cutting it to length I chucked it up in the late and squared the ends. I then horizontally drilled out a pilot hole followed by a 5/16 drill when is what the tap called out for in order to use a 3/8-18 bolt. This stuff is tuff and I mean tuff. The SS round stock is hard to thread: so hard that I broke the tap handle after less than 3/8ths of an inch penetration so now I have to figure what to do to finish out the treading process.

Anyway, that brings us up to date.

The gusset took most of the sag out of the main frame but I still have to put the band saw back on the mounts to see if/how much of a difference it made to the mounting of the saw.

Lee
You do not have the required permissions to view the files attached to this post.
Ol'fogasaurus
Posts: 17758
Joined: Mon Nov 13, 2006 10:17 pm

Re: metal band saw

Post by Ol'fogasaurus »

Its back together and done with the exception of the lift handle which I think I am going to look at again. The SS I was using was just too tuff to thread and I broke the handle for the tap.

Image

Image

Two pictures and that should be it for a while. It feels good to work with but heavy to move around with out the handles to lift the front up with. Other than that I am pretty satisfied with the build.

Lee
Ol'fogasaurus
Posts: 17758
Joined: Mon Nov 13, 2006 10:17 pm

Re: metal band saw

Post by Ol'fogasaurus »

Well, it isn't the Moaning Liza, it isn't the Eve-full Tower and it isn't a Van Go-get-it, it is more like an Andy Warhol, leaning tower of Pizza or Beetle Juice but it is going to get the job done.

Image

I got the handles done today. Yup, it is a bed frame and if it can support several hundred pounds small pieces should be OK for a handle. I made longer handles today as the old ones were just too short to work well. I gave up on the SS rod as it was just too tough to thread and I broke the handle of the threading tool trying to cut the threads.

Image

I used a chunk of an old BJ sway bar that was too pitted to be used on a car. I found two washers that fit on the rod so I tacked on a washer leaving room in case I might want to drill a hole for a cotter pin which I think I will do anyway. I then put the rod in place between the two handles and clamped them down tight and marked the inside of the rod as to where the other washer would fit; I then welded on the second washer and but the piece to length.

Image

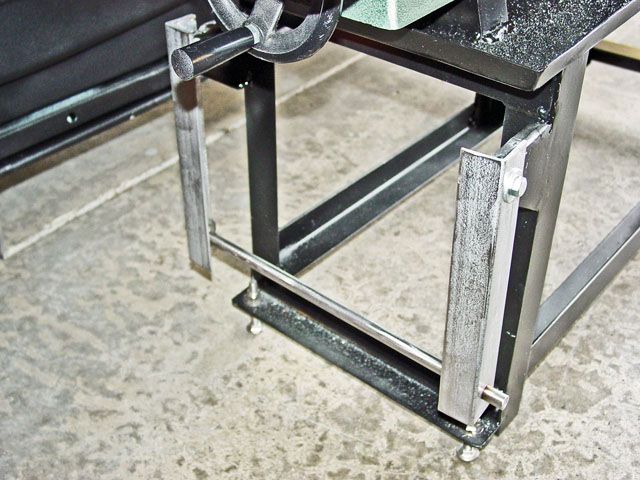
Yes, the handle does fold away. I will add a second jam nut to the inside allowing me to hold on to the ideal pressure so it doesn't swing all over the place when being used.

Image

That's about it folk. Other than painting the last things it is done.

Image

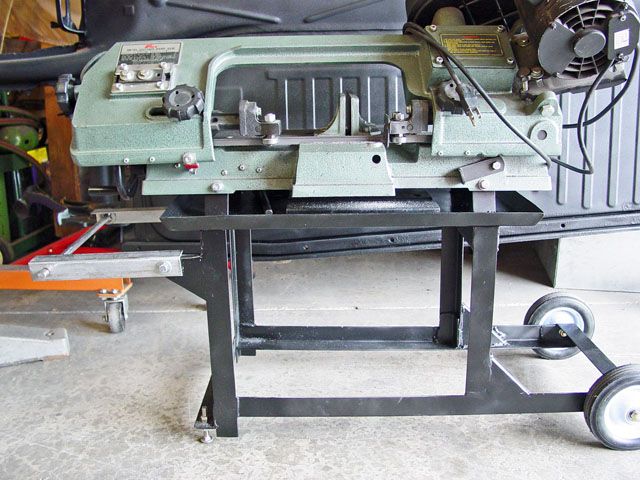
And yes I have moved it around and I cut the parts for the handle with it. It moves smoothly, quietly, maneuvers' around great, crosses cracks and seams in the concrete without stopping to drop in and is quieter and feels better now when cutting. You can even hear the difference in the sound of the material and saw when the end of the cut is about to end.

Things I would change would be the two main rails should be made from either thicker material or a different shape. With the wheels sitting so far to the rear (which is correct for stability) the weight of the motor is just aft of the middle of the frame; it is offset to the side of the cart that the motor sits on that has the sagging problem. I'm pretty sure that is part of the problems I have had... but not all of them.

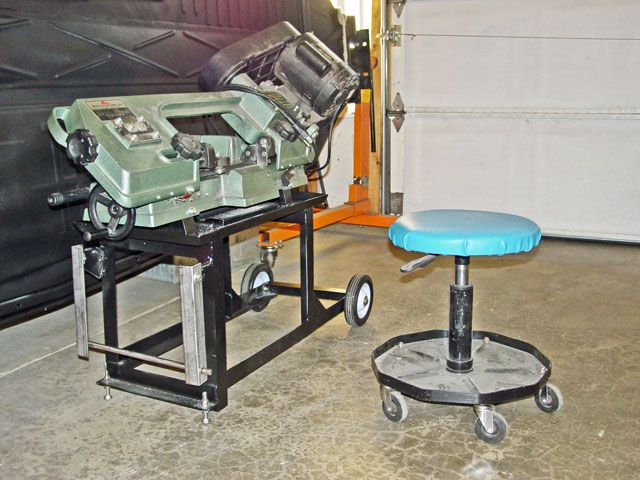
I would also make so the pan sat a bit higher up. As you can see by the stool, that is lowered to it's bottom setting, that you have to bend over a bit if you are going to monitor the cut. If you go too much I would start to worry about the weight sitting up so high especially without other changes to the width of the wheel base.

I was going to change the carriage bolts to 1/2" but looking at them in the box store it was over kill. The 3/8" SS Carriage bolts I used should be OK. I did go from 2" long to 2 1/2" long which I thought might be too long but now I am wondering if they are too short. If I had to go longer then I would go up one size of shank also. I also started to look for feet off a washer or dryer but now I am not sure that they wouldn't last a long time unless you were very careful with them; but they do have their advantages too.

Lee
Ol'fogasaurus
Posts: 17758
Joined: Mon Nov 13, 2006 10:17 pm

Re: metal band saw

Post by Ol'fogasaurus »

Image

I think it is done or close enough to be called that now.

In case anyone wants to get one of these combination band saws here is some more information you might find useful.

http://www.homemetalshopclub.org/news/1 ... pdf#page=7 Setting band saw blade tension. In other words tighten it is tight as you can on these little combo band saws and use the right tooth count and blade speed for what you are doing.

http://www.homemetalshopclub.org/projec ... stand.html Again, this is the plans for the band saw cart that I used as a basis for my cart.

http://www.homemetalshopclub.org/news/o ... ml#bandsaw Horizontal band saw tips.

http://www.mini-lathe.com/Bandsaw/Bandsaw.htm#bandsaw At the bottom are some more “doodies” that you can build and use on your band saw.

http://www.homemetalshopclub.org/news/article_sort.htm A lot more machining ideas here.

These combination horizontal/vertical band saws are handy little things to have and are somewhat portable to the site. You can find the same thing/similar thing from everyone from Jet to Sears (I think I saw them there) to ENCO to HF. Mine is an older 5 X 7 but the newer ones now have a deeper throat but the height was changed so they are 4 X 6 and use the same 64 1/2” blade.

There is another bigger version for about double the price that has coolant already as part of the unit.

The smaller unit will work as long as you keep after it and pay attention to what you are doing. Spitting the blade is the most irritating thing about them so keep the blade tension tight and use the proper tooth count for vertical sawing as compared to the lesser number of teeth for horizontal cutting. I also recommend a bi-metal blade for the horizontal cuts; the blade will last longer, the teeth will stay sharper and you would spit teeth as fast. For vertical cuts, the finer toothed blades I don’t think are bi-metal yet but I am not completely sure that is true. Also remember to change the blade speed which should be different between vertical use and horizontal use.

Lee
Ol'fogasaurus
Posts: 17758
Joined: Mon Nov 13, 2006 10:17 pm

Re: metal band saw

Post by Ol'fogasaurus »

Warning!!! I was moving the band saw back into its normal place when I found out that the whole shebang can tip over w/o warning.

There are two things to look out for:

Image

(added picture)

1) In this picture you can see a rod that hooks to a spring which in-turn hooks to the head of the saw; this allows you to set the tension/how determining both hard you have to work to set the saw in a vertical position and how much head pressure is on the blade when making in a horizontal cut. If the tension on the spring is tight enough (I haven't set it in 20 years so I had forgot how soft or hard it was set. I also did realize it would be that much of a problem) so at certain angles of tipping the whole stand the saw will open up like a spring loaded jack knife with the same torque reaction with the head coming up suddenly and either tip back or tip to the side. Just guessing, I think the stand was at somewhere less than 45° when the saw head started to rise. I double checked it again by lifting the stand up by the handle after it happened and again, the head started to lift up on its own. Your warned!

2) Don't forget about the spring. The new stand is so much smaller in height than the old stand that the saw came was so that where my ~6' tall wasn't a problem before now it can be if the spring is too tight and my head is not with the program.

When moving the saw on and off the stand during the build process I had strapped the head so an accident wouldn't happen during moving. I now thin that a bungee cord or something like that might not be a bad idea to have on it when the saw is not in use or being moved around. Something I will be doing for sure.

It doesn't look like there was any damage and everything is stilling as it should and it move correctly. Even better new is that the welds held and the stand doesn't seem to be torqued, bent or busted. The plastic cover over the pulleys had one of the hinges broken so it makes a rubbing sound but that can be fixed and so far everything else seems to be OK.

Lee

The post has been edited and some words were removed/changed and some added. The picture was also added.
with the exceptions of the deleted words I noted the changes in red - Lee
Ol'fogasaurus
Posts: 17758
Joined: Mon Nov 13, 2006 10:17 pm

Re: metal band saw

Post by Ol'fogasaurus »

I had a reason to use the saw today in the vertical position and other then the 18 TPI was too few of teeth or the speed was too slow for the thin material I was cutting the saw did pretty good. Sitting on the new lower stand turned out to be a non-issue as it was just as comfortable as it was before... maybe even more so as it feels more secure.

I found the stop for the saw's head rotation which is set to stop the head several degrees past vertical which, when you put the larger platen for vertical cutting in place, gives is an angle to see your work well when sitting on the cart/saw's base. If you are tall you can tilt the head a bit to the rear a bit so you have good vision of your work; the same ability to adjust the angle back if you are short.

As I said above, I am not sure if the blade speed was too slow so I am going to have to so some more research on it as there are three pulleys available. I think I read somewhere that the blade speed had to increase when cutting stock in the vertical position. I'm sure the manual for it is around here somewhere.

I do think I will have to make a new platen for it also as while the blade entrance slot is OK, the hole for the blade to go through is too big and it allows material to curl under and catch on the edges of oversized hole so that is going to be my next project for the saw. I have a 90° CSK so that other than the CSK depth the two dimpled/CSK mounting holes it should be doable (there are four standard dimples/CSKs I know of: 82°, 90°, 100° and 120° with 90° being the most common). I think this is might require both a dimple and some countersinking on the same holes; the dimples for centering the platen in the bottom guide and the countersink for the depth setting for the head setting of the two CSK screws; I'll have to check on it to see if both are necessary as the one that came with the saw is very thin stock.

I got a 24 tooth blade for it today but didn't use it. It wasn't a bi-metal blade so they can wear fast or can spit teeth depending on what you are cutting. Also I have to do some figuring on the three speeds of blade travel I am using. The 18 tooth bi-metal blade's teeth wants to catch on the material when in a vertical condition but horizontally is seems pretty good.

After all these years of using it I think I ignored a lot of things unless it had been a problem. For some reason it suddenly has become important. Maybe it is because I am having trouble justifying spending the big bucks to buy a good vertical band saw to cut ferrous metal.

Lee
Ol'fogasaurus
Posts: 17758
Joined: Mon Nov 13, 2006 10:17 pm

Re: metal band saw

Post by Ol'fogasaurus »

I found this today. Also it talked about blade speed and it looks like 200 is the number to be concerned with.

Lee
You do not have the required permissions to view the files attached to this post.
Ol'fogasaurus
Posts: 17758
Joined: Mon Nov 13, 2006 10:17 pm

Re: metal band saw

Post by Ol'fogasaurus »

Per the last post I found out that HF sells two bi-metal blades: 14 and 17 longer tooth blade for thicker material and an 18 fine tooth blade for thinner material (~1/8 and thinner). I had spit some teeth on thin material and the blade kept catching on the thin material and would come shooting off the dive and idler wheels. While I was looking at blades and contemplating the difference a welding and fab teacher who was also buying blades got talking to me and told me the difference that I hadn't noticed as I was only looking at bi-metal and the tooth count at the time.

The SS Philips head screws on my 20+ year old saw that held the platens down had finally worn out. I went up to a fastener store near me and got a couple SS 1/4 X 20 X 1/2" SS hex head screws but they didn't work correctly as the top stood up too high. I got looking at them and the screw and it looked like the head was too thick (silly me, I should have known better) so I went back to the fastener store I got them at and that size head was all they had in either steel or SS. I got looking at the heads closer and finally noticed that the CSK was wrong. They had given me an 82° CSK screw which was all they carried and I needed either a 90° or 100° degree CSK (the fourth standard size CSK is 120°). After leaving I checked around at other places locally and... CSK machine screws are hard to find.

After fussing around wrestling with the problem I knew I had a CSK laying around so after a bit of garage clean-up I found it and it was 82°... Shazzam! :evil: The screw heads were about the same size so, what the heck I decided to take a chance. First I drilled a hole in some thick scrap and made a CSK hole just for practice. I then re-CSK the holes in the small horizontal guide platen and it worked OK, z little iffy but safe and solid. The holes in the vertical platen were dimpled in the sheet metal and had a 90° run-out at the bottom of the dimple. I set it on a piece of wood and started to CSK the dimple. It did work but I was very careful to stop after metal shavings started to come out. After several cuts and measuring with the screw head I got the screw heads just below the surface of the platen w/o thinning out the dimple too much and still had a bit of the run-out left... but not much.

I don't really recommend this but if you are careful you might get away with it. I am going to build a larger t hicker platen for it but this will get me by until then.

I have seen a lot of these horizontal/vertical up for sale on CL lately with prices ranging from under $100 to way too much; e.g., the asking price is more than you can get them for new. They are a good starter piece as long as you keep the tension on the blade very tight and much cheaper than the bigger 14" throat models if you can live with the small throat but if you plan things right you can still do a lot with them.

If you look at the two speed 14" throat models be careful; they will work with nonferrous materials but the speeds are too high for steel. There is a speed reduction kit for some of them that puts the motor in the base and I think I have read that that makes enough of a difference to be usable.

For the cheaper horizontal/vertical stands (there is a higher priced four wheel model that is not really comparable to the cheaper one) if you make a good secure stand for them they seem to work better than it did before... mine sure feels like it anyway.

Lee
Ol'fogasaurus
Posts: 17758
Joined: Mon Nov 13, 2006 10:17 pm

Re: metal band saw

Post by Ol'fogasaurus »

Got to make an update but I think I will add some of the missing pictures of the new stand I built. This is part 1 going over what I did originally.
DSC04838.JPG
I bouight this horizontal/vertical from ENCO back in the early 90's when they had a store in the Tukwila area near Seattle. The store is now gone but they and many other companies still buy this from overseas and paint them different colors and have their own names put on them.

In stock form, they work OK but after getting quite exasperated with this one I did some searching and found a article about making a new stand for them that cures some of the problems the stock stands seem to have some problems that go up to the main unit(http://www.homemetalshopclub.org/projects/saw stand/sawstand.html) and this is what I based my band saw stand on. Also, the hand held small band saws can be purchased with a table for them or http://www.swagoffroad.com/SWAG-V30-Por ... _p_55.html.

DSC04842.JPG
The main stand was made from angle iron and is pretty straight forward; you can see it in the pictures and I think base dimensions are given in the URL I posted. I fit mine to my self dimension wise. It is the top platform that is the hardest to make.
DSC04843.JPG
I put bluing on the flat stock then marked out the dimensions I wanted. I then put a bend relief in the corners where the flanges will be bent up. If I remember I used a drill that was twice the diameter as the stock thickness. Since I was only bending up ~(roughly) 45° I thought this would be enough.
DSC04844.JPG
I then made a half cut pattern of the relief cut for a 45° bend.
DSC04845.JPG
This is the start of the bending.
DSC04846.JPG
This is the base support for making the bend. I did not put it on the centerline (CL) of the bend but back behind the CL a bit allowing for the bend radius.
DSC04847.JPG
This is going to look a bit confusing but what you see here is angle iron clamped to the flange I am bending up. I then put two locking clamp pliers on the angle iron and then lifted.
002.JPG
This is the end of part one. The rest of it was mostly welding the seams and making and adding the mounts.
Band saw cart finish (6).JPG
You do not have the required permissions to view the files attached to this post.
Ol'fogasaurus
Posts: 17758
Joined: Mon Nov 13, 2006 10:17 pm

Re: metal band saw

Post by Ol'fogasaurus »

Part 2
IMG_1056 copy.jpg
This is the platen used when doing work as a horizontal band saw. It is small and sits on top of the lower guide. It is held in place by CSK Allen Head screws. I am not sure of what the angle was but due to something I had to re-CSK them and I think I used an 82° CSK bit (check first).
IMG_1054 copy.jpg
This is the platen that comes with the band saw for vertical use. It isn't good for much but does work. The forming of the platen was mostly for strength and the platen isn't square.
IMG_1055 copy.jpg
I clamped a guide in place but it just didn't work mostly because the hole for the blade to go through it just too big and stuff hangs up on the hole.
IMG_1057.JPG
Quite a while ago I bought a sheet of what I remember being 1/8" plate. I was going to make a new platen for it and design it a bit different.

I notice that some of the hand held conversions have the same mistake to them and that is the slit for putting the blade though is in the front where you feed. I will put mine in the rear and make the hole for the blade quite a bit smaller and maybe bending the edge down a bit so stuff doesn't hand up in it.

Lee
You do not have the required permissions to view the files attached to this post.
Ol'fogasaurus
Posts: 17758
Joined: Mon Nov 13, 2006 10:17 pm

Re: metal band saw

Post by Ol'fogasaurus »

I forgot to mention that the cheaper band saws want to spit the blade off the pulleys; really irritating to say the least. I saw a guy on one of the reality shows (custom motorcycles) go ballistic after the umpteenth time the blade flew off the saw and bust his up while filming went on; a real TT. If I remember correctly the production company bought him a new upper level vertical band saw :roll: :lol: /

The key to stopping this it to adjust the upper wheel as tight as you can (within reason of course as I did have one band separate at the join spot weld). There are some other adjustments to be made also but the tension on the band is the biggest of the problems.

I see used ones up for sale for as little as $100 or as high as "is that made from gold?. I just did a check on Craig's List (locally) and there are two for $100 and one for $95. There is another horizontal design that starts somewhere in the $600-$700 range but I don't think they go horizontal. I did see this though: https://seattle.craigslist.org/tac/tls/ ... 55316.html

The smaller combination band saw does store away fairly easy (and was cheap) which is why I bought mine so long ago.
Ol'fogasaurus
Posts: 17758
Joined: Mon Nov 13, 2006 10:17 pm

Re: metal band saw

Post by Ol'fogasaurus »

While I am not going to build the platen today I do have a question:

I have a chunk of 1/8" thick, 11 1/4" X 17" piece of sheet that has somehow taken a small curve to it in the 17" length direction, probably from leaning against a flat piece of wall for a long time. How do I take the arc out of it. Would it be best to clamp several lengths of angle iron to it then apply heat it or just what. If I have to heat it how much heat should be applied; e.g., a torch or just a heat gun applied for a while then allowed to cool tired to the angle iron?
User avatar
SCOTTRODS
Posts: 626
Joined: Sun Nov 07, 2010 7:15 am

Re: metal band saw

Post by SCOTTRODS »

Lean it against the wall the other way for a few months... Maybe that'll help... :mrgreen:
I have found them completely missing more than once. - PILEDRIVER

Some pics of My Powder Coating work
http://s244.photobucket.com/albums/gg6/terrellster/
My Facebook Page for Powder Coating
http://www.facebook.com/profile.php?id=100001788886297
Post Reply