I recently bought one of these on eBay:
https://www.etsystudio.com/listing/5177 ... -toolno-cf
https://www.ebay.com/itm/SNAP-ON-Tools- ... SwvoBaz5Pd
but this one looks like it would do the same thing:
https://www.buckperformance.com/Spark-P ... gt-212.htm
Easy Spark Plug Gapper Tool
-
Ol'fogasaurus
- Posts: 17756
- Joined: Mon Nov 13, 2006 10:17 pm
Re: Easy Spark Plug Gapper Tool
I used those gapping pliers back in the late 50s and early 60s but there is an easier/cheaper plug gaper that you can put on your key ring/chain. It is a round ring with a tapered ridge around the outside and the gradations are marked as to the gap. They used to be given a way as business reminders but now I have seen them in the clear jars at the auto parts stores. We were supposed to use the feeler gage version.
I am looking at one of the old ones I have which is a Craftsman unit (with chain) that has p/n 940820 embossed on its face. I tried to get a picture of it but going to the sears site the pant number is now for a "refrigerator drawer"; reusing a part number, that's something that is not supposed to be done. Anyway the front side is in inches and the back side is metric. You can see one like it here: http://www.sears.com/search=craftsman%2 ... ap%20gauge
Not sure of the new plugs with many or split electrodes on them but have seen them brought out many different times.
Lee
-
Jim Ed

- Posts: 766
- Joined: Tue Aug 31, 2010 5:14 am
Re: Easy Spark Plug Gapper Tool
I used the Snap On CF71 gapper tool yesterday to gap my plugs to .028.
It speeded up the process.
I still had to use this tool:
https://store.snapon.com/Spark-Plug-Gau ... 35166.aspx
to get the gap exactly right.
Next I am going to test the plugs with an ohm meter before installing them.
https://www.youtube.com/watch?v=hnd7P7O_vEQ
It speeded up the process.
I still had to use this tool:
https://store.snapon.com/Spark-Plug-Gau ... 35166.aspx
to get the gap exactly right.
Next I am going to test the plugs with an ohm meter before installing them.
https://www.youtube.com/watch?v=hnd7P7O_vEQ
-
raygreenwood

- Posts: 11895
- Joined: Wed Jan 22, 2003 12:01 am
Re: Easy Spark Plug Gapper Tool
Ol'fogasaurus wrote: ↑Fri Apr 20, 2018 5:47 pm I used those gapping pliers back in the late 50s and early 60s but there is an easier/cheaper plug gaper that you can put on your key ring/chain. It is a round ring with a tapered ridge around the outside and the gradations are marked as to the gap. They used to be given a way as business reminders but now I have seen them in the clear jars at the auto parts stores. We were supposed to use the feeler gage version.
I am looking at one of the old ones I have which is a Craftsman unit (with chain) that has p/n 940820 embossed on its face. I tried to get a picture of it but going to the sears site the pant number is now for a "refrigerator drawer"; reusing a part number, that's something that is not supposed to be done. Anyway the front side is in inches and the back side is metric. You can see one like it here: http://www.sears.com/search=craftsman%2 ... ap%20gauge
Not sure of the new plugs with many or split electrodes on them but have seen them brought out many different times.
Lee
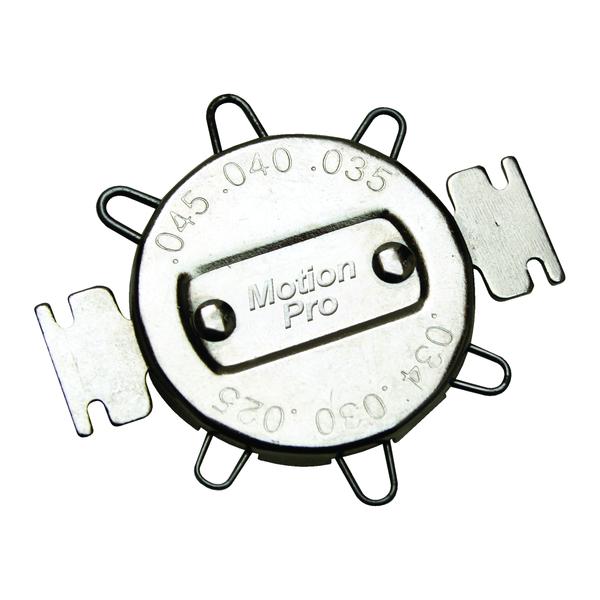
NEVER use a tapered/ramped gapping tool!. Across an average electrode which is about 0.070" wide....you get a definate slant. One side of the electrode will always be several thousandths closer to the center electrode.....and it will only and always spark from the closer edge first. Use a flat blade or wire ring type only.
The triple and double electrode plugs use a special gap gauge that can be used for almoat any plug and is excellent.
Ray
-
Ol'fogasaurus
- Posts: 17756
- Joined: Mon Nov 13, 2006 10:17 pm
Re: Easy Spark Plug Gapper Tool
Ray, that is an old tale that goes back to one of the many sparkplug wars years ago. There was a lot of bad mouthing other's products going on (just like the oil and gas wars) and this was just one of them, some of which are still hanging around. We did try that and then used the feeler gauges to double check; if it did happen it wasn't enough to really tell.
Unless you are really rough doing it you might be able to do it I guess. If your spark plugs do bend that easy you probably shouldn't be using them.
Lee
Unless you are really rough doing it you might be able to do it I guess. If your spark plugs do bend that easy you probably shouldn't be using them.
Lee
-
SCOTTRODS

- Posts: 625
- Joined: Sun Nov 07, 2010 7:15 am
Re: Easy Spark Plug Gapper Tool
I work on industrial machines and all I use the Ramp style for is checking them... most of the plugs I use are Pre-gapped nowadays, and have a little cardboard toilet paper tube around the firing end of the plug to protect them during handling and shipping. If I get 3 plugs (I do a lot of 3 cylinder engines) I check all. 3 to verify the gap is the same and "close" to what is called for on the engines. Most of my machines also have a Gpa range to hit, not a specific gap. This makes it much easier to comply with pre-gapped stuff for sure. There are times when I want an exact gap, and times I just want to be in range. I do my final check on specific gap with blade feeler gauges... Hard to go very wrong with those if you have any clue on how to use them.
The way I see it is this... Use what you have and know the best case scenario for the outcome if you know it. If you don't... probably shouldn't be doing your own engine work.
The way I see it is this... Use what you have and know the best case scenario for the outcome if you know it. If you don't... probably shouldn't be doing your own engine work.
I have found them completely missing more than once. - PILEDRIVER
Some pics of My Powder Coating work
http://s244.photobucket.com/albums/gg6/terrellster/
My Facebook Page for Powder Coating
http://www.facebook.com/profile.php?id=100001788886297
Some pics of My Powder Coating work
http://s244.photobucket.com/albums/gg6/terrellster/
My Facebook Page for Powder Coating
http://www.facebook.com/profile.php?id=100001788886297
-
Dale M.

- Posts: 1673
- Joined: Mon Oct 05, 2009 8:09 am
Re: Easy Spark Plug Gapper Tool
Old school here...
Prefered...
Backup...
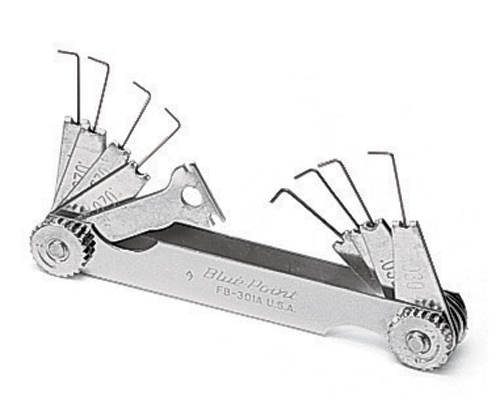
Dale
Prefered...
Backup...
Dale
"Fear The Government That Wants To Take Your Guns" - Thomas Jefferson
1970 "Kellison Sand Piper Roadster"
1970 "Kellison Sand Piper Roadster"
-
raygreenwood
- Posts: 11895
- Joined: Wed Jan 22, 2003 12:01 am
Re: Easy Spark Plug Gapper Tool
Yes....spot on...the free wire or L-wire or the wire ring tools...both you have pictured...are the best.
The ramp style gap tools suck....period. They ALWAYS give a slanted gap....ALWAYS. And....checking with feeler gauges (which is a great habit)...only confirms that some part of the gap ...one side....is of the correct gap. It does not set it flat and square.
Let me show you what I mean:
Lets take a look at this: These are fairly standard ramped style gap gauges. Most have almost the same specs with only a few variations.
It goes from 0.020" to 0.100"...in almost exactly 270*....with 0.010" marked off in 0.001" increments between each major .010" hash mark. So thats a ramp range of 0.080"....in 270*. That means that each 0.001" tick mark spans 3.375* of rotation around the ramp.
The center electrode width on virtually all standard copper/nickel plugs is 2.5mm...or 0.098" width. I will have to measure one of mine...but the side ground electrode is typically right at that width or a couple thou wider. Call it 0.100"-ish.
Your average ramped style round ramp gauge....1.5" in diameter.... The 1.5" gauge would give a edge perimeter of 4.71". Multiply that by 0.001" and divide by 360. You get 0.0133" per degree mark (if it were a full perimeter gauge). But...you can pull 0.098" off of each side of that...for the diameter of the electrode contact point on the ramp...giving an operative diameter of 1.304"...so the outside perimeter is actually 4.1". You get 0.01139" per degree.
Since the gauge is only using 270* of the 360*....multiply 270* x 0.01139"= 3.0753" of that 4.1" edge perimeter is used by just the gauge section.
So 3.0753" divided by 80...since there are 80 individual 0.001" tic marks on it.... = .0384"-ish of perimeter area is spanned by each degree mark. The standard 0.100" ground electrode will span 2.6 of the 0.001" tic marks....so one side of a 0.035 plug setting will be at 0.035"...and the other will be at 0.0376"-ish. Almost 0.003"...BIGGER gap on one side.
That is significant. The plug will ALWAYS spark from that edge...and both the center electrode and side electrode will wear at angle angle
The smaller the gauge diameter...the wider the variation.
Sorry to get all math nerd on you....but it is an issue using ramped gauges. Do they work...yeah....but not well.
As for plugs now days being pre-gapped....yep....its been that way for almost 40 years actually.
But you still need to check them. I find about 2 out of 10 in any brand to be off. The exception seems to be the iridium and other fine wire electrodes. They are virtually impossible to gap without cracking the electrode so they seem to have a better system for getting them right (or at least take better care with them). Ray
-
Ol'fogasaurus
- Posts: 17756
- Joined: Mon Nov 13, 2006 10:17 pm
Re: Easy Spark Plug Gapper Tool
Everything has a tolerance and a working range tolerance also. Flat plate has a dimensional size/range, wire has a similar range, machining has a range the same with castings, forgings and so on. I did a couple of drawings where the dimension was "X" with the decimal side of the dimension being out to 5 places (I may had done one to 7 decimal places but that was so long ago); for each decimal place the cost of the product goes up proportionally. I heard of one design being dimensioned to 9 decimal places but that, while necessary, was rediculous. Add to that material expansion and contraction which has to be figured into the design to start with.
Dimensional tolerance as well as angular tolerance is alway indicated either on the dimension or on the body of the drawing itself.
Your math was interesting but I was watching on of those "how to" engine build shows the other day and they were talking about spark plugs and gaps on the performance engine they were building. Like you said hey mentioned that the plugs came preset (but then they always were, you double checked them as the same plug could be used on several different engines and the gaps used were different) but they also said that the working range (dimensional tolerance) on the gap range wasn't anywhere near that much.
Back in the late 50s and early 60s when I was a (so called) mechanic every garage had one of those spark plug testing machines. This was where you screwed the plug into the machine, added a plug wire to the plug then, in the mirror, you could see the plug working. It was interesting but its good was more to the working ability of the plug itself (they were using checking for the color of the arc and checking the seal on the plug as back then the seals were somewhat of a problem.
The URL I posted had the same ones Dale posted plus some other interesting designs. The circular one I posted was a key chain design and usually used if you had a problem on the road. I still think, even after we tested (more of a fun thing vs. how important and yes, we did use a feeler gauge to double check) them and found out that if there was a problem wtih them causeing an angle to the ground (we didn't find that to happen) that they still were within tolerance unless the plug itself was an/the issue.
Lee