Hope you don't mind an early morning brain dump...
There are actually THREE plugs on the front...
The one up by the crank snout feeds the snout bearing at least, and is a restrictor that traps crud.
The restriction is not required as the bearing has a restricted oil feed hole, and you cannot clean out the passage with the plug in there.
Needs the smallest plug one can find, there exist 1/16" NPT plugs usually used for nitrous setups, I have also tried a large setscrew, but a 1/8" plug will work, but IIRC you may need to use a shortened tap to open it up enough to get it flush and miss the pulley.
(I have slept since then)
IMHO brass plugs/fittings work best, as the threads don't gall up on aluminum and the heat expansion rate is reasonably close. SS plugs work, but expands far less than the aluminum and will test yout thread sealant.
Aluminum plugs gall up and can be forever, or at least dork up the case.
Cheap Junk 1971 Build
-
Piledriver

- Moderator
- Posts: 22520
- Joined: Sat Feb 16, 2002 12:01 am
Re: Cheap Junk 1971 Build
Addendum to Newtons first law:
zero vehicles on jackstands, square gets a fresh 090 and 1911, cabby gets a blower.
EZ3.6 Vanagon after that.(mounted, needs everything finished) then Creamsicle.
zero vehicles on jackstands, square gets a fresh 090 and 1911, cabby gets a blower.
EZ3.6 Vanagon after that.(mounted, needs everything finished) then Creamsicle.
-
Piledriver
- Moderator
- Posts: 22520
- Joined: Sat Feb 16, 2002 12:01 am
Re: Cheap Junk 1971 Build
I have noticed, multiple occasions, that the exhaust valve stems seem to wear (or perhaps stretch and get skinny) as much or more than the guides (assuming you have the good guides to begin with)
Simply swapping in new TRW ex valves has given me mid-spec clearances with existing guides on several occasions.
Intakes seldom need replaces unless they have been cut too many times.
Simply swapping in new TRW ex valves has given me mid-spec clearances with existing guides on several occasions.
Intakes seldom need replaces unless they have been cut too many times.
Addendum to Newtons first law:
zero vehicles on jackstands, square gets a fresh 090 and 1911, cabby gets a blower.
EZ3.6 Vanagon after that.(mounted, needs everything finished) then Creamsicle.
zero vehicles on jackstands, square gets a fresh 090 and 1911, cabby gets a blower.
EZ3.6 Vanagon after that.(mounted, needs everything finished) then Creamsicle.
-
Clatter

- Posts: 2034
- Joined: Sun Apr 28, 2002 1:01 am
Re: Cheap Junk 1971 Build
Pile,
Is this the additional plug you were referring to?
(Marked in yellow)

Is this the additional plug you were referring to?
(Marked in yellow)
Last edited by Clatter on Fri Oct 25, 2019 10:23 am, edited 1 time in total.
Speedier than a Fasting Bullet!
Beginners' how-to Type 4 build thread ---> http://shoptalkforums.com/viewtopic.php?f=1&t=145853
Beginners' how-to Type 4 build thread ---> http://shoptalkforums.com/viewtopic.php?f=1&t=145853
-
Clatter
- Posts: 2034
- Joined: Sun Apr 28, 2002 1:01 am
Re: Cheap Junk 1971 Build
Pile mentioned something about valves that rings true with what was happening here.
The old valves were condemned by the measurement of the stem OD.
The 'good used' ones were determined 'good' by their stem measurement.
Alas, the 'newer' valves didn't tighten up the clearance to the guides enough for us to be happy.
Part of what makes these motors ungainly and unattractive is the smell.
You will notice plateau-honed new cylinders, new rings, and new guides in this build.
These motors stink and smoke compared to a 'real' car, even when stuff is new.
After getting away with certain things for years, and having an eye-burning stench to go with it,
It's one of my goals to at least get the thing as clean as i can.
Must be getting old...
Anyhow, here are a few stupid pet tricks related to preparation of the valvetrain area.
First off, i like to take a file and clean any shelf rash off of the gasket sealing area.

Taking the old burr knife and removing any sharp-ness off the edge of the chamber.
After the fly-cut, a burr might be a hot spot that could trigger detonation on a hot day.

Also good to grind the keepers so they don't touch...
Yeah, i know it's bad practice to use the side of a grinding wheel.
They get taken down on the face of the wheel, then just touched here to clean up.


Up-sizing the rocker mounting studs is an upgrade.
Easy to pull out the old ones with pliers.

This shows the size difference.
If you are going to run heavier springs these things are cheap insurance.
My cheap junker with type 1 singles and a Web 86 might not even get them.

So, just a bit o' valvetrain and misc.
Will get to more details later...
The old valves were condemned by the measurement of the stem OD.
The 'good used' ones were determined 'good' by their stem measurement.
Alas, the 'newer' valves didn't tighten up the clearance to the guides enough for us to be happy.
Part of what makes these motors ungainly and unattractive is the smell.
You will notice plateau-honed new cylinders, new rings, and new guides in this build.
These motors stink and smoke compared to a 'real' car, even when stuff is new.
After getting away with certain things for years, and having an eye-burning stench to go with it,
It's one of my goals to at least get the thing as clean as i can.
Must be getting old...
Anyhow, here are a few stupid pet tricks related to preparation of the valvetrain area.
First off, i like to take a file and clean any shelf rash off of the gasket sealing area.
Taking the old burr knife and removing any sharp-ness off the edge of the chamber.
After the fly-cut, a burr might be a hot spot that could trigger detonation on a hot day.
Also good to grind the keepers so they don't touch...
Yeah, i know it's bad practice to use the side of a grinding wheel.
They get taken down on the face of the wheel, then just touched here to clean up.
Up-sizing the rocker mounting studs is an upgrade.
Easy to pull out the old ones with pliers.
This shows the size difference.
If you are going to run heavier springs these things are cheap insurance.
My cheap junker with type 1 singles and a Web 86 might not even get them.
So, just a bit o' valvetrain and misc.
Will get to more details later...
Last edited by Clatter on Fri Oct 25, 2019 10:24 am, edited 1 time in total.
Speedier than a Fasting Bullet!
Beginners' how-to Type 4 build thread ---> http://shoptalkforums.com/viewtopic.php?f=1&t=145853
Beginners' how-to Type 4 build thread ---> http://shoptalkforums.com/viewtopic.php?f=1&t=145853
-
Piledriver
- Moderator
- Posts: 22520
- Joined: Sat Feb 16, 2002 12:01 am
Re: Cheap Junk 1971 Build
Clatter wrote:Pile,
Is this the additional plug you were referring to?
(Marked in yellow)

Yes.
Addendum to Newtons first law:
zero vehicles on jackstands, square gets a fresh 090 and 1911, cabby gets a blower.
EZ3.6 Vanagon after that.(mounted, needs everything finished) then Creamsicle.
zero vehicles on jackstands, square gets a fresh 090 and 1911, cabby gets a blower.
EZ3.6 Vanagon after that.(mounted, needs everything finished) then Creamsicle.
-
Brent69

- Posts: 28
- Joined: Fri Oct 28, 2011 9:31 pm
Re: Cheap Junk 1971 Build
Pretty sweet to see this. Keep up the good work!
-
Bobsnotch
- Posts: 3
- Joined: Sat Nov 01, 2014 1:07 pm
Re: Cheap Junk 1971 Build
Cool build Clatter. I'll have to keep an eye on this. 
Lots of good info to be found with this build.
Just so you know, I had to re-register as the forum couldn't find me, and wouldn't let me use my regular registered name that I've had on here for years. Doc must have purged my old password.
Lots of good info to be found with this build.
Just so you know, I had to re-register as the forum couldn't find me, and wouldn't let me use my regular registered name that I've had on here for years.
-
Dlglobal1
- Posts: 1
- Joined: Fri Oct 31, 2014 2:06 pm
Re: Cheap Junk 1971 Build
Thanks for this thread Clatter! I'm just getting started on the tear down and stock rebuild of my '70 T3 1600. My first motor rebuild in 30 years so nice to read lots of good tips here as I'm re- learning.
-
Clatter
- Posts: 2034
- Joined: Sun Apr 28, 2002 1:01 am
Re: Cheap Junk 1971 Build
So, at this stage parts are scattered around the state.
The case is off at my Local Hero's place getting final tanking and a skim-cut on the deck (cylinder registers).
Remember those dings?
It's also good with any used cases, to get the deck touched off with the fly-cutter.
They all spread the center main a tad with some use, even the type 4.
Not like a type 1, but still, better is better.
If it takes more than a thou or three to clean up, toss the case, It's junk.
I have a few pics of a case with a spread center main - remind me to get those...
The lifters are all on their way to SLR.
The whole lower rotating assembly got delivered to the machinist.
My guess with the two cranks was spot-on.
The one with smear-age from a bearing spinning, that I showed in the picture, was just that.
And it made the difference between having the crank ground, and just a polish.
So the 'burned' crank with the smear-age will get hosed down with WD-40 and wrapped in Saran Wrap.
In another 10 or 20 years a 2.0 crank will be worth turning down...
The 'rusty' crank can be polished, and will get the balance job, hopefully next week.
The last three or four core motors I ripped down, all of the fasteners and small parts got put in an old drawer.
This after they were tanked at my FLAPS.
The parts got inspected, and cleaned up for use with my motor here.
Hopefully, all of this stuff will all be ready to go and all lined out when the parts start drifting back in.
This fan hub is marginal.
After shining up the seal surface with some 400 wet/dry, it shows that the seal got dirty and/or burned up.
Some of this might be water damage, too.
This thing is scored enough to be considered a 'survival' part, not even good enough for our Cheap Junk build.

Here's a deal killer;
This is why they run the washer between the fan and hub -(That, or maybe a PO did something stupid with it...) the mounting 'ears' are damaged.
See the imprint along the bolt area?
Toss this one.

One of the motors had type 1 case nuts on the 6 main cross-bolts.
My guess is that we have a PO's work.
Anybody ever see a type 4 with sealing nuts before?

Might as well run 'em...
Wire-wheeling everything down...
After and Before:

Slowly, a pile of wheeled-down parts emerges...
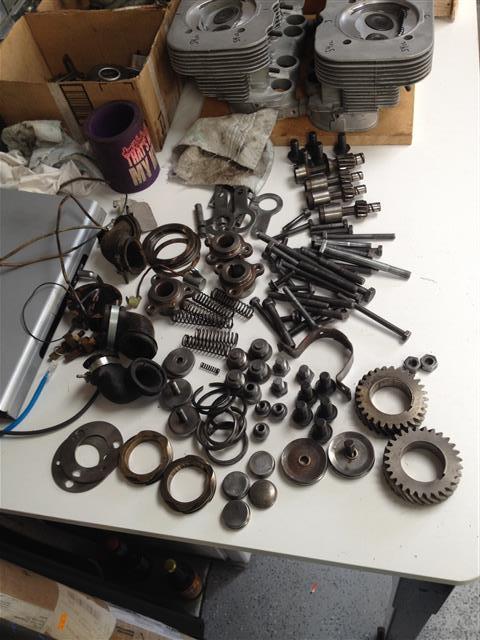
I didn't take pictures of everything,
But will show the results of my sorting to give an idea of the process, and how it, er, proceeds.
The box on the left is going to get tanked.
Strainer screen, rocker stands, etc. All were oily from core motors and never cleaned.
Box on the right is going to glass bead.
Sump plate, taco plate, crank gears, misc tin.
All of this stuff was rusty, and the wire wheel couldn't reach in the cracks.
Some of this stuff will get painted, and the wire wheel would contaminate.
Remember to very very carefully clean any internal parts that get blasted, like those crank gears.

Head studs and case cross-bolts (main case bolts)
These all get wire-wheeled extra hard.
The nuts need to spin freely to not foul torque readings.
You can also see places where someone used vice-grips to remove the head studs.
For some reason I feel compelled to smooth them back out with a grinder.
The head studs will get cleaned with some brake cleaner and given a coat of rattle-can.
Can't help but think a bit of rust prevention is good for head studs...
At the top, the pushrod tubes got added to the box of stuff to get blasted.
These seem to always get crusty and corrode.
Again, internal parts - clean carefully after blast.

What was a drawer heaping huge and spilling over, now has but a bit left.
This project took most of a day, and still these mostly nuts and washers remain.
With completion of this drawer, there will be a nice sorted lot of bolts ready to go on.

On a nicer build, the bolts might get blasted, then possibly black oxide, zinc, chrome, or cadmium, depending upon the owner's tastes.
That's a whole other subject....
The simple wire-wheel treatment is better than most production shops would bother with,
and perfect for our Junker here.
Next installment, I plan to have everything cleaned up and laid out, ready for our parts to arrive...
The case is off at my Local Hero's place getting final tanking and a skim-cut on the deck (cylinder registers).
Remember those dings?
It's also good with any used cases, to get the deck touched off with the fly-cutter.
They all spread the center main a tad with some use, even the type 4.
Not like a type 1, but still, better is better.
If it takes more than a thou or three to clean up, toss the case, It's junk.
I have a few pics of a case with a spread center main - remind me to get those...
The lifters are all on their way to SLR.
The whole lower rotating assembly got delivered to the machinist.
My guess with the two cranks was spot-on.
The one with smear-age from a bearing spinning, that I showed in the picture, was just that.
And it made the difference between having the crank ground, and just a polish.
So the 'burned' crank with the smear-age will get hosed down with WD-40 and wrapped in Saran Wrap.
In another 10 or 20 years a 2.0 crank will be worth turning down...
The 'rusty' crank can be polished, and will get the balance job, hopefully next week.
The last three or four core motors I ripped down, all of the fasteners and small parts got put in an old drawer.
This after they were tanked at my FLAPS.
The parts got inspected, and cleaned up for use with my motor here.
Hopefully, all of this stuff will all be ready to go and all lined out when the parts start drifting back in.
This fan hub is marginal.
After shining up the seal surface with some 400 wet/dry, it shows that the seal got dirty and/or burned up.
Some of this might be water damage, too.
This thing is scored enough to be considered a 'survival' part, not even good enough for our Cheap Junk build.
Here's a deal killer;
This is why they run the washer between the fan and hub -(That, or maybe a PO did something stupid with it...) the mounting 'ears' are damaged.
See the imprint along the bolt area?
Toss this one.
One of the motors had type 1 case nuts on the 6 main cross-bolts.
My guess is that we have a PO's work.
Anybody ever see a type 4 with sealing nuts before?
Might as well run 'em...
Wire-wheeling everything down...
After and Before:
Slowly, a pile of wheeled-down parts emerges...
I didn't take pictures of everything,
But will show the results of my sorting to give an idea of the process, and how it, er, proceeds.
The box on the left is going to get tanked.
Strainer screen, rocker stands, etc. All were oily from core motors and never cleaned.
Box on the right is going to glass bead.
Sump plate, taco plate, crank gears, misc tin.
All of this stuff was rusty, and the wire wheel couldn't reach in the cracks.
Some of this stuff will get painted, and the wire wheel would contaminate.
Remember to very very carefully clean any internal parts that get blasted, like those crank gears.
Head studs and case cross-bolts (main case bolts)
These all get wire-wheeled extra hard.
The nuts need to spin freely to not foul torque readings.
You can also see places where someone used vice-grips to remove the head studs.
For some reason I feel compelled to smooth them back out with a grinder.
The head studs will get cleaned with some brake cleaner and given a coat of rattle-can.
Can't help but think a bit of rust prevention is good for head studs...
At the top, the pushrod tubes got added to the box of stuff to get blasted.
These seem to always get crusty and corrode.
Again, internal parts - clean carefully after blast.
What was a drawer heaping huge and spilling over, now has but a bit left.
This project took most of a day, and still these mostly nuts and washers remain.
With completion of this drawer, there will be a nice sorted lot of bolts ready to go on.
On a nicer build, the bolts might get blasted, then possibly black oxide, zinc, chrome, or cadmium, depending upon the owner's tastes.
That's a whole other subject....
The simple wire-wheel treatment is better than most production shops would bother with,
and perfect for our Junker here.
Next installment, I plan to have everything cleaned up and laid out, ready for our parts to arrive...
Last edited by Clatter on Fri Oct 25, 2019 1:13 pm, edited 3 times in total.
Speedier than a Fasting Bullet!
Beginners' how-to Type 4 build thread ---> http://shoptalkforums.com/viewtopic.php?f=1&t=145853
Beginners' how-to Type 4 build thread ---> http://shoptalkforums.com/viewtopic.php?f=1&t=145853
-
Clatter
- Posts: 2034
- Joined: Sun Apr 28, 2002 1:01 am
Re: Cheap Junk 1971 Build
OK, a few more pics from the fastener/misc. sorting session...
Here we have an example of the goal of the sorting;
Parts are cleaned and prepped to go on.

Like the sump plate strainer bolt here... Small, top-middle.
The threads in that thing have been chased with a bottom tap.
Because it was crusty from sitting (outside maybe even), the threads got chased.
This gets a small torque to avoid 'The Syndrome', so it best be nice.
Here's a pic of The Syndrome.

Found a defect on a distributor drive gear.
See the dings on the tooth to the right?

Any flaws on the distributor drive are _No_ Bueno!
_Especially_ Especially the brass drive gear on the crank!
These get buggered up very easily!!! <--- Three exclamation points.
Any dings and chunk-age missing from these gears will cause an erratic spark.
The spark jumps around enough on the stock distributor, without having the teeth all mangled.
You have been warned... Don't fry your motor with random/inaccurate/scattery timing.
This shows the Next Level in fastener and bracketry finishing.
The fasteners are white cad, and the brackets are powder coated.
Our Junker build we have here will be getting nothing but wire-wheeling on fasteners, and rattle-can on the brackets and whatnot.

Jumping around a bit,
Here is a bus and "Vanagon"/"T3"/"Waterboxer/WBX" flywheel side-by side.


There were rumors circulating that the Vanagon flywheels were forged, but it supposedly was a myth.
The WBX flywheel here is showing the oval thingies with big part numbers..
Be sure to get the fasteners with the flywheel(!)
The WBX fly uses socket-head allen bolts, while all other type 4s use the big serrated hex bolts.
I like these Vanagon/Waterboxer flywheels because they are easily found in the junkyards as of year 2014, and all other type 4s are not.
Resist the urge to blast a case, unless you are going to pull most all of the galley plugs.

The tapped plugs shown earlier are just for leakage protection.
The stock aluminum galley plugs can fall out, but only the five i did are notorious for this.
If you blast a case, Pile's 6th plug, and possibly all the others, will need the threaded plug treatment,
And the above photo shows why.
(That case got vapor blasting BTW).
Here's an pic from a night long ago at my old shop.
A few cases were lined up for inspection.

A USA-made bore gauge was invited to the party.

One case had the dreaded 'spread center main'.
You can't really tell, because the case fools the camera focus,
But,
Here is a bad case back-lit, and viewed down the main bearing bore.
You can see a small bit of light running vertically from above the center main saddle.
This was more obvious viewed in real life...

Some have been known to bolt up the case halves with a bit of thin pressure graphing film or carbon paper.
(Jake used to call this the 'carbon paper trick').
If the paper can be pulled away from the center main webs (case bolts torqued) without tearing, there is too much clearance.
It takes very very thin paper, not just regular paper.
When you can see the spread, like in the above pic, the case is definitely bad.
Sad to do it, but this case got tossed in the recycle bin...
So, a few misc. pictures i dug up off of my server,
And the thoughts that followed... Hope somebody learned something.
Here we have an example of the goal of the sorting;
Parts are cleaned and prepped to go on.
Like the sump plate strainer bolt here... Small, top-middle.
The threads in that thing have been chased with a bottom tap.
Because it was crusty from sitting (outside maybe even), the threads got chased.
This gets a small torque to avoid 'The Syndrome', so it best be nice.
Here's a pic of The Syndrome.
Found a defect on a distributor drive gear.
See the dings on the tooth to the right?
Any flaws on the distributor drive are _No_ Bueno!
_Especially_ Especially the brass drive gear on the crank!
These get buggered up very easily!!! <--- Three exclamation points.
Any dings and chunk-age missing from these gears will cause an erratic spark.
The spark jumps around enough on the stock distributor, without having the teeth all mangled.
You have been warned... Don't fry your motor with random/inaccurate/scattery timing.
This shows the Next Level in fastener and bracketry finishing.
The fasteners are white cad, and the brackets are powder coated.
Our Junker build we have here will be getting nothing but wire-wheeling on fasteners, and rattle-can on the brackets and whatnot.
Jumping around a bit,
Here is a bus and "Vanagon"/"T3"/"Waterboxer/WBX" flywheel side-by side.
There were rumors circulating that the Vanagon flywheels were forged, but it supposedly was a myth.
The WBX flywheel here is showing the oval thingies with big part numbers..
Be sure to get the fasteners with the flywheel(!)
The WBX fly uses socket-head allen bolts, while all other type 4s use the big serrated hex bolts.
I like these Vanagon/Waterboxer flywheels because they are easily found in the junkyards as of year 2014, and all other type 4s are not.
Resist the urge to blast a case, unless you are going to pull most all of the galley plugs.
The tapped plugs shown earlier are just for leakage protection.
The stock aluminum galley plugs can fall out, but only the five i did are notorious for this.
If you blast a case, Pile's 6th plug, and possibly all the others, will need the threaded plug treatment,
And the above photo shows why.
(That case got vapor blasting BTW).
Here's an pic from a night long ago at my old shop.
A few cases were lined up for inspection.
A USA-made bore gauge was invited to the party.
One case had the dreaded 'spread center main'.
You can't really tell, because the case fools the camera focus,
But,
Here is a bad case back-lit, and viewed down the main bearing bore.
You can see a small bit of light running vertically from above the center main saddle.
This was more obvious viewed in real life...
Some have been known to bolt up the case halves with a bit of thin pressure graphing film or carbon paper.
(Jake used to call this the 'carbon paper trick').
If the paper can be pulled away from the center main webs (case bolts torqued) without tearing, there is too much clearance.
It takes very very thin paper, not just regular paper.
When you can see the spread, like in the above pic, the case is definitely bad.
Sad to do it, but this case got tossed in the recycle bin...
So, a few misc. pictures i dug up off of my server,
And the thoughts that followed... Hope somebody learned something.
Last edited by Clatter on Fri Oct 25, 2019 1:16 pm, edited 3 times in total.
Speedier than a Fasting Bullet!
Beginners' how-to Type 4 build thread ---> http://shoptalkforums.com/viewtopic.php?f=1&t=145853
Beginners' how-to Type 4 build thread ---> http://shoptalkforums.com/viewtopic.php?f=1&t=145853
-
PinstripePotoroo
- Posts: 12
- Joined: Sat Jan 28, 2012 12:35 pm
Re: Cheap Junk 1971 Build
This is indeed both very intresting and very helpfull, did'nt know I had so much to learn. I will keep follow the progression with great enthusiasm !
-
E_bug
- Posts: 260
- Joined: Mon Dec 28, 2009 11:05 pm
-
jsturtlebuggy

- Posts: 51
- Joined: Tue Jun 11, 2013 7:19 pm
Re: Cheap Junk 1971 Build
Yes the red sealing nuts were used on all early type 4 engines. The seal part faced out. They are not the same as a type I nut, different thread pitch. I have worked on rebuilt many of these engine since the middle 1970s in shops.
I still have one I bought in 1976 from a Porsche 914. It has went from a 1700cc to 1911, to a 2.0L and now a 2056cc. It in a street legal dune buggy now, has been in VW single cab, sand rail, street legal sand rail, and Baja Bug too. It just to reliable to ever get rid of.
I still have one I bought in 1976 from a Porsche 914. It has went from a 1700cc to 1911, to a 2.0L and now a 2056cc. It in a street legal dune buggy now, has been in VW single cab, sand rail, street legal sand rail, and Baja Bug too. It just to reliable to ever get rid of.
Joseph
-
Clatter
- Posts: 2034
- Joined: Sun Apr 28, 2002 1:01 am
Re: Cheap Junk 1971 Build
Thanks for the kind words, guys.
Nice to know that anyone would read this.
With some of the fantastic builds on this site,
A junk pile like this is pretty boring,
However,
With most people doing this,
just a basic/intermediate level build up is in line with their needs.
Right?
Here is something that is a small issue, but perhaps could be important?
Because i took apart a bunch of motors, all of the head studs got thrown in a box.
This could have happened to any of these motors by now, unless they have never been apart.
When plucking them out for use, it can be prudent to make sure they are all the same.
Not a super-crucial issue, yet, different head studs could have slightly different properties,
and the head clamping might possibly become irregular over time?
Here are a few of the different brand markings.

This led me on to thinking about head seal.
I threw my leak-down tester on a motor i have here to check it out.
Air comes in, and gets regulated to, in this case, 90PSI.
The other gauge shows how much pressure the chamber builds as it escapes.
Here is a rebuilt motor, never run, showing about 10% leak-down.
This is OK. It should be better after everything gets run-in.
Anything obviously less, and something is wrong (at least on a fresh motor).
Mostly checking to see if they are all the same.
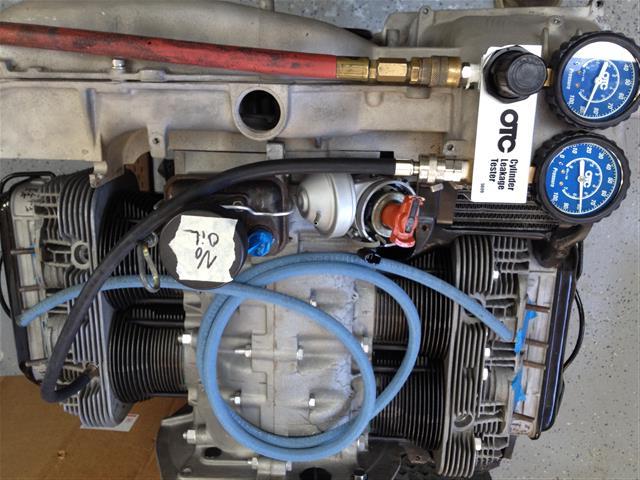
Reason i show this, is that it's really good to check a fresh motor after you build it.
Most often, you will have leakage at the heads, for a variety of reasons.
One, is the deck is not flat, due the case spreading.
Second is variation in the length of the cylinders, or cylinders not square.
Third might be related to the sealing surface of the heads, with machining marks, or not perfect from hole to hole.
Anyhow, that is why the blue hose is sitting on top of the motor.
I put one end in my ear, and cruise the other around various areas of the head seal.
This is a real eye-opener for any of you aspiring builders out there.
Give it a try.
FWIW, this tool came from Eastwood, and was only like $85 or so. Bargain.
Put it on an old junky Type 1 i had lying around, too.

At the local Pick-N-Pull yard again.
Don't know why i even go there anymore, they hardly ever have any aircoolers anymore,
But, lo and behold, lookie here - an early Vanagon!
Can't help but look for a thermostat or ignition/distributor off one of these.
(gone already )
)
Hot-rodders _love_ these non-heater-outlet fan shrouds, however.
If you are building a motor big enough to not have heater boxes, these cool better than the other shrouds.
FWIW...

Until next time!
Nice to know that anyone would read this.
With some of the fantastic builds on this site,
A junk pile like this is pretty boring,
However,
With most people doing this,
just a basic/intermediate level build up is in line with their needs.
Right?
Here is something that is a small issue, but perhaps could be important?
Because i took apart a bunch of motors, all of the head studs got thrown in a box.
This could have happened to any of these motors by now, unless they have never been apart.
When plucking them out for use, it can be prudent to make sure they are all the same.
Not a super-crucial issue, yet, different head studs could have slightly different properties,
and the head clamping might possibly become irregular over time?
Here are a few of the different brand markings.
This led me on to thinking about head seal.
I threw my leak-down tester on a motor i have here to check it out.
Air comes in, and gets regulated to, in this case, 90PSI.
The other gauge shows how much pressure the chamber builds as it escapes.
Here is a rebuilt motor, never run, showing about 10% leak-down.
This is OK. It should be better after everything gets run-in.
Anything obviously less, and something is wrong (at least on a fresh motor).
Mostly checking to see if they are all the same.
Reason i show this, is that it's really good to check a fresh motor after you build it.
Most often, you will have leakage at the heads, for a variety of reasons.
One, is the deck is not flat, due the case spreading.
Second is variation in the length of the cylinders, or cylinders not square.
Third might be related to the sealing surface of the heads, with machining marks, or not perfect from hole to hole.
Anyhow, that is why the blue hose is sitting on top of the motor.
I put one end in my ear, and cruise the other around various areas of the head seal.
This is a real eye-opener for any of you aspiring builders out there.
Give it a try.
FWIW, this tool came from Eastwood, and was only like $85 or so. Bargain.
Put it on an old junky Type 1 i had lying around, too.
At the local Pick-N-Pull yard again.
Don't know why i even go there anymore, they hardly ever have any aircoolers anymore,
But, lo and behold, lookie here - an early Vanagon!
Can't help but look for a thermostat or ignition/distributor off one of these.
(gone already
Hot-rodders _love_ these non-heater-outlet fan shrouds, however.
If you are building a motor big enough to not have heater boxes, these cool better than the other shrouds.
FWIW...
Until next time!
Last edited by Clatter on Fri Oct 25, 2019 1:19 pm, edited 1 time in total.
Speedier than a Fasting Bullet!
Beginners' how-to Type 4 build thread ---> http://shoptalkforums.com/viewtopic.php?f=1&t=145853
Beginners' how-to Type 4 build thread ---> http://shoptalkforums.com/viewtopic.php?f=1&t=145853
-
bj

- Posts: 1156
- Joined: Sat Feb 08, 2003 12:01 am
Re: Cheap Junk 1971 Build
thanks for the thread...good info for sure!!
BJ
BJ