Ol'fogasaurus black buggy
-
Ol'fogasaurus
- Posts: 17760
- Joined: Mon Nov 13, 2006 10:17 pm
the rest of a body lift build
For the rest of a body life build see: http://www.shoptalkforums.com/viewtopic.php?t=105659
Lee
My opinion is worth slightly less than what you paid for it.
My opinion is worth slightly less than what you paid for it.
-
RyanB

- Posts: 1466
- Joined: Wed Feb 26, 2003 12:01 am
Lee,
You are doing a super bang up job here. I love looking at your threads and your workmanship is simply awesome. I have to constantly tell myself to slow down to make my fabrication look even 1/4 as good as yours. Keep up the great work man!
~Ryan
You are doing a super bang up job here. I love looking at your threads and your workmanship is simply awesome. I have to constantly tell myself to slow down to make my fabrication look even 1/4 as good as yours. Keep up the great work man!
~Ryan
--------------------------------------------------------------------
My current build thread:
http://www.shoptalkforums.com/viewtopic ... 8&t=139952
R.I.P. Alfred Munson I miss you. http://www.volksrods.com/forum/showthread.php?t=9927
My current build thread:
http://www.shoptalkforums.com/viewtopic ... 8&t=139952
R.I.P. Alfred Munson I miss you. http://www.volksrods.com/forum/showthread.php?t=9927
-
Ol'fogasaurus
- Posts: 17760
- Joined: Mon Nov 13, 2006 10:17 pm
-
Ol'fogasaurus
- Posts: 17760
- Joined: Mon Nov 13, 2006 10:17 pm
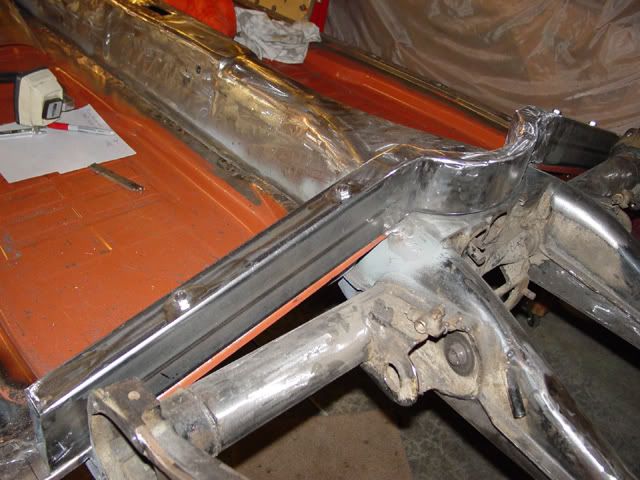
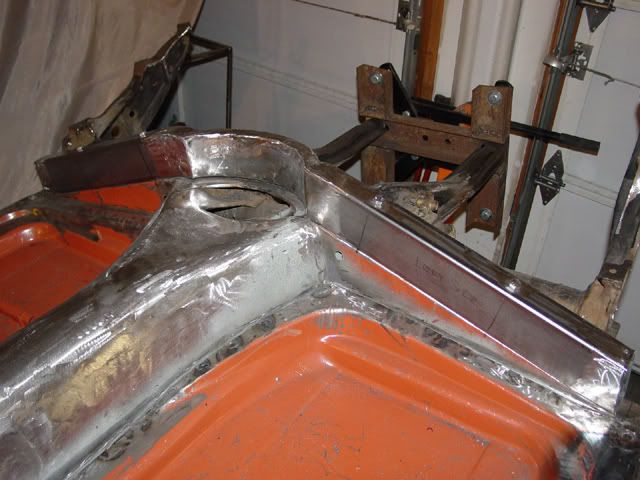
Well, I finally had 3/4 of a good day in the garage. The rear part of the body lift is made out of three pieces joined together. I have been making the two vertical pieces of the three piece rear body lift and have been having a heck of a time with them. The arc part of the three pieces was done several months ago. I started on the left rear piece and roughed it in. Then I started on the right side piece. That is where the trouble began. I could not get it to fit the arc either on the underside or on the upper surface. I could not get the bend to start in the right place and be gental bend rather than a sharp bend. The leg on the bend would not end in the right place either. I had to cut it to length a coupled of times to miss the reverse beads in the rear of the pan. I finally got an arc gauge and took the contour of the top of the pan and rear cross-piece. Using the gauge and making my cuts more generous, I was finally able to get the contour right and I tacked it. in place (shape) with a short strap. I then bent a short piece of material for the bottom and welded it in. The contour is OK but not as tight as I would like. I cut fill pieces and closed out the notches. It’s top does match the top of the arc’d piece so that is good.
Yesterday, I reshaped the first piece I had cut. I had to cut the one weld loose at tt the arc and reshape it. I also got one of the fill pieces in. Today I got the rest of the fills in place. I had been using a long magnet to hold the fill pieces in place so the fill would be level when welding them in. On the last fill (I was so proud of myself for it looking OK [no perfect which I try for but OK]) the magnet slipped and I didn’t notice it and I ended up with a divot. Pride always gets ya, gotta remember that. I did a fill piece in it and while it is OK it not something I am proud of. Luckily, most of it will be cut off when I weld it to the side rails, my next project.
ON the first body lift I did, I was so lucky and everything did what it was supposed to. This has been the job from hell (well almost). The pieces of material I got for the lift had to be from different manufactures. The two ling pieces have the welded join on the bottom of the tube. The two side pieces, the seam is in the long leg. When I made the first side piece it fit perfect before welding. After welding it fit OK, but after the welds were ground down, the material has shrunk so the bend was too much. I am going to try again this week. I have learned a couple things since then so maybe it will hold shape.
This time, I have to put an arc in the front of the side pieces to match the pan’s arc. Normally I wouldn’t have to do this but with the pedal assembly being so far outboard, the straight end would be in the way. It will be a challenge and I really am looking forward to doing it… strange as it may seem.
Lee
My opinion is worth slightly less than what you paid for it.
My opinion is worth slightly less than what you paid for it.
-
turbobaja

- Posts: 2826
- Joined: Fri Sep 14, 2007 4:56 pm
Congrats on the progress, Lee. I like how you challenge yourself, and enjoy the hard work while your at it. Nothing like saying, "I made that". 
I feel your pain with the fill pieces and magnets. By the time I got "good" at making them and installing them, there were dozens of poorly installed, eye-sores all over the place . Not to mention all the mounds of steel where I tried to weld a 1/4" hole closed and just ended up making it 10x worse
  . Live and learn, right?
Karl
I feel your pain with the fill pieces and magnets. By the time I got "good" at making them and installing them, there were dozens of poorly installed, eye-sores all over the place
Karl
-
Ol'fogasaurus
- Posts: 17760
- Joined: Mon Nov 13, 2006 10:17 pm
Its like Dr.s and Lawyers, they have a "practice" until you get good then they retire. 
I try to learn as i go but I not afraid to ask questionx either. Sometimes I think I am doing it wrong but then I see it is the way the pros are doing it then I feel better. Luckily, I haven't had to do the patching of rust out body holes.. well not too much anyway. It is a hard thing to do and my copper strip is pretty blackened already..
I have learned a lot from this and one other buggy site. Most of the guys (and girl) I have to admire at what they can do and do accomplish.
Lee
My opinion is worth slightly less than what you paid for it.
My opinion is worth slightly less than what you paid for it.
-
Ol'fogasaurus
- Posts: 17760
- Joined: Mon Nov 13, 2006 10:17 pm
-
Ol'fogasaurus
- Posts: 17760
- Joined: Mon Nov 13, 2006 10:17 pm
Re: Ol'fogasaurus black buggy
It has been a while since I have been able to work on my buggy. Got some new glasses w/o the auto darkening feature which now allows me to do some welding (I can now see what I am doing, not welding in the dark). I still need readers to get a little closer but at about $150 per pair, it is not something I can do that often.
I still have some touch up welding on the kerfs to do but the two side pieces are now formed and bolted in place. I haven’t welded the whole mess together and added the gussets yet but it is now showing some direction.
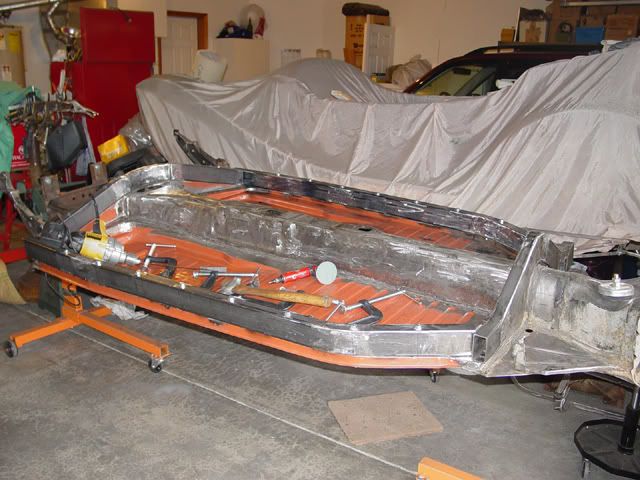
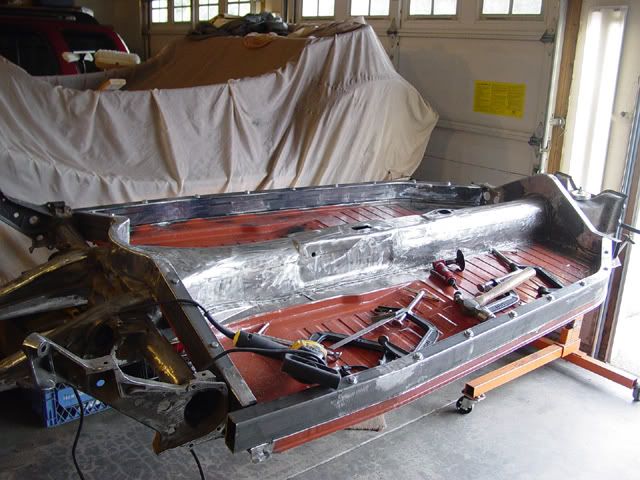
I have to figure out seat mounting location when the lift is in one piece. I am still debating on selling the buggy and going onto something else. I want to get it onto all fours first.
I still have some touch up welding on the kerfs to do but the two side pieces are now formed and bolted in place. I haven’t welded the whole mess together and added the gussets yet but it is now showing some direction.
I have to figure out seat mounting location when the lift is in one piece. I am still debating on selling the buggy and going onto something else. I want to get it onto all fours first.
-
Lotrat

- Posts: 4975
- Joined: Sat Mar 29, 2008 11:43 pm
Re: Ol'fogasaurus black buggy
It's gotta feel good to be able to work on it again. I remember how you said you couldn't weld a straight line before you had your eyes worked on. How are they now?
-
Ol'fogasaurus
- Posts: 17760
- Joined: Mon Nov 13, 2006 10:17 pm
Re: Ol'fogasaurus black buggy
They are still a problem. At times I can look at a straight line, either vertical or horizontal, and it is wavy. Right now, lines look straight. The wavy part is (probably) caused by some swelling going on inside. I don't see the wavy lines as much as I did although I had a session a couple of days ago. It also is not as bad as it was. I also periodically see something else going on but it also comes and goes. Like I think I said before; there were two tears on the center of the retina and a lot of damage done. They welded the tears (lazier) back to the eyeball so there is some healing to go on there. They will take another look at things when we get back from snow birding in the CA, AZ, NM areas starting at the end of this year and the first few months of the new year. The surgeon said he would look at it in a year and it looks like it is going to take the full year to settle down.
The next problem is to reestablish some good work ethics (again?). Get out there and work rather than sit and (try to) read. Even that is getting better now that I have a good reading light.
Thanks for the concern.
The next problem is to reestablish some good work ethics (again?). Get out there and work rather than sit and (try to) read. Even that is getting better now that I have a good reading light.
Thanks for the concern.
-
Ol'fogasaurus
- Posts: 17760
- Joined: Mon Nov 13, 2006 10:17 pm
Re: Ol'fogasaurus black buggy
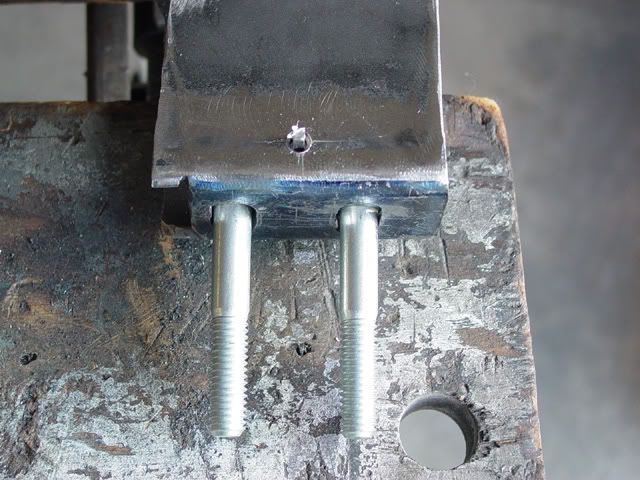
I finally got a chance to do some more work on the buggy the last couple of weeks. I have been planning on how to make some hidden fasteners from the two pairs of bolts that are in the front cross-piece of a buggy pan. These are for the two bolt per side the come from the underside to bolt the body to the pan. I plan to use them for the EMPI front beam supports that bolt on a Baha.
Since the holes in the pan are slotted, I slotted the holes in the front cross-piece of the lift. I was pretty sure on how I wanted to make the bolts float in the cross-piece and that I wanted to “pin” the “nut plate” so it would not go up inside ot the body lift when I put the nuts and washers on. I had some up with several ways to do it all would be fun to do but easy (KISS) is the word.
I figured out the grip I would need by measuring the distance from the top of the pan in the area of the slots to the bottom of the pan and it was close to 1 inch. I then added the material thickness of the body lift tube (.120) and the thickness of the EMPI beam support (.25) and got my grip length for the bolt except for the mount material for the stud plate. I did find some .25 thick scrap steel I had and decided to use it. I figured out the center lines of the holes and narrowed down the stock to .55. This dimension allowed me to mount the bolts and still be able to use the full length of the slot.
I am still having troubles seeing good enough to do decent welding so the welds on the studs are kind of crappy but they will be hidden so who cares (I really do but this is the best I was able to do right not). All I wanted was the open area between the two bolts (studs).
Today I decided to take a chance and put it all together. The first thing was to cut the lock pieces. I found some flat stock and cut a length about an 1/8 in square.

This is what the three pieces looked like before I got started.
I then measured how high the spacers fit in the lift and marked and bored a hole on each side of the lift. I then countersunk the holes for the welding strength. I test fit the lock piece and when it fit, I started in welding and dressing the welds.
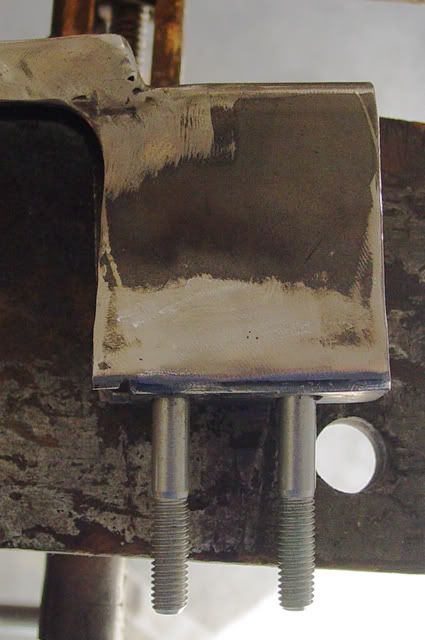
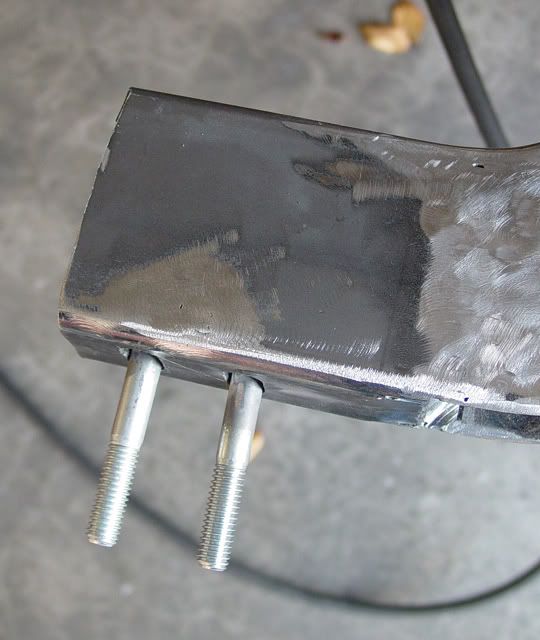
The two finished ends.
When I sat the piece back in place on the chassis, it worked better than I expected. I am a little concerned that the locking pieces may be too thin but I will find that out good or bad.
The next job is doublers on the bends. Someone made a statement about ot grinding welds and he was right, but I had planned from the start to have the doublers because I may want to attach the cage to the body lift but that is another story. I think GDRORETIRED may have done that on his buggy.
Since the holes in the pan are slotted, I slotted the holes in the front cross-piece of the lift. I was pretty sure on how I wanted to make the bolts float in the cross-piece and that I wanted to “pin” the “nut plate” so it would not go up inside ot the body lift when I put the nuts and washers on. I had some up with several ways to do it all would be fun to do but easy (KISS) is the word.
I figured out the grip I would need by measuring the distance from the top of the pan in the area of the slots to the bottom of the pan and it was close to 1 inch. I then added the material thickness of the body lift tube (.120) and the thickness of the EMPI beam support (.25) and got my grip length for the bolt except for the mount material for the stud plate. I did find some .25 thick scrap steel I had and decided to use it. I figured out the center lines of the holes and narrowed down the stock to .55. This dimension allowed me to mount the bolts and still be able to use the full length of the slot.
I am still having troubles seeing good enough to do decent welding so the welds on the studs are kind of crappy but they will be hidden so who cares (I really do but this is the best I was able to do right not). All I wanted was the open area between the two bolts (studs).
Today I decided to take a chance and put it all together. The first thing was to cut the lock pieces. I found some flat stock and cut a length about an 1/8 in square.
This is what the three pieces looked like before I got started.
I then measured how high the spacers fit in the lift and marked and bored a hole on each side of the lift. I then countersunk the holes for the welding strength. I test fit the lock piece and when it fit, I started in welding and dressing the welds.
The two finished ends.
When I sat the piece back in place on the chassis, it worked better than I expected. I am a little concerned that the locking pieces may be too thin but I will find that out good or bad.
The next job is doublers on the bends. Someone made a statement about ot grinding welds and he was right, but I had planned from the start to have the doublers because I may want to attach the cage to the body lift but that is another story. I think GDRORETIRED may have done that on his buggy.
-
fusername
- Posts: 6806
- Joined: Sun Jan 28, 2007 11:26 am
Re: Ol'fogasaurus black buggy
very nice looking. I am looking to your project to motivate me to make my own lift kit, come the day i own a baja. gives a bit of solidity, head room, and cage anchors.
-
Ol'fogasaurus
- Posts: 17760
- Joined: Mon Nov 13, 2006 10:17 pm
Re: Ol'fogasaurus black buggy
Whoo-Hoo, I can see again. After almost two years of battle, I got most of my vision back (it doesn’t help my typing though). I picked up my contact lens today and it is a miracle. My vision is slightly worse than it was before the problem but better than anyone thought it would be. The surgery fixed most of the problem but there are still a few wrinkles in the retina from the two tears’ in the center of my retina. They eye surgeon smoothed out the wrinkles as best he could before he welded the retina back to the eyeball with a laser.
I have to wait a few days, to build up wearing time, before I try to weld any. Once I got started, it would be easy to forget time and over due things.
I have hammer bent/formed two of the four doublers, using a tapered end 3 lb and the open jaws of a vice technique, which will be welded in to support the kerf’d bends. I will reduce the width (three inches wide, about an eighth [or so] of an inch more than I think I want) of them and add the holes for rosette/plug welds. There was one post saying that he though you were not supposed to grind welds which is true but in this case, the doublers were planned on and I needed things smooth the bends out for the doublers and, as feet and other things will/could be in the area of the bends, I felt that the grinding was appropriate.
I have so many things to do to get caught up with things I don’t know where to start (so maybe I won’t).
Anyway, I am pretty up today. Lee
-
Big Dave

- Posts: 3208
- Joined: Tue May 17, 2005 4:31 pm
Re: Ol'fogasaurus black buggy
That's great Lee! Good vison is something everybody takes for granted until it's gone. I'm glad you can finally see to do some welding....just make sure you have a good helmet or your eyes will really hurt with the contacts.
I don't always show my signature. But when I do, it's in this area.
-
Ol'fogasaurus
- Posts: 17760
- Joined: Mon Nov 13, 2006 10:17 pm
Re: Ol'fogasaurus black buggy
Gotta check and replace the batteries.