Tucking metal on the edge/Wheel well test piece

General tips/tricks/tools that could be utilized on any platform.
User avatar
theKbStockpiler
Posts: 596
Joined: Sun Jul 15, 2012 10:25 am

Re: Tucking metal on the edge/Wheel well test piece

Post by theKbStockpiler »

I was looking for English Wheel videos and came across this Guy.
https://www.youtube.com/watch?v=cPTR6QyNY9Q
https://www.youtube.com/watch?v=woSSwxZxO_s

I'm going to watch all of his videos until I can recall them from memory. :shock: It's the best above basic metal working info I have come across in a video.
Super beetle with attitude
Bad Bob
Posts: 112
Joined: Wed Nov 12, 2014 10:47 pm

Re: Tucking metal on the edge/Wheel well test piece

Post by Bad Bob »

Check out the his Jag bonnet build. Hours of awesome. Great explanation of the flexible shape pattern.
User avatar
theKbStockpiler
Posts: 596
Joined: Sun Jul 15, 2012 10:25 am

Re: Tucking metal on the edge/Wheel well test piece

Post by theKbStockpiler »

He's doing real work and not demonstrating a piece of equipment.His own equipment is intimidating. :shock:
Since I have your attention could I ask a few more English Wheel questions?

What does pulling down on the metal do while wheeling? Also have you ever heard of using a X or W pattern to change the ratio of curve between back and forth or on the sides?

Thanks for your expertise!
Super beetle with attitude
Ol'fogasaurus
Posts: 17760
Joined: Mon Nov 13, 2006 10:17 pm

Re: Tucking metal on the edge/Wheel well test piece

Post by Ol'fogasaurus »

If you can get the show "Bitchin' Rides" I just watched a two one hour (end of the season) episodes that contained about an hour and a half of metal working on a '67 Dodge. Thy contained several types of metal forming and bending then came different things like painting and wiring. Well worth the time sitting in front of the screen.

Lee
Bad Bob
Posts: 112
Joined: Wed Nov 12, 2014 10:47 pm

Re: Tucking metal on the edge/Wheel well test piece

Post by Bad Bob »

Pulling down on a panel while pulling it toward you will bend it also, putting more curve from front to back, while the side to side curve comes only from the stretch. The X’s and W’s just localize the stretching. Get some scraps and play!
User avatar
theKbStockpiler
Posts: 596
Joined: Sun Jul 15, 2012 10:25 am

Re: Tucking metal on the edge/Wheel well test piece

Post by theKbStockpiler »

Thank you for the clarification on the English Wheel use!
I was doing some shrinking and was trying to come up with a method that would be aggressive and fast because I was loosing my patients.
leaving the tuck tool partially in the tuck while it was hammered down worked well enough.It was actually too aggressive. :shock:
Image

Here's a picture of the patch panel I'm working on. This is earlier in the stage that I'm in now but it turned out good enough for what I want. It's just one part of what will be welded to a few more pieces to make one big piece.
Image

Besides for a English wheel to smooth it out some here's a list of the products I used to make it.
-HF small anvil
-HF teardrop hammer
Home made sandbag made with 'Husky Document Bag $5'. https://www.homedepot.com/p/Husky-12-in ... /307699159
-Home made shrinker seen in previous posts
-Offset Aviation snips
-HF plastic hammer with interchangeable heads
-Picard large face body hammer that was not all that necessary
Super beetle with attitude
User avatar
theKbStockpiler
Posts: 596
Joined: Sun Jul 15, 2012 10:25 am

Re: Tucking metal on the edge/Wheel well test piece

Post by theKbStockpiler »

Here's a couple of pictures of the second part of my wheel housing patch for a Cherokee.A lot of shrinking has to be done. A few things that I have learned are that if you are gentle on the metal in general you don't have to be concerned with re-working it. Other than adding extra work to the piece, if you end up doming a area just to get it on the edge ,it's not a big deal to shrink part of the dome down afterwards if you can't find a way around it. My hand made plier style turker was well worth making but they take a lot of squeezing and I'm looking to try to speed things up. I bought the materials to make a fork style tucker but have not made it yet. I noticed that if the plier tucker has to force down and essentially shrink a dome part down .the metal resists being tucked to a point that you have to knock/shrink the dome down first if you want to shrink that area more. I'll post more info on the experiences of doing this piece later.


Image

Image
Super beetle with attitude
Ol'fogasaurus
Posts: 17760
Joined: Mon Nov 13, 2006 10:17 pm

Re: Tucking metal on the edge/Wheel well test piece

Post by Ol'fogasaurus »

You've learned a lot in a short time. Remember you are dealing with inanimate objects that/who have to follow certain rules so modifying them is like learning how to raise kids... work on it slowly and nicely and good things will happen better and easier (I didn't have any kids so I didn't learn :lol: ).

Lee
User avatar
theKbStockpiler
Posts: 596
Joined: Sun Jul 15, 2012 10:25 am

Re: Tucking metal on the edge/Wheel well test piece

Post by theKbStockpiler »

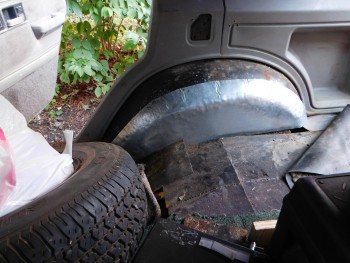
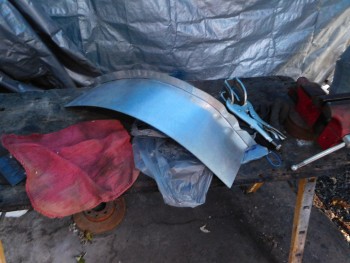
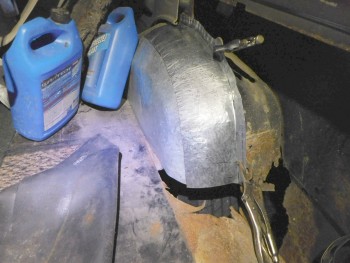
The second part ;I got close to being able to use,got overworked and cracked in a few places so I had to start another one. The secondary issues when forming a patch panel are becoming apparent so It's taking longer then the first part which was more straight forward.

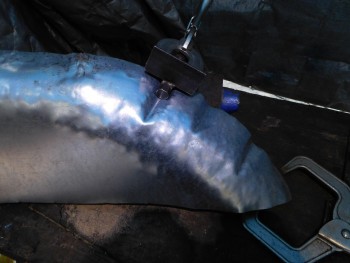
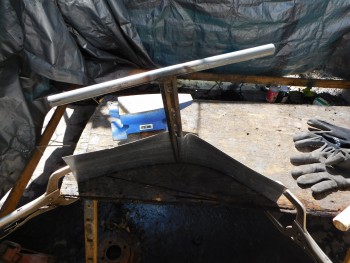
I made a tucking fork out of two alignment punches bought at HomeDepot. All I did to them was round off the tips ,weld them together and weld a handle to them. I did not want to spend a lot of time welding it and it shows. :lol: I did not want to set up my big welder so I did it with a 105 amp mig with flux core. Well its working. The fork pieces flex some when using it but they have not broken yet so I guess they will be okay. If you watch the videos on how to use an English Wheel 1-4 ; which I suggest you do, he puts the info needed vary planely and easy to grasp. He does leave a fair amount out in order to guide you through the process that I will go into here.

Image

After you get good at shrinking a tuck and not just knocking it down, you have to get efficient at it and also not crease or fold over the metal onto it's self or in other words shrink it too much in one tuck. If the metal is creased or folded over you cant get it out without causing further damage from what I can tell.

I'm shrinking right now by putting in the tuck with the fork and keeping it locked by putting in my clamp style tucker just for insurance. The fork is considerably faster if you are going in deep from the edge. If the tucks get much more than 45 degrees and your locking the tuck in using any method including just hammering skill it will most likely stand the metal up too much and cause a crease or fold over. As Wray Schelin states if this comes close to happening you can always just hammer straight down to open it up some. If you are keeping the tuck locked ; one way or another, the secondary goal is to shrink the tuck and keep the metal relatively smooth and undamaged. Basically as Wray Schelin states ,you gather up the tuck and then hammer what's left down without creasing it or folding it over. I have been starting from the inside of the tuck and working to the edge of the piece. When the tuck is hammered it can't be at an angle that is straight down or it just gets spread back out without shrinking. The edge of the tuck has to be hit at an angle that forces the part under the hammer down AND forces the metal towards another part of the tuck. The tuck also needs sort of a 'escape path' or space, so it's assured it won't get creased or folded. When using a fork the first twisting motion does not cause tension, the second twist does this. After you have created a tuck that is not too steep the last part to do is make sure the metal has tension on it and is drawn together on the last side of the tuck.
Super beetle with attitude
User avatar
theKbStockpiler
Posts: 596
Joined: Sun Jul 15, 2012 10:25 am

Re: Tucking metal on the edge/Wheel well test piece

Post by theKbStockpiler »

I just got a usable piece finished for he second part of the wheel housing and here it is. It's not perfect but the fit is decent so I'm going to use it and move on to the next piece. This is what I learned or experienced:

I was able to get about 3/4 of the shrinking done with the plier type shrinker but in my opinion they are best for shrinking down a flat piece of metal for a dog leg of a door opening where the shrunk part is not bent at the same time. As I got somewhat close but had to do more shrinking the metal would get too fatigued and instead of being able to make a tuck it would tear. I was suspicious that I was working the metal more than needed and was sort of sacrificially stretching it partly as I was shrinking it. I doubt is is possible to get the shrinking process down without actually stretching the metal some which work hardens the metal even more. I used the fork tucker for the complete shrink.

This is how the fork tucker worked the best:

If the metal is not bent in the direction desired while the tuck is put in , the tuck only brings the outside of the piece closer together and the bend is not created at the same time. If the fork is put in and just twisted it will bring the outside edge in more and bend the metal in the desired direction at first but when the tuck is shrunk the outside edge is brought in but the bend does not stay. I had the best results angling the fork to a 45 degree angle or less and ROLLING the fork while while deliberately making the fork bend the metal in the desired direction. You have to work the fork in a little at a time so it twists easily which will help determine if you are stretching it un-needlessly. I did not just twist the fork and allow the twisting motion to bring the metal down. I think this introduced additional stretching. If I used the plier tucker or only twisted the the fork tucker sometimes it did not seem to make any head way even though I know that I got the tuck shrunk blow by blow and was positive I did not just flatten the tuck down/out.

Going in deep with the tucker did not seem to work that well. If you just shrink the edge and it's deep enough you can just shrink the inside part by hammering it from the outside in the regular way like when removing a dent. How I got it done was by shrinking the edge in about 2 inches and then smacking the edge and farther in with a slapping spoon. This forced the edge in and shrunk the inside at the same time. I did not support the edge (used a sand bag) and used a steep angle to hit the edge on it's side somewhat. I think the combination of forcing the edge in and the inside down forced the opposing bends together and shrunk it down.

On this last attempt on the second part ; it took about 4 tries, when the edge started to get really stiff and required harder blows with the hammer to shrink ,I annealed it with a torch and by spraying it with water. It seemed to help. Also , at this point I only did non aggressive tucks and did not try to trap the tuck in by making the sides too steep.


Image
Super beetle with attitude
Ol'fogasaurus
Posts: 17760
Joined: Mon Nov 13, 2006 10:17 pm

Re: Tucking metal on the edge/Wheel well test piece

Post by Ol'fogasaurus »

You've come a long way. Congrats and keep learning. Proud of you!

Lee
Bad Bob
Posts: 112
Joined: Wed Nov 12, 2014 10:47 pm

Re: Tucking metal on the edge/Wheel well test piece

Post by Bad Bob »

Looks good! Of course, the second one always turns out better.
User avatar
theKbStockpiler
Posts: 596
Joined: Sun Jul 15, 2012 10:25 am

Re: Tucking metal on the edge/Wheel well test piece

Post by theKbStockpiler »

My own personal goals for panel making is restoring my 1302 and getting the big holes in my daily driver patched up. :lol: The floor is not really bad now but in the past I had to be careful where I placed things because they might fall through a hole onto the road. :shock: I replaced 3 of the spring perches and pieced back together the rear frame a few years ago.
Image

Image

I'm into the "Information Want's to be Free' philosophy so that is part of the reason this thread was started. I did not expect to get any pointers really and was confident the modelling clay and paper experiments were solid. All of the videos I see and blogs are not really enough to do this type of thing so my intent is to shortening the gap in the bridge.
Super beetle with attitude
Ol'fogasaurus
Posts: 17760
Joined: Mon Nov 13, 2006 10:17 pm

Re: Tucking metal on the edge/Wheel well test piece

Post by Ol'fogasaurus »

Couldn't see for sure but just-in-case remember when cutting holes keep the corners rounded not 90 degree corners which can cause stress cracks

Lee
User avatar
SCOTTRODS
Posts: 626
Joined: Sun Nov 07, 2010 7:15 am

Re: Tucking metal on the edge/Wheel well test piece

Post by SCOTTRODS »

Ol'fogasaurus wrote: Sun Sep 22, 2019 7:10 pm Couldn't see for sure but just-in-case remember when cutting holes keep the corners rounded not 90 degree corners which can cause stress cracks

Lee
This point its often left out, or considered "common knowledge" by a lot of the videos as well... The slower the change in cross sectional area (the bigger the radius of any inside corner or opening), the better. Straight cut corners are not very likely to last, due to , as Lee suggests, Stress that sets up in the corner, causing cracks. If you want an example, just cut some thin sheet and make the inside corner square and. put it in the vise and pull on one side and watch it tear/crack free... Do the same with a piece with a radiuses inside corner and it could crack, but will give many time more than the sharp change in cross sectional area of the square cut... variations come from how big that radius is, over the piece.
I have found them completely missing more than once. - PILEDRIVER

Some pics of My Powder Coating work
http://s244.photobucket.com/albums/gg6/terrellster/
My Facebook Page for Powder Coating
http://www.facebook.com/profile.php?id=100001788886297
Post Reply