
RyanB's Buggy
-
RyanB

- Posts: 1466
- Joined: Wed Feb 26, 2003 12:01 am
Re: RyanB's Buggy
Got back out to the garage last night and re-welded the front transaxle mount. It is now bolted in! Just need to get the L Brackets to connect the swingaxle spring plates to the rudux boxes from Dan @ Hecker Machine.
-
Ol'fogasaurus
- Posts: 17881
- Joined: Mon Nov 13, 2006 10:17 pm
Re: RyanB's Buggy
Ryan, are you going to stiffen up the outer parimeter of the pan?
-
560
- Posts: 986
- Joined: Mon Jul 12, 2010 12:08 am
-
RyanB
- Posts: 1466
- Joined: Wed Feb 26, 2003 12:01 am
Re: RyanB's Buggy
Hi Lee! For this buggy build, I am not going to stiffen up the pan. It will only occasionally be ridden in the sand. Mostly logging trails and other, slow access places.
With the pan essentially done, it was time to bring the body back inside to figure out how to begin to get it ready to bolt down to the pan. I have much work ahead of me. Pretty sure that I am going to have to cut out put of the back package tray area over the transmission. It is riding on top of it and the body is not 100% on the pan yet. In the 4th picture below, it's hard to tell but that space between the pan and the body is about 1/2", once I remove some of the package tray area this may finally sit down onto the pan better.
I am in desperate need of at least one swingaxle spring plate, if anyone has one laying around...
A mock up to get a feel for what it will begin to look like.

And here begins my 1st big problem. The body is riding on the top of the transaxle and it not completely sitting on the pan. I fear I am going to have to cut this area out and glass it back in higher.

THe body is mostly forced down onto the pan. The rear corners are not looking so great and the previous picture shows why it may not be sitting down 100%

After jacking up the pan you can see it's still not flush with the body. I am not 100% sure what I am going to do about this. It appears the other side is much closer.

With the pan essentially done, it was time to bring the body back inside to figure out how to begin to get it ready to bolt down to the pan. I have much work ahead of me. Pretty sure that I am going to have to cut out put of the back package tray area over the transmission. It is riding on top of it and the body is not 100% on the pan yet. In the 4th picture below, it's hard to tell but that space between the pan and the body is about 1/2", once I remove some of the package tray area this may finally sit down onto the pan better.
I am in desperate need of at least one swingaxle spring plate, if anyone has one laying around...
A mock up to get a feel for what it will begin to look like.
And here begins my 1st big problem. The body is riding on the top of the transaxle and it not completely sitting on the pan. I fear I am going to have to cut this area out and glass it back in higher.
THe body is mostly forced down onto the pan. The rear corners are not looking so great and the previous picture shows why it may not be sitting down 100%
After jacking up the pan you can see it's still not flush with the body. I am not 100% sure what I am going to do about this. It appears the other side is much closer.
-
Ol'fogasaurus
- Posts: 17881
- Joined: Mon Nov 13, 2006 10:17 pm
Re: RyanB's Buggy
Ryan, you are where I am with my black buggy in several ways; e.g., the body not fitting the pan in places; only mine was much worse in ways as the body sections were not assembled on a jig. I did not have the cracking like you photos show but my fit was much worse. I had to reshape the body firewall in the Napoleon’s hat area (besides to make it fit the mods I did to put the hydraulic pedal assembly in), the rear firewall area over the tunnel and the body mount flanges most of the way down the sides; I still have the sides to finish by thickening the fiberglass in the modified area and making some side bulges for the fasteners.
While I am not 100% positive, I think the adding the stiffening tubes down the sides of the body mount tunnel is going to do a lot for fit, make a much better ride on and off-road not to mention the possibility it may stop some crazing of the gel coat from all the flexing that the pan can do. I would at least put a long straight edge on the pan and the body mount flanges to see if you can fine which one is off or if they both are. You could even go to replacing the sides with some 1” square or 1 ½” wide rectangular tubing which I suspect would be easier. Bending/ shaping the tube before you remove the old part would make it easier to do.
You are going to have some fiberglass work anyway so make the body fit the pan and miss the transaxle with some room to spare. It is easier and you can repair any other problems at the same time. Remember you also have a body seal in there too.
Lee
While I am not 100% positive, I think the adding the stiffening tubes down the sides of the body mount tunnel is going to do a lot for fit, make a much better ride on and off-road not to mention the possibility it may stop some crazing of the gel coat from all the flexing that the pan can do. I would at least put a long straight edge on the pan and the body mount flanges to see if you can fine which one is off or if they both are. You could even go to replacing the sides with some 1” square or 1 ½” wide rectangular tubing which I suspect would be easier. Bending/ shaping the tube before you remove the old part would make it easier to do.
You are going to have some fiberglass work anyway so make the body fit the pan and miss the transaxle with some room to spare. It is easier and you can repair any other problems at the same time. Remember you also have a body seal in there too.
Lee
-
RyanB
- Posts: 1466
- Joined: Wed Feb 26, 2003 12:01 am
Re: RyanB's Buggy
Lee, I may consider that. As in just adding the 1" square tubing into the channel from underneath? I could potentially do that at any time so I could come back later and add that I would think. But no I had not considered it before.
A super long "weekend" for me. I had Mon-Wed off. I didn't quite get done what I wanted to. Basically I went looking for an old pedal cluster I had that had a good spring on it. The current pedal cluster the spring is a bit iffy. Well, after digging into my pile O parts and having stuff fall on me I got frustrated and began cleaning and organizing. Yea well 3 days later things are much more organized.
So, what did I get done on the buggy? A few things. I had to shorten the shift rod. I took my time making marks and making sure everything was lined up and straight. Made my cuts (15 1/2" is what I took out of the pan) and welded it all back together. This is when I found my 1st hurdle. I don't really remember having difficulty in putting in the shift rod in my old buggy. But due to it being shortened, it was difficult to get it to go through the front mounting hole underneath the shifter. It was just too short. I ended up snaking baling wire from the back, through the hole and hooking the shift rod. After much difficulty I pulled it through.
Enter problem number 2. When I attempted to lift the shift rod up into place to attach the coupler to the transmission it wouldn't come up for enough. I can no longer see into the area in question so I am assuming that the E-brake tubes are in the way. with everything welded into place I cant really get back into that area, so what to do? Not many options so I applied some muscle. I simply grabbed the bar and bent it up into place. I am sure there is an ugly kink the rod, and I am sure it will never be able to be removed now...
Enter problem number 3. I went to attach the coupler and low and behold, there is no indent in the nosecone shift part. Well, this transmission came out of a bus, so naturally it is below and not above. I went and looked at the original transmission and 'tried' to accurately reproduce the same location of the hole. Well, that did not go well. I ended up having to weld to fill that hole. Grind it down and then this time I put the transmission into 3rd gear, put the shifter into 3rd after sliding on the coupler and drilled through it into the bar. It now shifts correctly...
So, now with the pedal cluster in place and the shifter in place it was time to tackle the spring plates. Not much to report there. Went on without too much difficulty. Though I am certain I have much more preload on the passenger side than I do on the drivers side. I will probably have to redo the drivers side but I'll wait to see how it sits.
The last thing I did was to mount the motor. I mistook a couple of Type4 clutches that are much larger then my type1. So, just for kicks I mounted the motor to fire it up. I need to find a used clutch pressure plate to get me by for now. I have a clutch disk.
Things to do...
1) Find a clutch pressure plate.
2) Get swingarm boots
3) Need a new wingnut for the clutch cable
4) Get L Brackets from Dan @ Hecker Machine
MUCH more of course, this is just the imminent stuff.
And the obligatory pic. This is after running the motor briefly.

A super long "weekend" for me. I had Mon-Wed off. I didn't quite get done what I wanted to. Basically I went looking for an old pedal cluster I had that had a good spring on it. The current pedal cluster the spring is a bit iffy. Well, after digging into my pile O parts and having stuff fall on me I got frustrated and began cleaning and organizing. Yea well 3 days later things are much more organized.
So, what did I get done on the buggy? A few things. I had to shorten the shift rod. I took my time making marks and making sure everything was lined up and straight. Made my cuts (15 1/2" is what I took out of the pan) and welded it all back together. This is when I found my 1st hurdle. I don't really remember having difficulty in putting in the shift rod in my old buggy. But due to it being shortened, it was difficult to get it to go through the front mounting hole underneath the shifter. It was just too short. I ended up snaking baling wire from the back, through the hole and hooking the shift rod. After much difficulty I pulled it through.
Enter problem number 2. When I attempted to lift the shift rod up into place to attach the coupler to the transmission it wouldn't come up for enough. I can no longer see into the area in question so I am assuming that the E-brake tubes are in the way. with everything welded into place I cant really get back into that area, so what to do? Not many options so I applied some muscle. I simply grabbed the bar and bent it up into place. I am sure there is an ugly kink the rod, and I am sure it will never be able to be removed now...
Enter problem number 3. I went to attach the coupler and low and behold, there is no indent in the nosecone shift part. Well, this transmission came out of a bus, so naturally it is below and not above. I went and looked at the original transmission and 'tried' to accurately reproduce the same location of the hole. Well, that did not go well. I ended up having to weld to fill that hole. Grind it down and then this time I put the transmission into 3rd gear, put the shifter into 3rd after sliding on the coupler and drilled through it into the bar. It now shifts correctly...
So, now with the pedal cluster in place and the shifter in place it was time to tackle the spring plates. Not much to report there. Went on without too much difficulty. Though I am certain I have much more preload on the passenger side than I do on the drivers side. I will probably have to redo the drivers side but I'll wait to see how it sits.
The last thing I did was to mount the motor. I mistook a couple of Type4 clutches that are much larger then my type1. So, just for kicks I mounted the motor to fire it up. I need to find a used clutch pressure plate to get me by for now. I have a clutch disk.
Things to do...
1) Find a clutch pressure plate.
2) Get swingarm boots
3) Need a new wingnut for the clutch cable
4) Get L Brackets from Dan @ Hecker Machine
MUCH more of course, this is just the imminent stuff.
And the obligatory pic. This is after running the motor briefly.
-
Ol'fogasaurus
- Posts: 17881
- Joined: Mon Nov 13, 2006 10:17 pm
Re: RyanB's Buggy
http://www.shoptalkforums.com/viewtopic ... 3&start=15. Look at page 2 and 3: I would not do a couple of things again mainly the adding the crush tubes as they were time consuming, limiting and probably not necessary. The other thing was to remove the material where I had flattened out the stiffening beads. The plugging of the rear was OK and I have yet to finish the locking the front end of the tube but I plan on using a piece of flat stock welded to the tube and to the under piece of the frame head.
I have to mark the ends of the beam support tubes going to the beam when adjusted to the extreme rear position but that is a 5-minute job.

I made my shift rod adjustable by buying a bolt that would fit inside the tube and two nuts. I turned one ot the nuts down about half way up to match the inside diameter of the tube and welded it in place. The head of the bolt was cut off and welded to the old end of the shift rod. The other bolt is used as a jam nut. You can buy this on like but it has the dimple for the grub screw so you don't need the old end of a shift rod.
I’m missing a lot of photos out of my photo bucket account so I have to find them on my computer. If you want I will look for them otherwise not.
Lee
I have to mark the ends of the beam support tubes going to the beam when adjusted to the extreme rear position but that is a 5-minute job.
I made my shift rod adjustable by buying a bolt that would fit inside the tube and two nuts. I turned one ot the nuts down about half way up to match the inside diameter of the tube and welded it in place. The head of the bolt was cut off and welded to the old end of the shift rod. The other bolt is used as a jam nut. You can buy this on like but it has the dimple for the grub screw so you don't need the old end of a shift rod.
I’m missing a lot of photos out of my photo bucket account so I have to find them on my computer. If you want I will look for them otherwise not.
Lee
-
RyanB
- Posts: 1466
- Joined: Wed Feb 26, 2003 12:01 am
Re: RyanB's Buggy
Lee, that is a dang ingenious way to do the shift tube. If I run into problems with mine, I may go down that route this next time. Love it!
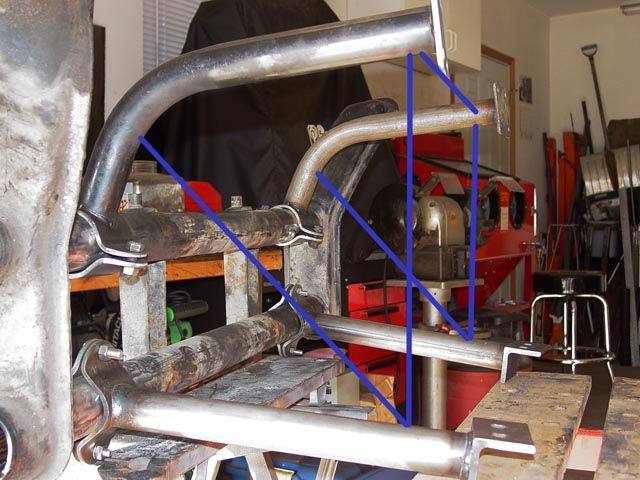
Your top picture confused me. I don't have a tube buggy. Standard pan. What are you trying to show me with the blue lines that would benefit my build?
On Buggyfreaks, someone suggested a lift kit. I had not considered it. I would prefer to make my own but getting the bends and stuff just right... Descisions descisions.
Here is the link to it. I could probably make my own with about $50 in material. This would keep me from having to cut up the glass body as well...
http://www2.cip1.com/ProductDetails.asp ... 26-701-280
Your top picture confused me. I don't have a tube buggy. Standard pan. What are you trying to show me with the blue lines that would benefit my build?
On Buggyfreaks, someone suggested a lift kit. I had not considered it. I would prefer to make my own but getting the bends and stuff just right... Descisions descisions.
Here is the link to it. I could probably make my own with about $50 in material. This would keep me from having to cut up the glass body as well...
http://www2.cip1.com/ProductDetails.asp ... 26-701-280
-
BAJA-IT
- Posts: 2046
- Joined: Tue Oct 07, 2008 5:02 pm
Re: RyanB's Buggy
My Bro-in-law made a lift for his buggy out of wood, and glassed it to the body. Worked great. To bad that car is no longer around.
BRAT Motorsports #936
Bolt Center: Salt Lake City, Ut
ACE: Air Cooled Engineering, now Black Line Racing
Bolt Center: Salt Lake City, Ut
ACE: Air Cooled Engineering, now Black Line Racing
-
Ol'fogasaurus
- Posts: 17881
- Joined: Mon Nov 13, 2006 10:17 pm
Re: RyanB's Buggy
Thanks Ryan, the shift rod coupler is a very easy thing to do, it took no brains. http://www.mooreparts.com/store/product/1503/AC710002E/ the commercial unit, $7 plus shipping.RyanB wrote:Lee, that is a dang ingenious way to do the shift tube. If I run into problems with mine, I may go down that route this next time. Love it!
Your top picture confused me. I don't have a tube buggy. Standard pan. What are you trying to show me with the blue lines that would benefit my build?
On Buggyfreaks, someone suggested a lift kit. I had not considered it. I would prefer to make my own but getting the bends and stuff just right... Descisions descisions.
Here is the link to it. I could probably make my own with about $50 in material. This would keep me from having to cut up the glass body as well...
http://www2.cip1.com/ProductDetails.asp ... 26-701-280
This is the commercial body lift, if you had a Baja and drove it only on the street I would recommend it (with some hesitation) as you have the VW body to add some structure to the lift. Even if you boxed it, it is still formed flat stock and not that really that strong… mainly for looks I think. The same for the wooden body lift and a couple of other methods I have seen. When it comes to a glass buggy body on a stock (albeit shortened stock pat) the outer perimeter is just to flimsy. GDRBORETIRED wasn’t retired then so it was GDRBO and I had several long discussions’ on this very subject on the now defunct Buggy_Talk, and it was his and several other peoples’ opinions were that the commercial ones now days just are not worth paying with or modifying.
That is why I did my own body lift on the blue buggy: http://www.shoptalkforums.com/viewtopic.php?t=105659. On the blue one I learned a lot of lessons which I used on the black buggy: http://www.shoptalkforums.com/viewtopic ... lack+buggy except I fixed a few things like adding a doubler over the kerfing after all the problems I had welding the bends in place (try to get rectangular tubing with the seam on the short side not in the long side. It can be had either way) and I built my own front and rear cross-pieces rather than salvaging the ones off a cheap kit like I did on the blue buggy.
Since you are using swing axles I don’t think you need the body lift as long as you don’t modify the front beam for more travel. The swing axle, even with the reduction gear has strict travel limitations that when exceeded cause extreme tuck-under and breakage in the lower unit of the transaxle; e,g., the side gears and other associated parts like the spiders. The front end should have travel in the 70% to 90% range when compared to the rear of the car.
However, a body lift would eliminate some of the pan flex on the outer perimeter of the pan and help support the tunnel’s ability to be the whole support for the buggy. The pans still have a tendency to want to bend in the tunnel which I have been told is in the front of the tunnel just behind the front cross-piece. Mine started to split/tear at the hole for the E-brake.
The tubes I posted are for the frame head and front beam support. My front beam is tipped and I think I did it being silly and trying to jump the buggy at the top of a hill; silly me but then I was young and in my early to mid-50s and you know how young guys are….! The tubes can be purchased already cut to length and bent: http://www.mooreparts.com/store/product/1176/AC413151/ The lower beam tube support. http://www.mooreparts.com/store/product/1175/AC413150/ The upper beam tube support. The lines represent some additional stiffening up of the front end to work something like this.
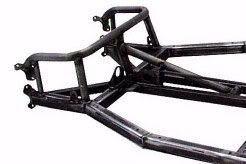
My blue buggy already has the lower bars on it and I think it did help when I hit a no-see-um the day I broke two steering boxes.
Lee
-
RyanB
- Posts: 1466
- Joined: Wed Feb 26, 2003 12:01 am
Re: RyanB's Buggy
Lee, as always your input is highly detailed! Thanks very much!
Considering I am sorta getting back into this after not having a buggy for 2-3 years now. I am still applying the KISS principal. Also, one of the biggest reasons I got out of my rail and buggy was I constantly broke them. I was pounding them hard in the Sand. I now have quads to ride hard in the sand. Satisfy my need for speed. The buggy is mainly for woods/trail crawling and mainly low speeds. I don't know that I'll have to worry much about the tunnel bending/ripping or having problems with the pan head and beam as I wont be jumping it for sure. Jumping days are over for me after a couple bad mishaps in the sand rail. I'll happily jump my quad. heh.
So, in the interest of keeping costs down for this build. I am going to the wood lift route I think. I love building these things though, so I think the next one I do I'll be taking the additional extra time like you did to put into building up the pan.
Shaping up to be a potentially busy weekend. Picking up the L Bracket adapters from Dan @ Hecker Machine. Getting a used clutch from my friend Peter, and picking up a few small items to finish up mounting the motor and transmission.
I've decided to go with the lift on the body. I'll be doing it using wood glassed into the bottom of the body. Many area's of the bottom of the body are in very bad shape. I think this will help both stiffen up the body while allowing me to fit it to the wood and glass it in. Much better I think than cutting into the body to make more room in other area's and still have to address the poor area's. The suggestion came from 2 different forums and really made me sit and think about it.
I'm not 100% on this as of yet. I'll buy some 2x4 and mock it up. I may not want it that high. I only need clearance for the transaxle. The tires wont be hitting the body AFAIK.
Considering I am sorta getting back into this after not having a buggy for 2-3 years now. I am still applying the KISS principal. Also, one of the biggest reasons I got out of my rail and buggy was I constantly broke them. I was pounding them hard in the Sand. I now have quads to ride hard in the sand. Satisfy my need for speed. The buggy is mainly for woods/trail crawling and mainly low speeds. I don't know that I'll have to worry much about the tunnel bending/ripping or having problems with the pan head and beam as I wont be jumping it for sure. Jumping days are over for me after a couple bad mishaps in the sand rail. I'll happily jump my quad. heh.
So, in the interest of keeping costs down for this build. I am going to the wood lift route I think. I love building these things though, so I think the next one I do I'll be taking the additional extra time like you did to put into building up the pan.
Shaping up to be a potentially busy weekend. Picking up the L Bracket adapters from Dan @ Hecker Machine. Getting a used clutch from my friend Peter, and picking up a few small items to finish up mounting the motor and transmission.
I've decided to go with the lift on the body. I'll be doing it using wood glassed into the bottom of the body. Many area's of the bottom of the body are in very bad shape. I think this will help both stiffen up the body while allowing me to fit it to the wood and glass it in. Much better I think than cutting into the body to make more room in other area's and still have to address the poor area's. The suggestion came from 2 different forums and really made me sit and think about it.
I'm not 100% on this as of yet. I'll buy some 2x4 and mock it up. I may not want it that high. I only need clearance for the transaxle. The tires wont be hitting the body AFAIK.
-
Ol'fogasaurus
- Posts: 17881
- Joined: Mon Nov 13, 2006 10:17 pm
Re: RyanB's Buggy
I'd use a harder wood that fir, pine of hemlock. Even with taking it easyyou are going to get some flexing. Just getting into my blue buggy the first time after doing the lift I noticed the different stiffer "feel" and that was before engine start of moving it.
Lee
Lee
-
GDRBORETIRED
- Posts: 557
- Joined: Wed Sep 13, 2006 2:29 pm
Re: RyanB's Buggy
If you do use wood choose a hardwood, oak, maple or alder would be good for that job.
-
RyanB
- Posts: 1466
- Joined: Wed Feb 26, 2003 12:01 am
Re: RyanB's Buggy
Another productive weekend for me. And exciting! I got to pick up the custom L brackets so that I can hook up the reduction gear boxes to the spring plates.
It is almost a roller now! I need to get the drums turned, and complete the rear brakes.
A huge thank you to Dan @ Hecker Machine for making up my custom brackets. If you need adapter plates or other custom work, he's awesome! You wont be disapointed with any of his work!
I've heard the suggestions about using hard wood. I've stuck with the standard fir that you get with 2x4. I am keeping costs down. Also keep in mind that this is already MUCH stronger than if the 2x4's were not there. 2x4's on edge seem to work really well. I stood on the edge after putting this in and there was no flex in it. The body will eventually get glassed directly to the wood. I still need to figure out the captians hat area and the rear curve. After a couple tries with the captains hat I called it a day.
Here is the initial fitting of the L Bracket I had made.

Nothing Scientific here, I had to eyeball this. I knew of no other way. Basically this is the droop I built in. I think that when it is sitting on the wheels it should be level.

The L Bracket is in place and mostly bolted in. Suspension is almost complete!

Another angle of the L bracket setup.

Another angle of the L bracket setup.

Another angle of the L bracket setup.

Rear suspension is complete. Almost a roller!

Beginning of the body lift

Drivers side mostly complete

Drivers and passenger sides are done.

Body now sitting on the lift.

It is almost a roller now! I need to get the drums turned, and complete the rear brakes.
A huge thank you to Dan @ Hecker Machine for making up my custom brackets. If you need adapter plates or other custom work, he's awesome! You wont be disapointed with any of his work!
I've heard the suggestions about using hard wood. I've stuck with the standard fir that you get with 2x4. I am keeping costs down. Also keep in mind that this is already MUCH stronger than if the 2x4's were not there. 2x4's on edge seem to work really well. I stood on the edge after putting this in and there was no flex in it. The body will eventually get glassed directly to the wood. I still need to figure out the captians hat area and the rear curve. After a couple tries with the captains hat I called it a day.
Here is the initial fitting of the L Bracket I had made.
Nothing Scientific here, I had to eyeball this. I knew of no other way. Basically this is the droop I built in. I think that when it is sitting on the wheels it should be level.
The L Bracket is in place and mostly bolted in. Suspension is almost complete!
Another angle of the L bracket setup.
Another angle of the L bracket setup.
Another angle of the L bracket setup.
Rear suspension is complete. Almost a roller!
Beginning of the body lift
Drivers side mostly complete
Drivers and passenger sides are done.
Body now sitting on the lift.
-
Ol'fogasaurus
- Posts: 17881
- Joined: Mon Nov 13, 2006 10:17 pm
Re: RyanB's Buggy
I mad another post but it has disappeared.
Instead of making the "hat area out of 2-by use two pieces of 3/4" plywood gluded together. Stronger and it will be much easier to do.
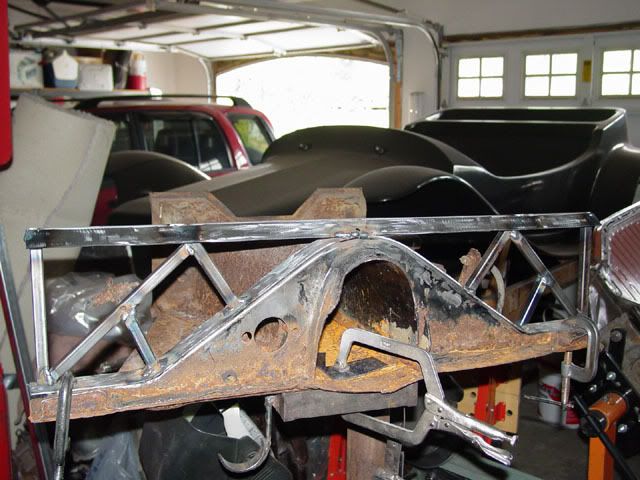
I would also make a pattern like I did (it took a short time to do it out of scrap materials) and you can use it for the arcs on the top and the bottom. Just be sure to index the two arcs, top and bottom together.
When I built my 3” lift, I did the math for the rear cross-piece and you should be able to take a piece of 2-by and lay it on at an angle. At 3” thick tube, the change in height in the diagonal, the distance variation was .01 which the pan gasket will cover.
One the front though, by using the 2-by at an angle the difference is so much that the body will not sit down on the pan. Remember, you are raising the body straight up, the 2-bys on the diagonal will widen the distance; it will raise it but not correctly but just won’t let the body to come down because of the width difference in the “hat” area.
Instead of making the "hat area out of 2-by use two pieces of 3/4" plywood gluded together. Stronger and it will be much easier to do.
I would also make a pattern like I did (it took a short time to do it out of scrap materials) and you can use it for the arcs on the top and the bottom. Just be sure to index the two arcs, top and bottom together.
When I built my 3” lift, I did the math for the rear cross-piece and you should be able to take a piece of 2-by and lay it on at an angle. At 3” thick tube, the change in height in the diagonal, the distance variation was .01 which the pan gasket will cover.
One the front though, by using the 2-by at an angle the difference is so much that the body will not sit down on the pan. Remember, you are raising the body straight up, the 2-bys on the diagonal will widen the distance; it will raise it but not correctly but just won’t let the body to come down because of the width difference in the “hat” area.