Ol'fogasaurus black buggy

Offroad VW based vehicles have problems/insights all their own. Not to mention the knowledge gained in VW durability.
Ol'fogasaurus
Posts: 17881
Joined: Mon Nov 13, 2006 10:17 pm

Post by Ol'fogasaurus »

A lot of things going on right now so I haven't had much time to spend in the garage. I did get to work on the front cross-piece today and it is now tacked together.

Image

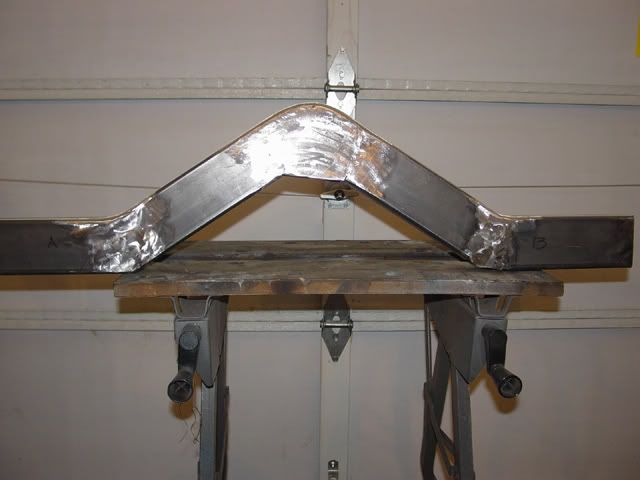
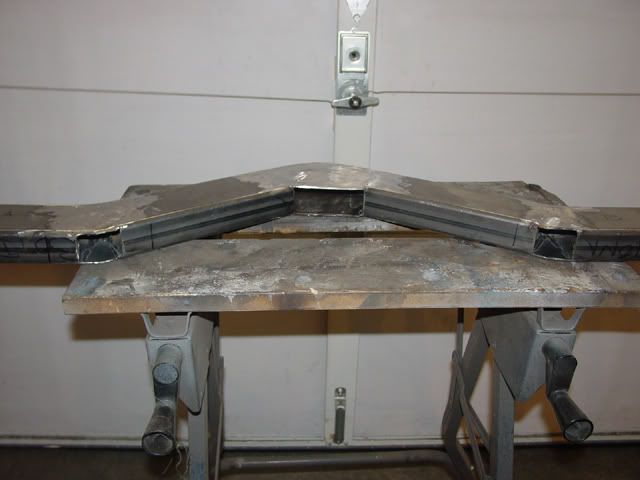
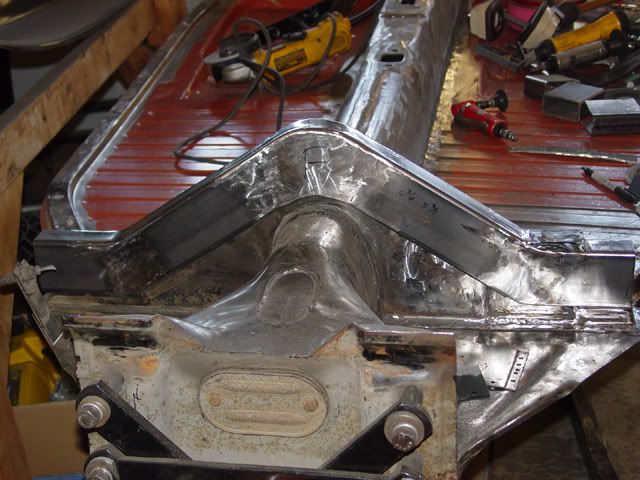
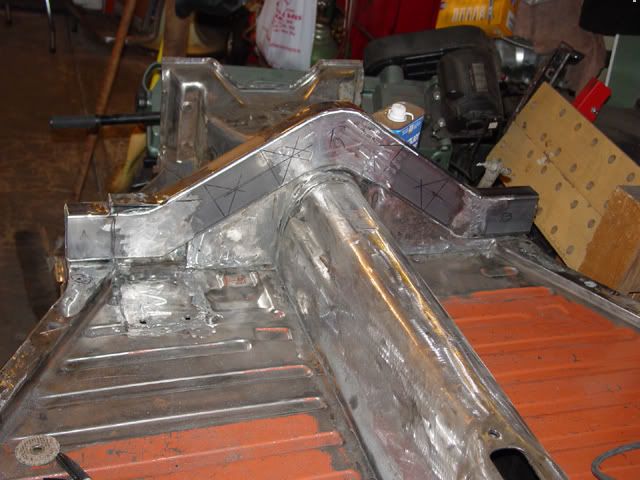
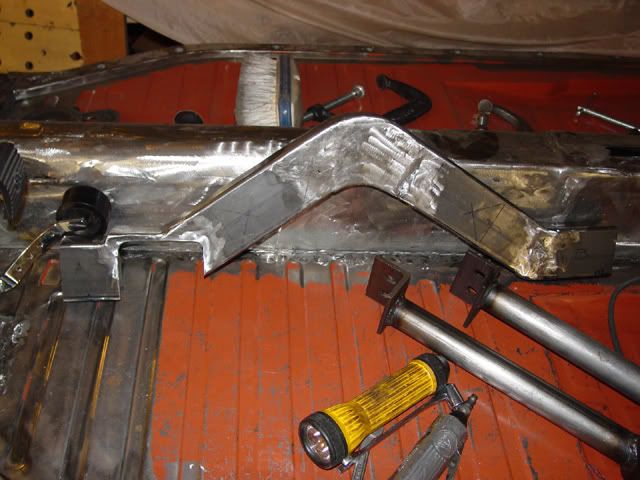
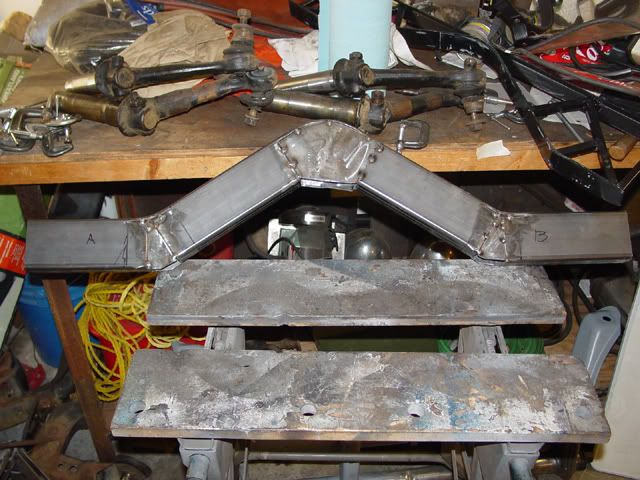
My cuts into the tube were accurate enough that I only needed to make two templates. A little fiddling with the shape (and some more to do later) and they fit pretty good. On the other side, I marked the legs A and B and the jig also has A & B marked so I know how it fit in there. I new nave to put the jig back on the other frame head I had as I didn't mark the two holes on each side. The holes will be used for the support to the beam. One of the reasons I did not make the cross-piece like the kits do this time is the four holes in the front cross-piece. On the other buggy, I duplicated the holes on the top and bottom of the front piece. When I tightened up on the bolts, the strap used collapsed and I had to replace it. This time I will leave the end open and only bolt though the bottom of the leg. One bolt will be custom because of the pedal assembly which is very close to the hole. I will leave the end of the cross-piece open until the body lift is bolted in place for the final time they put a thin piece of metal over the end and tack it in place. Once the holes/slots a drilled, I can cut the bottom to length both inside and outside and then cut the inside of the tube going up the side for the slip-over fit

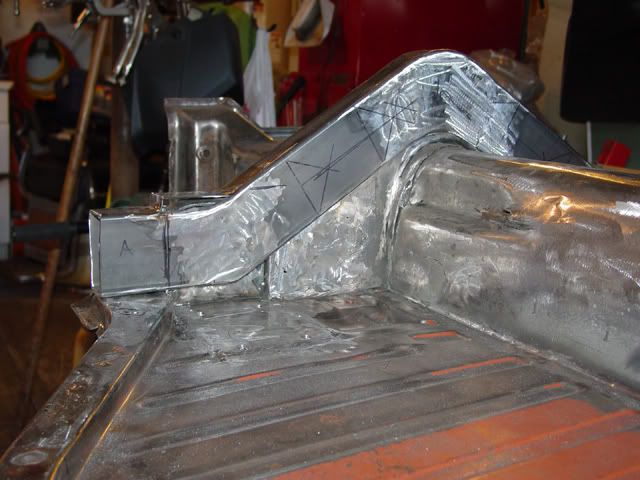
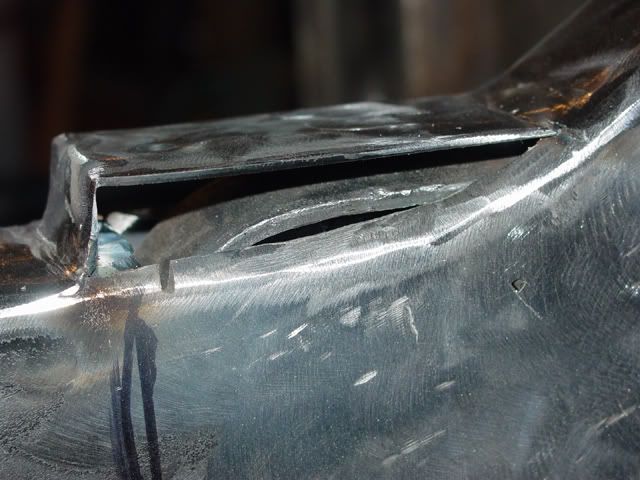
Once I get the holes cut, then I can start matching the cut out that was made for the pedal assembly mount. The mount will sit slightly above the body lift front corss-piece so it will have to be covered and the body flange will have to be trimmed and re1formed. Fun and games! I did lay the ;oft cross-piece against the body and the fit is close enough. I would like to have it fit better but with the pan gasket in place, it should be OK.
Lee

My opinion is worth slightly less than what you paid for it.
User avatar
Turbo_Manx_Maniac
Posts: 3308
Joined: Wed Oct 22, 2003 1:32 pm

Post by Turbo_Manx_Maniac »

I think we need to start a messy garage thread. :lol:


Lee, I like your fixture idea. Sorry if I missed this but are you bolting or welding the lift to the pan?
I accidentally Googled my Twitter. (And I liked it)
Ol'fogasaurus
Posts: 17881
Joined: Mon Nov 13, 2006 10:17 pm

Post by Ol'fogasaurus »

What... (sputter, sputter), messy (sputter, sputter), that is organized! You want to see messy.... !

Actually that corner of the table was messy and I wasn't going to neat it up for a picture. I think I have stuff for about 4 projects sitting there.

No, the lift is going to be removable. Earlier in the string you can see the 1 X 1 X .120 tubular support I already welded to the body mount tunnel. It has crush sleeves welded into it. It took me a long time to decide whether to street it, off-road it, or a combo. It will be off-roaded (sand) but could be put onto the street with some minor work (e.g., dual M/C braking, e-brake, and brakes up front, a windshield and wiper, you know small stuff like that.. The pan is supported on the perimeter, and will have some additional support where needed.
Lee

My opinion is worth slightly less than what you paid for it.
Ol'fogasaurus
Posts: 17881
Joined: Mon Nov 13, 2006 10:17 pm

Post by Ol'fogasaurus »

I finally got to grind the welds on the front cross-piece today. This sure has been a labor. I have discovered that I was so lucky on the first body lift I built, no real problems on it. This one has fought me most of the way and I am just getting started. It is a battle of wills (will I finish “it” or will “It” win.

Image

I have not shaped it yet either. Iwill wait fo the fit check first.

I have also learned a new respect for fabricators/mechanics who work metal. It is one thing to give them a drawing of what I want and then have them come back with parts that will pass a “go-no go” gauge.

After some of the problems with shrinkage during welding and grinding, I clamped a heat sink in where I was welding. I used a quarter of an inch thick piece of copper as a heat sink. Even with the heat sink, I got shrinkage. I am going to have to make a slice in the middle of the part almost to the crown to spread the slopes apart. The slopes closed up a combined total of about a quarter of an inch at the bottom of the slope.

I made a couple of other mistakes. First, I made my jig out of metal I had laying around. The material I used was not strong enough! I though that laying the angle piece mounted tent like, the two legs would stop most of the deflection (even thought it wasn’t the best of material to start with) … wrong. The strap I used for the contour was too thin also and bunched up (warped) during the welding of the support legs). The square tubing was OK but welding it to the strap, I got some pull-away (shrinkage). I need to rethink my locations for the claps to sit also.

Second, even though I kept the welds to about an inch long, it was too much heat. I now wish I had one of the welders that has unlimited heat adjustment rather than the four settings. This time, I will clamp the part in the jig and then tack a piece of 1 x 1 x .120 wall square tube to the bottom to hold the shape. I almost did it to start with but I mistakenly thought I could do it without the bar.

As you can see, I have not cut the bottom of the slope away yet, that will happen next after everything is stabilized. Then I can do a check fit on the spare frame head I have. I also can mark the four holes needed for the lower support for the front beam. After that, then it is the fit up to the pan especially around the pedal assembly.

Image

Would I do this again this way, I doubt it. It works and will be strong but a properly made lift using two sides and the proper thickness strap to make the proper width probably would be easier.

I am not sure, but I am thinking about having Leather move this to the VW kit car forum. Anyone interested in leaving it here?
Lee

My opinion is worth slightly less than what you paid for it.
User avatar
david58
Moderator
Posts: 14101
Joined: Sun Oct 23, 2005 6:14 pm

Post by david58 »

Ol'fogasaurus wrote: I am not sure, but I am thinking about having Leather move this to the VW kit car forum. Anyone interested in leaving it here?
What, :wink: you belong here with the rest of us misfits. :lol:
Hot, humid air is less dense than cooler, drier air. This can allow a golf ball to fly through the air with greater ease, as there won't be as much resistance on the ball.
Ol'fogasaurus
Posts: 17881
Joined: Mon Nov 13, 2006 10:17 pm

Post by Ol'fogasaurus »

I wasn't going to vacate this forum, just not sure it what I am doing right now isn't better on the other forum. If someone with a buggy wanted to do a lift, would they think to look on the off-road forum? Maybe … maybe not.

There is an awful lot of over lap on the forums isn’t there. You have to look around or ask the right question and hope someone is looking at the new posts URL.

By-the-way David, on the unanswered questions thing I had asked about, I didn’t notice it until today when I was having troubles getting on without getting kicked off. At one time, the un-answered question URL was the only one showing. I just remembered the other two URLs. I really don’t remember seeing it before and especially the large number of un-answered questions.
Lee

My opinion is worth slightly less than what you paid for it.
User avatar
david58
Moderator
Posts: 14101
Joined: Sun Oct 23, 2005 6:14 pm

Post by david58 »

Ol'fogasaurus wrote:I wasn't going to vacate this forum
I knew that. :lol: But I feel your thread belongs in this forum. :wink:
Hot, humid air is less dense than cooler, drier air. This can allow a golf ball to fly through the air with greater ease, as there won't be as much resistance on the ball.
User avatar
Leatherneck
Moderator
Posts: 17104
Joined: Sat Jul 01, 2006 6:47 pm

Post by Leatherneck »

Lee, if you feel it would better suit the needs of STF in the other forum just say the word. Good to have you in either one.
Ol'fogasaurus
Posts: 17881
Joined: Mon Nov 13, 2006 10:17 pm

Post by Ol'fogasaurus »

Several of us who are messing around with glass/tub buggies have danced around with things that could belong in either or both forums. The support I made for in the body mount tunnel for example. Building body lifts is another example. I got information from other forums in regards to a Kaffer bar. Preloading the rear torsion bars are another questions I (think I) have seen asked and so on. I just got thinking about it and was putting my size 15 tootsie in the water to see if any fish would bite (they just banned one of the newer rages here, the use of cleaner fish to eat the dead skin off your feet. Just thought of that as I was writing about testing the water and such. I don’t know what the big sink [no pun intended] is all about as some of us drink what the fish go to the bathroom in and it is OK)..

Anyway, just thinking with my hands (keep it to yourselves guys, I don’t want to hear about it!)
Lee

My opinion is worth slightly less than what you paid for it.
User avatar
Leatherneck
Moderator
Posts: 17104
Joined: Sat Jul 01, 2006 6:47 pm

Post by Leatherneck »

Ol'fogasaurus wrote:Several of us who are messing around with glass/tub buggies have danced around with things that could belong in either or both forums. The support I made for in the body mount tunnel for example. Building body lifts is another example. I got information from other forums in regards to a Kaffer bar. Preloading the rear torsion bars are another questions I (think I) have seen asked and so on. I just got thinking about it and was putting my size 15 tootsie in the water to see if any fish would bite (they just banned one of the newer rages here, the use of cleaner fish to eat the dead skin off your feet. Just thought of that as I was writing about testing the water and such. I don’t know what the big sink [no pun intended] is all about as some of us drink what the fish go to the bathroom in and it is OK)..

Anyway, just thinking with my hands (keep it to yourselves guys, I don’t want to hear about it!)
Well it's probably alittle late for that. :lol:
Ol'fogasaurus
Posts: 17881
Joined: Mon Nov 13, 2006 10:17 pm

Post by Ol'fogasaurus »

NOt too happy with this yet.

Got to do some work on the black buggy since we got back from the dunes Friday (no riding this trip, just work). The basic shape of the front cross-piece is done and it is now ready for slots for the mounting bolts and trimming of the two faces for the pedal assembly.

Image

This is looking towards the rear of the car (obviously) and you can see the mount for the pedal assembly. I don’t think I will have to take all of that area out, but a lot of it may have to be removed... I think. Besides the obvious, I also have to have room for the hydraulic lines to clear the lift.

Image

This is looking forward (yeah, stating the obvious again). A good part of this face, around the pedal assembly, will have to go.

If you look close, you can see where the brake assembly’s mount’s brace comes though the body lift cross-piece. I looked to see if at least some of the mount could be trimmed away but no, it has to stay and it important. So close but then so it life… so they tell me.

Image

A little wider view of the area I am working with. I still have some work to do as the very bottom is not the fit I want, I am sure leaning a lot on this one.

Image

A closer view of the notched out area. I have the top n place and need to fill it in but there are a couple of other problems to be fixed first. The cut for the fix will be in this area so...

It could end up requiring a doubler in the notch out area on both sides. A lot of structure is going to have to be removed.

Would I do it this way again? Not unless I had to. If someone had access to a water jet or laser cutter, he could make several sets of sides to sell. Probably not a lot of calls for body lift parts, but maybe enough to justify doing it. I think I would look at doing a two inch lift also. It would be nice to have the cast piece but they are so hard to come by.

The front and rear cross-pieces are not normally called into a lot of load capabilities so they can be made lighter weight (material), but if you attach the cage to the lift, this can change quickly. The biggest problem is that the cheaper cross-piece uses thin strap for the center that is wrapped around the two side pieces. If you are going to use the two slots in the pan that are located on the front cross-piece, you have bolt though situation that can collapse (like the first body lift did) as the strap material is not strong enough. I am installing a pair of the front beam supports that bolt to these hole and they need to have a good yarf load put on the bolts. I have come up with what I think might work but more on that another time. The VW body is, as I remember, a bolt up situation and I have to go down thought the pan in thus case,

The commercial body lifts are just too light duty. For those of us where the body itself comes off, or the top of the body comes off, the loss of that structure is a big deal. The same with the addition of the Baja glass front end, the frame head looses support. That is another thing I will have to work on…

Revised once to add an additional comment.
Last edited by Ol'fogasaurus on Mon Oct 27, 2008 5:08 pm, edited 1 time in total.
Lee

My opinion is worth slightly less than what you paid for it.
User avatar
Joxracing
Posts: 1267
Joined: Sun Mar 09, 2008 9:48 am

Post by Joxracing »

Lookin good :wink:
Ol'fogasaurus
Posts: 17881
Joined: Mon Nov 13, 2006 10:17 pm

Post by Ol'fogasaurus »

This will probably be the last post of this for a while unless something interesting comes up.

Image

I finally got around to cut out the area for the pedal assembly. It turned out OK but I was hoping for it to look better. The fit is OK but with more practice, it could be better. I guess this is the way we learn.

Image

The pedal assembly fits in OK and the bolts for the attachment to the master cylinders and pedal assembly bracket are accessible… to a point. It is getting so thin near the area bumped up to clear the mounting bracket, I may come back and build doublers on both sides, around the cutouts, to give some additional support. As I have said before, normally the front and rear cross-pieces don't get a lot of loading but they could the way this one is working out. I could have built in some loading, more than planned. It is based on how I plan on mounting the seats and cage.

Image

Before I close out the ends of this piece, I have to deal with the four holes (slots) in the pan that were body mount holes but are going to be used for the two bars that run forward to support the front beam. On my other buggy, I ran the holes through the top of the cross-piece and bolted down through the pan to install the two front beam supports I use. The problem there was that the bolts wanted to crush the fiber glass so I cut holes for the bolt head and washers. Looked like crap and the body mount flange was seriously weakened.

This time I only put slots in the bottom of the cross-piece. For bolts, I plan on taking a piece of solid 5/8 bar and drilling and threading it for two studs. The studs will be able to move around freely and will be kept in place by a plate I will insert in the cross-piece via pierces in both sides then welding the ends solid. They way it will be free to move but will not be able to be pushed up so the nuts won’t be able to be installed. Maybe over kill but that is how I plan on doing it.

By-the-way, does anyone know the diameter and thread count for the four bolts in the rear corss-piece? I think they are 12 mm but I am not sure.
Lee

My opinion is worth slightly less than what you paid for it.
User avatar
Leatherneck
Moderator
Posts: 17104
Joined: Sat Jul 01, 2006 6:47 pm

Post by Leatherneck »

Lee, you are really doing a bang up job on this, the craftsmanship is outstanding. Are you having fun doing it?
Ol'fogasaurus
Posts: 17881
Joined: Mon Nov 13, 2006 10:17 pm

Post by Ol'fogasaurus »

After it is done it is usually fun. Sometimes during the build it is fun too. To be honest, it has been very frustrating at times also. This is especially true when things are not going the way you want or you goofed and you either had to start over or fix the AW $%@&!. I’ve had some problems that got expensive to fix but over all… yeah, when a task is done I often get to smile to myself.

The reason I said I wouldn't post on it for a while is that what is left on the body lift is the same or similar to what I did on the blue buggy (another string). Maybe I should make a cross-reference to it in case anyone wants to use it.

I learned a lot of lessons, some the hard way mostly because I didn’t really know what I was doing a lot of the time so I had to forge ahead the best I could. (it is one thing to design something, in engineering, then draw up what you want and wait for someone to make it. I am starting doing the fabricating very late in life and I am learning a lot of lessons from it. If you are wondering if they would have helped when I was in engineering? No, design dictated is one thing; designing to make it fabrication easy is not always the best way to design. I worked with someone who did that and his parts were expensive and ended up being complicated because of it. The person making the part has to be kept in mind also because you have to be able to make the part too.)

There aren’t too many people around here to network with; at least that I have got to know especially that are doing similar things to my projects. I think Marc is not too far away but I have not met him. I suspect that there may be a couple others too close by also. (By-the-way, Bow Wow/Autovice is going to move before too long. Somewhere still in Lynnwood WA. The site is not fixed yet though. Just a heads up to the move for those who live around here. Just one of several changes there). Places like this and other sites are good to visit if not just see what others have done before… as long as the string titles are searchable. Leather’s guide sticky is great for that if it is looked at.

There have been things I have been told to do, or how to do things but the description of the “thing” was nothing other then a verbal description. Verbal alone is not always as good as it is when combined to a visual look also. That is one reason I probably got too gabby or too detailed on the task is was documenting (my teaching things again). I also have been told to do this or do that and it wasn’t until I was done that I understood the “what’s and why’s” of doing “this or that”.

Oops, I got philosophical and wordy again.
Lee

My opinion is worth slightly less than what you paid for it.
Post Reply