Budget street legal rail (re)build (WARNING: pic heavy)

Offroad VW based vehicles have problems/insights all their own. Not to mention the knowledge gained in VW durability.
User avatar
Marc
Moderator
Posts: 23741
Joined: Thu May 23, 2002 12:01 am

Re: Budget street legal rail (re)build (WARNING: pic heavy)

Post by Marc »

GoMopar440 wrote:...This shroud is from a standard ACVW engine as far as I know. Where would coolant fluid be used? Same with the ECM. Did they ever come on these carburated engines?
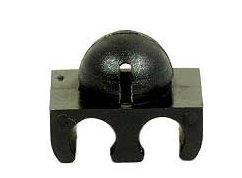
No, I think Leatherneck's being facetious. The upper center hole is for the throttle cable guide tube, the three lower ones are where the plastic/nylon sparkplug cable clips snap into the shroud.
Image


...there's a "triple" one for the left side which also supports the fuel pipe going to the pump.
https://images.duckduckgo.com/iu/?u=htt ... 51.jpg&f=1

The small holes & slits along the bottom are where the thermostat flaps are mounted.
User avatar
GoMopar440
Posts: 258
Joined: Sun Apr 12, 2015 8:56 am

Re: Budget street legal rail (re)build (WARNING: pic heavy)

Post by GoMopar440 »

Thanks Marc. I hadn't seen those spark plug clips before. I'll take another look at my shroud tomorrow and decide if I want to keep the holes for those or not. I don't think I'm going to use the flap system in the bottom of the shroud, so I'll probably just fill those holes up.
Home made rail (street legal), 1600 DP, 34PICT-3, T3 brakes, 4-1 glass-pack exhaust, 31's in back and 7.00x15's up front. Link to build thread: viewtopic.php?f=28&t=147561&p=1227553#p1227553
User avatar
Marc
Moderator
Posts: 23741
Joined: Thu May 23, 2002 12:01 am

Re: Budget street legal rail (re)build (WARNING: pic heavy)

Post by Marc »

GoMopar440 wrote:...I don't think I'm going to use the flap system in the bottom of the shroud, so I'll probably just fill those holes up.
Another option, if you can find some flap assemblies, is to braze them in the open position. The factory engineers placed them so as to direct the cooling air effectively when open.

For this project I'd leave the holes there (or just find some rubber plugs for them if they bother you) in case you come across the parts to put in a functional t'stat system in the future.

Did you get a thermostat with the engine? If the bellows is still at minimum length, it should be OK. If it's lost its vacuum and has expanded it's NFG, but save the thread adapter nipple off the top before you toss it.
User avatar
GoMopar440
Posts: 258
Joined: Sun Apr 12, 2015 8:56 am

Re: Budget street legal rail (re)build (WARNING: pic heavy)

Post by GoMopar440 »

From the T3 engine all the pieces that were on the engine. I have the bellows, bellows mounting bracket, actuating rod and the bell crank bracket that was attached to the head. The bellows part looks to be intact and probably usable, but I haven't function checked it yet to be sure. After seeing the prices of just the bellows part (over $100), I'm going to clean it up and save it in case I find the other parts for the flap system later on.

I'll probably just go ahead and fill the holes as planned since I've already hacked this shroud up for carb clearance. I'm trying to get the rearward facing side of the shroud as smooth as possible before painting. Rubber plugs everywhere would look like an afterthought IMHO.

Anyway, it's about 45* outside here so I'm heading out to the shop and the barn to go work on stuff. I'll post an update and pics of my progress later tonight.
Home made rail (street legal), 1600 DP, 34PICT-3, T3 brakes, 4-1 glass-pack exhaust, 31's in back and 7.00x15's up front. Link to build thread: viewtopic.php?f=28&t=147561&p=1227553#p1227553
User avatar
Leatherneck
Moderator
Posts: 17104
Joined: Sat Jul 01, 2006 6:47 pm

Re: Budget street legal rail (re)build (WARNING: pic heavy)

Post by Leatherneck »

Marc wrote:
GoMopar440 wrote:...This shroud is from a standard ACVW engine as far as I know. Where would coolant fluid be used? Same with the ECM. Did they ever come on these carburated engines?
No, I think Leatherneck's being facetious. The upper center hole is for the throttle cable guide tube, the three lower ones are where the plastic/nylon sparkplug cable clips snap into the shroud.
Image


...there's a "triple" one for the left side which also supports the fuel pipe going to the pump.
https://images.duckduckgo.com/iu/?u=htt ... 51.jpg&f=1

The small holes & slits along the bottom are where the thermostat flaps are mounted.
I'm sorry I was. :P
User avatar
GoMopar440
Posts: 258
Joined: Sun Apr 12, 2015 8:56 am

Re: Budget street legal rail (re)build (WARNING: pic heavy)

Post by GoMopar440 »

Today I went out to the shop and worked on the steering wheel adapter. With the lathe now fixed I was able to finish boring out the center hole and then open up the large recess in the large outer cover piece. After test fitting the original splined center piece on the steering shaft, it looked like the outer cap was going to hit the outer body that goes around the shaft and key switch. So I turned a recess on the rearward part of the outer edge enough that it would clear the ID of the housing when installed. It's probably just easier to show the pics, but PhotoBucket is not cooperating again. I'll add the pics whenever they finally upload. The two 800x600 pics I tried to upload have stalled out and are just sitting there stuck at 90% for the last 15 minutes now. :x

EDIT: The pics finally uploaded, but not without some difficulty. I somehow ended up with 5 new pics when I only uploaded two. Two of one pic and three of the other. :roll: Anyway, here they are.
Image
Image

The three threaded holes needed to mount the steering wheel will be added later.
Home made rail (street legal), 1600 DP, 34PICT-3, T3 brakes, 4-1 glass-pack exhaust, 31's in back and 7.00x15's up front. Link to build thread: viewtopic.php?f=28&t=147561&p=1227553#p1227553
User avatar
dustymojave
Posts: 2314
Joined: Mon Dec 01, 2008 9:08 pm

Re: Budget street legal rail (re)build (WARNING: pic heavy)

Post by dustymojave »

The 3 factory threaded holes for the steering wheel are 1/4-28 fine thread. In soft cast zinc, I disapprove of fine threads. I've encountered several of these adapters which were stripped and/or cross-threaded. I like to install coarse thread helicoils.
Richard
Lake LA, Mojave Desert, SoCal
Speed Kills! but then...So does OLD AGE!!
Tech Inspection: SCCA / SCORE / HDRA / ARVRA / A.R.T.S. OffRoad Race Tech - MDR, MORE, Glen Helen BajaCup
Retired Fabricator
'58 Baja with 955K Miles and counting
User avatar
GoMopar440
Posts: 258
Joined: Sun Apr 12, 2015 8:56 am

Re: Budget street legal rail (re)build (WARNING: pic heavy)

Post by GoMopar440 »

The original adapter I have is a factory VW part, that had the VW logo and part number on it, so the holes were probably originally metric. The PO hacked it up so bad I'm having to true it up and make that cap to rebuild it. If I'm going to be putting my butt in this rail I want to KNOW that it will go where I tell it to when I turn the wheel. With the condition it was in when I got it, I wasn't so sure it would be able to do that reliably.

Two of the 3 holes in the adapter, and in the steering wheel hub, were wallowed out to egg shapes. I'm not sure how the PO managed to do that with the threaded part of the holes. I don't have a before pic to show the factory VW logo or part numbers. I trued up the OD and the face before I remembered to take a pic of it. Here's a couple of pics of the adapter midway through the process that shows how badly the holes were aligned.
Image
Image

Fine threads and coarse threads both have their place. I'd like to go with which ever thread will give me reliable clamping of the wheel to the adapter. Helicoils aren't my favored way to reinforce threaded holes in soft alloys. I like to use Time-Serts since they are a solid threaded sleeve that reinforces the hole as well as the threads. http://www.timesert.com/
Last edited by GoMopar440 on Fri Jan 29, 2016 5:55 pm, edited 1 time in total.
Home made rail (street legal), 1600 DP, 34PICT-3, T3 brakes, 4-1 glass-pack exhaust, 31's in back and 7.00x15's up front. Link to build thread: viewtopic.php?f=28&t=147561&p=1227553#p1227553
User avatar
david58
Moderator
Posts: 14100
Joined: Sun Oct 23, 2005 6:14 pm

Re: Budget street legal rail (re)build (WARNING: pic heavy)

Post by david58 »

Nice work.
User avatar
GoMopar440
Posts: 258
Joined: Sun Apr 12, 2015 8:56 am

Re: Budget street legal rail (re)build (WARNING: pic heavy)

Post by GoMopar440 »

Not much rail work has been going on here lately. I had to run the wife out to the airport this morning to go to a funeral for a family member in New Orleans. She's going to be staying down there till the middle of the month so she can make it to her daughter's wedding. So, yea, it's been a little hectic around the house lately.

I did get one thing rail related done today though. I ordered a new 75W alternator from RockAuto.com for the T3 engine. Once that gets here I'll be able to assemble most of the rest of the parts I've been collecting for that engine. The last time I looked at that same alternator it was listed at just under $95 for it. Now it's selling for almost $105. I wish I had the money when I first saw it and I could have saved $10. There's no core charge and shipping is $9.56. Even with the shipping it's still way cheaper than any of the VW parts houses had listed for just a stock 55W alternator. It's the third one down the list on this page if anyone else wants to check it out. http://www.rockauto.com/catalog/raframe ... ttype=2412

And on a somewhat related topic, I spotted a set of Starrett No. 226 micrometers in the local pawn shop today. They had $60 on the sticker for the three mic set (1"-2", 2"-3" & 3"-4"), but I was able to negotiate them down to $25 for all of them. I don't usually get lucky in pawn shops like that, but I guess today was my day. 8)
Home made rail (street legal), 1600 DP, 34PICT-3, T3 brakes, 4-1 glass-pack exhaust, 31's in back and 7.00x15's up front. Link to build thread: viewtopic.php?f=28&t=147561&p=1227553#p1227553
User avatar
GoMopar440
Posts: 258
Joined: Sun Apr 12, 2015 8:56 am

Re: Budget street legal rail (re)build (WARNING: pic heavy)

Post by GoMopar440 »

More snow here again today (as usual this time of year) and I just got back from a HF for a tool run. I picked up a 1/4" in/lb torque wrench and a 1/2" ft/lb torque wrench for $11.99 each. Unfortunately I remembered wrong and already had a 1/2" torque wrench at home. I'll be heading back up that way again on Wednesday, so I'll swap it out for the 3/8" version then. Let's see... I also picked up a set of telescoping gauges so I can check cylinder ID's. I somehow lost my Starrett snap gauge set I had for a long time. :x I also picked up a quick change air brush kit and an air line dryer for it so I can spray Cerokote. I needed one of those for the gunsmith shop anyway, so I can write it off an a business expense. Other than that it was just some small consumable type stuff like latex gloves, zip ties, etc.
Home made rail (street legal), 1600 DP, 34PICT-3, T3 brakes, 4-1 glass-pack exhaust, 31's in back and 7.00x15's up front. Link to build thread: viewtopic.php?f=28&t=147561&p=1227553#p1227553
User avatar
GoMopar440
Posts: 258
Joined: Sun Apr 12, 2015 8:56 am

Re: Budget street legal rail (re)build (WARNING: pic heavy)

Post by GoMopar440 »

I spent a little more time out in the shop working on the steering adapter. When I mocked up the steering wheel, the threads on the shaft only went into the big nut about half way. So I put the adapter back into the lathe and turned down the height of the cap about 1/8". Then I put a bevel back on the inner and outer edges to dress it up. The result is the shaft threads just barely stick out of the top of the nut now. I would have liked more thread showing, but I'll probably weaken the cap if I make it any thinner than I already have. I'll just use some blue Lock-Tite on the nut when I install it for good.
Image
Image

The adapter wasn't he only thing the PO hacked up when he butchered this thing. The steering wheel mounting holes got the same treatment. I'm not a fan of these tiny steering wheels, so I'll be looking for a more normal sized one like what I have on my rail now.
Image

Today I wanted to head down to Brax's place (closest VW shop around) to look for more engine parts, but his voice mail said he'd be out from the 1st to the 4th. Good thing I always call first before making the 1/2 hour drive down to his place. I'll catch up with him on Friday after he gets back.

I just got an email from RockAuto saying the alternator shipped out today. I should be getting it on Friday according to the tracking info. Once that gets here I'll be able to mock up most of the rest of the T3 engine.
Home made rail (street legal), 1600 DP, 34PICT-3, T3 brakes, 4-1 glass-pack exhaust, 31's in back and 7.00x15's up front. Link to build thread: viewtopic.php?f=28&t=147561&p=1227553#p1227553
User avatar
Leatherneck
Moderator
Posts: 17104
Joined: Sat Jul 01, 2006 6:47 pm

Re: Budget street legal rail (re)build (WARNING: pic heavy)

Post by Leatherneck »

Thanks for the update pics, let us know how that rockauto deal works out. Heard different opinions on them.
User avatar
GoMopar440
Posts: 258
Joined: Sun Apr 12, 2015 8:56 am

Re: Budget street legal rail (re)build (WARNING: pic heavy)

Post by GoMopar440 »

I made it down to the VW shop (Brax's Euro Parts) today and did a little bartering. I was looking for a 091 trans or a Rhino trans/case. I struck out on both counts. He did have a few 002's and one rebuilt pyramid case though. I didn't have enough for the pyramid even with trading in my T3 trans and rear torsion assembly, so I picked up one of the 002's. I also picked up a few other small misc pieces as well.
Image
Image

When I got home I started out by cleaning up the 002 so I could get a better look at what I had to work with. After a few hours of chiseling, picking , scrubbing and wire wheeling, it doesn't even look like the same trans anymore.
Image

I snapped some pics of the numbers I could find on the trans so I can look it up and see what gears it's supposed to have in it. The gearing could have been changed by a PO sometimes in it's past life before I got it, but at least I'll have a starting point once I decode the numbers.
"Q":
Image
"002.301.103B"
Image
"002.301.211", "002.301.173A"
Image
"CK116 2295"
Image

Of course now that it was all clean, I went ahead and painted it the Gunmetal Grey I've been using on most everything else.
Image
Image

The alternator arrived in the mail today (on time) so I mounted it on the pedestal to check for fit. It lines up ok, and the fuel pump has 1/4" clearance at the closest point. I won't be able to test it out until I get the engine running though. The alt shaft feels smooth when I spin it and the exterior looks just about identical to the one I have on the rail now. If it works as good as it looks I'll be happy. So far all my transactions with Rock Auto (parts quality, shipping speed and packaging, customer service, etc) have been very positive.
Image

I was on my feet far too long cleaning up the trans, so that's where I had to stop for today.
Home made rail (street legal), 1600 DP, 34PICT-3, T3 brakes, 4-1 glass-pack exhaust, 31's in back and 7.00x15's up front. Link to build thread: viewtopic.php?f=28&t=147561&p=1227553#p1227553
Ol'fogasaurus
Posts: 17881
Joined: Mon Nov 13, 2006 10:17 pm

Re: Budget street legal rail (re)build (WARNING: pic heavy)

Post by Ol'fogasaurus »

GoMopar440 wrote:I spent a little more time out in the shop working on the steering adapter. When I mocked up the steering wheel, the threads on the shaft only went into the big nut about half way. So I put the adapter back into the lathe and turned down the height of the cap about 1/8". Then I put a bevel back on the inner and outer edges to dress it up. The result is the shaft threads just barely stick out of the top of the nut now. I would have liked more thread showing, but I'll probably weaken the cap if I make it any thinner than I already have. I'll just use some blue Lock-Tite on the nut when I install it for good.
Image
Image

The adapter wasn't he only thing the PO hacked up when he butchered this thing. The steering wheel mounting holes got the same treatment. I'm not a fan of these tiny steering wheels, so I'll be looking for a more normal sized one like what I have on my rail now.
Image

Today I wanted to head down to Brax's place (closest VW shop around) to look for more engine parts, but his voice mail said he'd be out from the 1st to the 4th. Good thing I always call first before making the 1/2 hour drive down to his place. I'll catch up with him on Friday after he gets back.

I just got an email from RockAuto saying the alternator shipped out today. I should be getting it on Friday according to the tracking info. Once that gets here I'll be able to mock up most of the rest of the T3 engine.
On the last pix. Had you thought of putting some short studs of bolts in those holes in the steering wheel just in case the nut loosens up. Just a thought.
Post Reply