So I'm patching together a old Cherokee to get a few more years out of it. The dogleg for one of the rear doors needs replacing. I did the other side maybe 5 years ago and it turned out okay using the HF style of stretcher/shrinker.
If you ever use a edge shrinking/stretching tool, you will figure out that they have their limitations and are not a magical device that creates perfect work. If you stretch or shrink the metal too much it tears the metal and you have to start over again. You have to shape the metal very gradually and slowly because if you try to work it back in the opposite direction it will also tear if not trying to correct a very slight mistake.
What to do? Stretch or shrink the metal using a different method,
If you want to stretch a side of a dogleg and the desired side that should be stretched is just hammered on ,it will not bend the other side even though it has hardly any strength. It will bulge out but not bend the other side. The solution to this is to force the bend while hammering on the side you want stretched at the same time. If you have a long piece of metal with leverage built in, you can force it against a anvil and hammer the other side to get this done. I used a square head hammer hoping that it would stretch the outside more than the inside by sticking the point in the farthest at the point that needed the lesser amount of stretch. I did a smaller piece by clamping a thick piece of steel to one side and putting a fulcrum in the middle and then using clamps on the out sides.Put some tension on it and hammer at the outside of the corner.
Shrinking was about the same.
To start the tuck, I used a vice opened up about an inch, and used a cross peen hammer
to get it started. Then I forced the tuck open by just bending the piece.I clamped it to a old brake rotor and forced the tuck to stay open with some force while also hammering it down. You don't have to have the tuck so it's straight up and down as you do with out the compression on it.
This method worked well enough that I don't plan on using a S/S set again. I have a plan on making a set up that holds and or initiates the shape needed so all you do is put it on and just hammer the right spot with a hammer on a anvil or a vice.
Did a rear dogleg better without a shrinker/stretcher set.
-
theKbStockpiler

- Posts: 596
- Joined: Sun Jul 15, 2012 10:25 am
Did a rear dogleg better without a shrinker/stretcher set.
Super beetle with attitude
-
Ol'fogasaurus
- Posts: 17761
- Joined: Mon Nov 13, 2006 10:17 pm
Re: Did a rear dogleg better without a shrinker/stretcher set.
Got pix of the old part and your new one?
There are a lot of things that can be done depending on.... Making a bending jig is one way and flanging might be another way.
I'm fighting a similar problem myself for my cage as it is going to require several bends due to the pan's shape and the FG body's shape plus supporting a shear requirement on the floor because of it being an open top FG body. The left and right side of the rear of the pan's mounting area are going to be shaped a bit differently due to the pan halve being bent differently and the body's shape not being quite the same on both sides.
Drawing plans/patterns for this kind of stuff was my job for 35+ or so years.
Lee
-
theKbStockpiler
- Posts: 596
- Joined: Sun Jul 15, 2012 10:25 am
Re: Did a rear dogleg better without a shrinker/stretcher set.
I'll take a picture of the piece and post it with pictures of my fixture at the same time. A custom dogleg is not very interesting anyway. The original dogleg is rust granulars by the side of the road. I'm planning on welding in the dogleg tomorrow and I don't have all of the pieces of the fixture yet. They're ordered.
I imagine the original method to stretch and shrink is by making a buck and hammering it into shape. Can't go too far and not enough either.
For your own project, plannishing hammers have high crown kits that might work. Also ,the inexpensive planishing hammers don't have a really good adjuster so they have to be modified.
Super beetle with attitude
-
Ol'fogasaurus
- Posts: 17761
- Joined: Mon Nov 13, 2006 10:17 pm
Re: Did a rear dogleg better without a shrinker/stretcher set.
Since the term "dogleg" has many meanings or designs and since I haven't seen type 4 stuff before I was curious.
If what you are talking about is what I think you are then the forming of them (sometimes complicated) which can be done several ways. For us'n amateurs in metal forming some of the ways could too expensive or too complicated.
You are right about the metal's material and its buildup/and its ability to be formed can get complicated especially if tight bending (shape) or the addition of "wings" are part of the design. I've been retired for almost 22 years now so something "old" could be interesting.
Lee
-
theKbStockpiler
- Posts: 596
- Joined: Sun Jul 15, 2012 10:25 am
Re: Did a rear dogleg better without a shrinker/stretcher set.
The part of the rear panel 'full quarter panel' that is between the rear door and the wheel is the 'dog leg'.
If you want to make a patch or full panel, you have to decide how much shrinking or stretching to do. Also how many pieces the repair piece is made from will cut down on the shrinking or stretching. A dogleg patch piece is basically a L shaped piece of metal that wraps around the rear wheel. Instead of butt welding the outside edge with a piece that goes along the door and essentially making a L shape, a L piece is bent. If you just bend a L shape with your hands, it's going to either stretch one side or buckle one side. The side that bends the thin way, is easy to do. As the other side is forming an arc, it has different circumferences so it has to be stretched or shrunk the long way.
The edge stretcher/shrinker sets have teeth that dig into the metal causing weak spots. I think that they are marketed for people that want an easy 'not thinking or understanding' solution for the corner of a dogleg because that's all they would be good for if they worked better.
Super beetle with attitude
-
Ol'fogasaurus
- Posts: 17761
- Joined: Mon Nov 13, 2006 10:17 pm
Re: Did a rear dogleg better without a shrinker/stretcher set.
As I said, the term "dogleg" is tied to many shapes, and I tied it to something else. That is why I wanted to see what you were talking about.
What you said on bending metal compressing and stretching in the bend area is true, but the bend usually has to be tight to cause that. Each material and their thickness will change the minimum bend. There are bend tables for that even online.
https://www.bing.com/search?q=sheet+met ... a2c7622cb0
https://www.bing.com/search?q=sheet+met ... 65240c5614
For what it is worth I lived with these and other tables most of my working life one way or another.
Lee
-
theKbStockpiler
- Posts: 596
- Joined: Sun Jul 15, 2012 10:25 am
Re: Did a rear dogleg better without a shrinker/stretcher set.
Here's a shrinker/stretcher set vid.
https://www.youtube.com/watch?v=63eA7grPZBk
Here are some images for now. I still have not received the parts for the fixture idea.
https://www.imagebam.com/view/MEDRPK2
https://www.imagebam.com/view/MEDRPKA
https://www.imagebam.com/view/MEDRPK6
The repair had to be fixed a bunch of times because I don't have much experience with the edge details. So far it's turning out okay for a rescued rust bucket.
Super beetle with attitude
-
Ol'fogasaurus
- Posts: 17761
- Joined: Mon Nov 13, 2006 10:17 pm
Re: Did a rear dogleg better without a shrinker/stretcher set.
Good post, they should help someone who is trying to fix body dam(n)age. 
What I am doing is shrinking and stretching but not the same. Mine is a lot of "tippy-tappy" with body hammers and dollys to get stretch and reform one side to match the other side of the pan and at the same time not to stretch the material to get it too thin. I will still have to put some doublers in place to help support the floor from impact in-case of a roll over by the roll bar foot even with shear support by the body lift. The cage, when there is no top to the vehicle, is doing more work so the works is harder, the load is faster and more ex-stream.
The top not only absorbs the shock loads but spreads loads (like in a rollover) throughout the pan; front to back, side to side and diagonally.
Lee
-
Bad Bob
- Posts: 112
- Joined: Wed Nov 12, 2014 10:47 pm
Re: Did a rear dogleg better without a shrinker/stretcher set.
If you want to shrink a tuck like the one in your first picture, heat will help. Even a propane torch will do. My experience with Chinese shrinkers was not positive. A real Lancaster is much better. You should be able to do that radius with a shrinker. What thickness are you working with?
-
theKbStockpiler
- Posts: 596
- Joined: Sun Jul 15, 2012 10:25 am
Re: Did a rear dogleg better without a shrinker/stretcher set.
I have been working with 20 and 18 gauge. I think it's cold rolled. I think the HF versions are good but the process is bad. If you don't dig into the metal, it can be worked a lot more before tearing. I tried my new method out and it worked but I don't have a good enough process down for it yet. I have to be able to get tension on the bend more precisely. Edit: Can shrink like a mad man but I have to direct the tension better to get the stretching to work as well.
Super beetle with attitude
-
Ol'fogasaurus
- Posts: 17761
- Joined: Mon Nov 13, 2006 10:17 pm
Re: Did a rear dogleg better without a shrinker/stretcher set.
It's very likely that the cars panels were "stamped" originally. Quick and dirty so to speak.
Heat working the seam welds can be good, but you can go too far with the heat also so be careful.
Lee
Heat working the seam welds can be good, but you can go too far with the heat also so be careful.
Lee
-
theKbStockpiler
- Posts: 596
- Joined: Sun Jul 15, 2012 10:25 am
Re: Did a rear dogleg better without a shrinker/stretcher set.
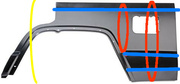
Here's an image with the types of contours of a xj cherokee full rear panel.
https://www.imagebam.com/view/MEE0NFE
Blue: About a 45 degree angle bend or crease.
Red: Area of crown.
Yellow: Curvature of entire panel looking from front to back
The detailed edge where the flair goes on was the big issue I had. To keep the contour of the rest of the panel intact, I had to try to twist,pull and bend it down at the same time, This did not work and I had to cut it off and do that small piece again. I thought heat would solve all of the issues, wishful thinking.
In order to make this panel by hand, the entire non red area would have to be stretched out so the crown area did not bulge out.
I did learn a lot from this project so it has been very valuable in that respect.
Super beetle with attitude
-
Ol'fogasaurus
- Posts: 17761
- Joined: Mon Nov 13, 2006 10:17 pm
Re: Did a rear dogleg better without a shrinker/stretcher set.
Just think, at the place where it was formed, they would lay out the material on the form, then "Ka-Chang" the stamp would come down and the piece would be formed. 
I drew a lot of patterns for this kind of stuff including vacuum forming similar things also.
Hand forming is time consuming but usually very necessary after the patterns and forms have been destroyed.
Lee
I drew a lot of patterns for this kind of stuff including vacuum forming similar things also.
Hand forming is time consuming but usually very necessary after the patterns and forms have been destroyed.
Lee
-
theKbStockpiler
- Posts: 596
- Joined: Sun Jul 15, 2012 10:25 am
Re: Did a rear dogleg better without a shrinker/stretcher set.
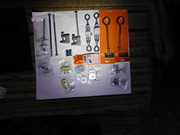
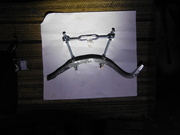
Here's the hardware I gathered to make the process go better and a example of it attached to a piece of work.
The clamps are 3/8' beam clamps. Got 2 of them off of Ebay for under 15 bucks.
or
https://www.imagebam.com/view/MEE2A2I
https://www.imagebam.com/view/MEE2A2V
The clamps are 3/8' beam clamps. Got 2 of them off of Ebay for under 15 bucks.
or
https://www.imagebam.com/view/MEE2A2I
https://www.imagebam.com/view/MEE2A2V
Super beetle with attitude
-
Bad Bob
- Posts: 112
- Joined: Wed Nov 12, 2014 10:47 pm
Re: Did a rear dogleg better without a shrinker/stretcher set.
How wide is the flange that you’re shrinking? About 3/4”? Try the shrinker only 1/4” deep every inch around your curve. Then, go in between with 3/8”shrinks. I lay out lines with a sharpie to help keep it consistent. It may take several tries to get one that you’re happy with. Like Gene Winfield says, “Every day is a school day “.